This post may contain affiliate links. Please read our disclosure policy.
Soft fluffy steamed buns are characterized by their red/pink outer skin and white crumbs on the inside.

I remember growing up seeing mi ku/mian gui at our house during certain celebrations. Some are shaped round, oblong, and some are in tortoise shape. The tortoise shape was my favorite (no surprise!). This is my attempt of making mi ku buns using my favorite soft and fluffy steamed buns recipe. I have also tried this recipe with no-knead steamed buns/bao and it works great too.
What is mi ku buns?
Mi means flour and ku means tortoise in the Hokkien language. So if I were to translate this directly it means flour tortoise. Mi ku is basically plain steamed buns that are painted pink/red on the outside. Why red? well, red is an auspicious color in Chinese culture. It represents prosperity, good luck, good fortune (all the good stuff!). Why tortoise? Tortoise is also an auspicious symbol for longevity and good health. Mi ku buns are usually prepared and usually used as one of the offerings for praying for Taoist Deities. After the praying, mi ku is usually eaten for breakfast (just like how steamed buns/mantou are usually eaten for breakfast too in Asian culture).
The red skin is usually peeled off and not eaten. I’m not sure exactly why, to be honest. My guess is because they have been sitting out on the table during the celebration, sometimes outdoors, and especially where I grew up, dust is everywhere like no other’s business. So, perhaps that’s why the skin is peeled off? just my guess! Here at home, I don’t peel them off because they are yummy stuff and they are part of the buns!

Steamed Mi Ku Buns / 面龟 (Tortoise Steamed Buns)
Ingredients
Dough:
- 300 g all-purpose flour plus more for dusting as needed
- 60 g Wheat starch or use cornstarch or potato starch (not potato flour)
- 4 g instant yeast
- 1 tsp baking powder
- 60 g sugar
- 200 g milk or more as needed
- 2 Tbsp cooking oil
To paint the buns:
- 2 tsp water
- 4 drops red food coloring more or less according to your preference
For the eyes of the tortoise: (use either one)
- green mung beans
- Black sesame seeds
Instructions
- This recipe can make 10 round shape buns, or 6 large oblong buns, or 10 tortoise shape buns. Of course if you make them smaller you get more
Make the dough with a stand mixer:
- Place the flour, starch, instant yeast, sugar, and cooking oil in a mixing bowl. If you are using a stand mixer, use a dough hook attachment. Gradually add in liquid. If the dough still a bit dry, add a bit of water or milk. Add more teaspoon by teaspoon until the dough comes together and continue to knead until the dough is smooth and elastic. The dough is slightly sticky to the touch . Oil your hands a bit to help you pick up the dough and to prevent the stickyness
Make the dough by hands:
- If you are kneading by hands, mix everything until you get a rough dough (it's not going to be smooth yet). Cover and rest it for 15 minutes. Then go back and knead it. You'll be surprised by how easier it is to knead it now. Knead until the dough is smooth and pliable, about 15-20 minutes. Add liquid as needed. At any point during kneading, you can always stop and rest the dough if you find it hard to knead. This is to relax the gluten. Then go back to knead again and you'll be surprised by the difference it makes by just resting the dough before kneading again. It's easier for you too
Rest the dough:
- Cover and rest the dough for 15 minutes. This is not to proof the dough. It shouldn't double in size. This is to relax the gluten for easier shaping and rolling the dough
Shaping into a round shape:
- Place the dough on a lightly floured surface. Divide equally into 10 pieces. Work with one piece at a time and cover the rest to prevent drying. Flatten the dough with your palm and then pull the edge towards the center all around and round it up into a round ball. Put on top of parchment paper and transfer to a baking pan or bamboo steamer for proofing
Shaping into an oblong shape:
- Place the dough on a lightly floured surface. Divide equally into 8 pieces. Work with one piece at a time and cover the rest to prevent drying. Flatten the dough with your palm and roll it out into longer oblong shape and then pull the edge towards the center all around and shape it into oblong with a bit of waist in the middle, almost like an "8". Place this on parchment paper and transfer to a baking pan or bamboo steamer for proofing. Repeat with the rest of the dough
Shaping into a tortoise shape:
- Place the dough on a lightly floured surface. Divide equally into 10 pieces. Pinch off two smaller doughs, one for the head and another one to be divided into 4 for the feet. Work with one piece at a time and cover the rest to prevent drying. Flatten the main dough for the body with your palm and then pull the edge towards the center all around and round it up into a round ball. Roll the dough for the head into a ball and attach it to the body. Dab with a bit of water if necessary to attach. Round the rest of the 4 small dough into slightly oval and attach to the body for the feet. Put on top of parchment paper and transfer to a baking pan or bamboo steamer for proofing
Proofing:
- Let the dough rise at room temperature or at a warm place. If it's winter where you are, you can use your oven "bread proof" function to let them proof in there, or simply turn on your oven to the lowest temperature and then turn off and after 15 minutes, place the shaped buns in there to let them proof. They won't necessarily double in size, but at least puff up to about 50% of the original size. This may take about 30 mins to 1 hour at a warm temperature. Don't go by the time however. The buns will feel lighter and when you push them gently with your finger, they will spring back slowly. These buns are ready to be painted and steamed
Paint the buns:
- Mix the water and food coloring. Dip a paint brush into the color and squeeze out the excess liquid. This is important as you don't want the surface of the buns to be soaked in liquid as that will make it too wet and wrinkle during steaming. Gently paint it as evenly as possible without making the skin too wet. Let them air dry for about 5-10 minutes, depending on how humid it is where you are
Steaming:
- Fill the steamer with water. Don't turn on the stove yet. Transfer the buns to the steamer. Wrap the lid of the steamer with a cloth to prevent water condensation from dripping onto the surface of the buns. If you use a bamboo steamer, you can skip this
- Bring the water in a steamer to a boil and then LOWER THE HEAT TO MEDIUM. Cover with a lid but leaving it about 1/4-inch gap for some steam to escape. Steam on medium heat for 12 minutes or about 15 minutes for large oblong buns
- Once the buns are done steaming, turn off the heat and wait for 5 minutes before opening the lid so the buns will not collapse or wrinkle due to a sudden change in temperature.
Cooling:
- Remove from the steamer and put on a cooling rack for them to cool down. This will prevent the steamed buns from getting wet and soggy at the bottom
- The buns are the softest when they are warm. We don't add any additives or preservatives to our dough. A simple brief reheating in a microwave or steamer will restore its softness


*Nutrition facts are just estimates and calculated using online tools*
How to make sure mi ku buns are not wrinkled
1. Do not overproof
When the dough is overproof it is more likely to wrinkle during steaming because the dough has weakened and is prone to collapse
2. Go easy on the paint
Because we need to paint the outer skin red/pink, if the paint is too “wet” the outer skin may wrinkle when you steam.
3. Let them dry a bit before steaming
After painting the buns, I let them sit for about 5 minutes for air-drying, which is not difficult during the winter time because the humidity is so low and things dry up easily. If it is humid where you are, just try to go easy on the paint
4. Steam with the lid opened slightly
I have shared this technique in my soft fluffy steamed buns recipe and pretty much all the steamed buns recipes you see on this blog, it always works to prevent the steamed buns from getting those ugly wrinkles, or worse, collapsing. When you allow some steam to escape, the steamed buns won’t wrinkle
How to make mi ku buns at home
In this post, I’m making three different shapes: a regular round shape, oblong shape (supposed to look like an oblong with a waist, like a number 8, but didn’t quite appear as such lol!) and tortoise shape.
1. Place the flour, starch, instant yeast, sugar, baking powder, and cooking oil in a mixing bowl. If you are using a stand mixer, use a dough hook attachment. Gradually add in liquid. If the dough still a bit dry, add a bit of water or milk. Add more teaspoon by teaspoon until the dough is smooth. Oil your hands a bit to help you pick up the dough and to prevent the stickyness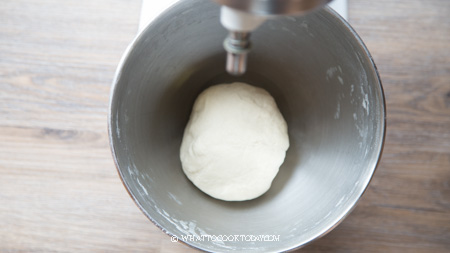
2. Cover and rest the dough for 15 minutes. This is not to proof the dough. It shouldn’t double in size. This is to relax the gluten for easier shaping and rolling the dough
3. For a round shape: Place the dough on a lightly floured surface. Divide equally into 10 pieces. Work with one piece at a time and cover the rest to prevent drying. Flatten the dough with your palm and then pull the edge towards the center all around and round it up into a round ball. Put on top of parchment paper and transfer to a baking pan or bamboo steamer for proofing
5. Place the dough on a lightly floured surface. Divide equally into 10 pieces. Pinch off two smaller doughs, one for the head and another one to be divided into 4 for the feet. Work with one piece at a time and cover the rest to prevent drying. Flatten the main dough for the body with your palm and then pull the edge towards the center all around and round it up into a round ball. Roll the dough for the head into a ball and attach it to the body. Dab with a bit of water if necessary to attach. Round the rest of the 4 small dough into slightly oval and attach to the body for the feet. Put on top of parchment paper and transfer to a baking pan or bamboo steamer for proofing
4. For an oblong shape: Place the dough on a lightly floured surface. Divide equally into 8 pieces. Work with one piece at a time and cover the rest to prevent drying. Flatten the dough with your palm and roll it out into longer oblong shape and then pull the edge towards the center all around and shape it into oblong with a bit of waist in the middle, almost like an “8”. Place this on parchment paper and transfer to a baking pan or bamboo steamer for proofing. Repeat with the rest of the dough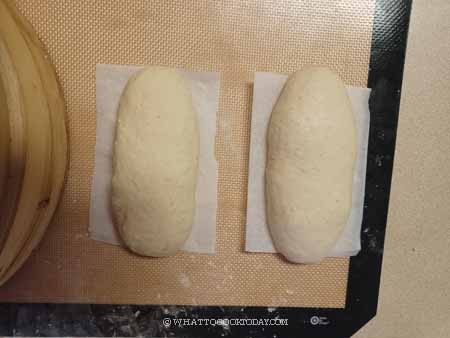
6. Let the dough rise at room temperature or at a warm place. If it’s winter where you are, you can use your oven “bread proof” function to let them proof in there, or simply turn on your oven to the lowest temperature and then turn off and after 15 minutes, place the shaped buns in there to let them proof. They won’t necessarily double in size, but at least puff up to about 50% of the original size. This may take about 30 mins to 1 hour at a warm temperature. Don’t go by the time however. The buns will feel lighter and when you push them gently with your finger, they will spring back slowly. These buns are ready to be painted and steamed
7. Mix the water and food coloring. Dip a paint brush into the color and squeeze out the excess liquid. This is important as you don’t want the surface of the buns to be soaked in liquid as that will make it too wet and wrinkle during steaming. Gently paint it as evenly as possible without making the skin too wet. 
8. Use a chopstick or something pointy to make some indentation on the head for the eyes. Then attach the green mung beans. If you use black sesame seeds, you don’t need to do this. Just lightly wet the head and attach the sesame seeds. 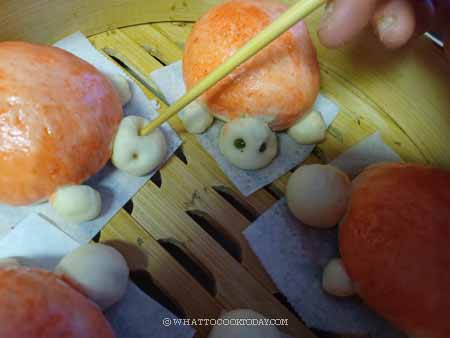
9. Let them air dry for about 5-10 minutes, depending on how humid it is where you are
10. Fill the steamer with water. Don’t turn on the stove yet. Transfer the buns to the steamer. Wrap the lid of the steamer with a cloth to prevent water condensation from dripping onto the surface of the buns. If you use a bamboo steamer, you can skip this
11. Bring the water in a steamer to a boil and then LOWER THE HEAT TO MEDIUM. Cover with a lid but leaving it about 1/4-inch gap for some steam to escape. Steam on medium heat for 12 minutes or about 15 minutes for large oblong buns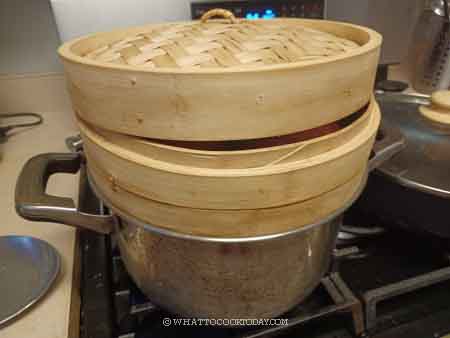
12. Once the buns are done steaming, turn off the heat and wait for 5 minutes before opening the lid so the buns will not collapse or wrinkle due to a sudden change in temperature.
13. Remove from the steamer and put on a cooling rack for them to cool down. This will prevent the steamed buns from getting wet and soggy at the bottom

Another way of making tortoise mi ku buns
Instead of painting the surface of the dough with pink, I actually colored the dough, leaving a small portion white in color for the feet. This version actually has nice even color compared to the painted version.

Did you make this mi ku buns recipe?
I love it when you guys snap a photo and tag it to show me what you’ve made. Simply tag me @WhatToCookToday #WhatToCookToday on Instagram and I’ll be sure to stop by and take a peek for real!

