This post may contain affiliate links. Please read our disclosure policy.
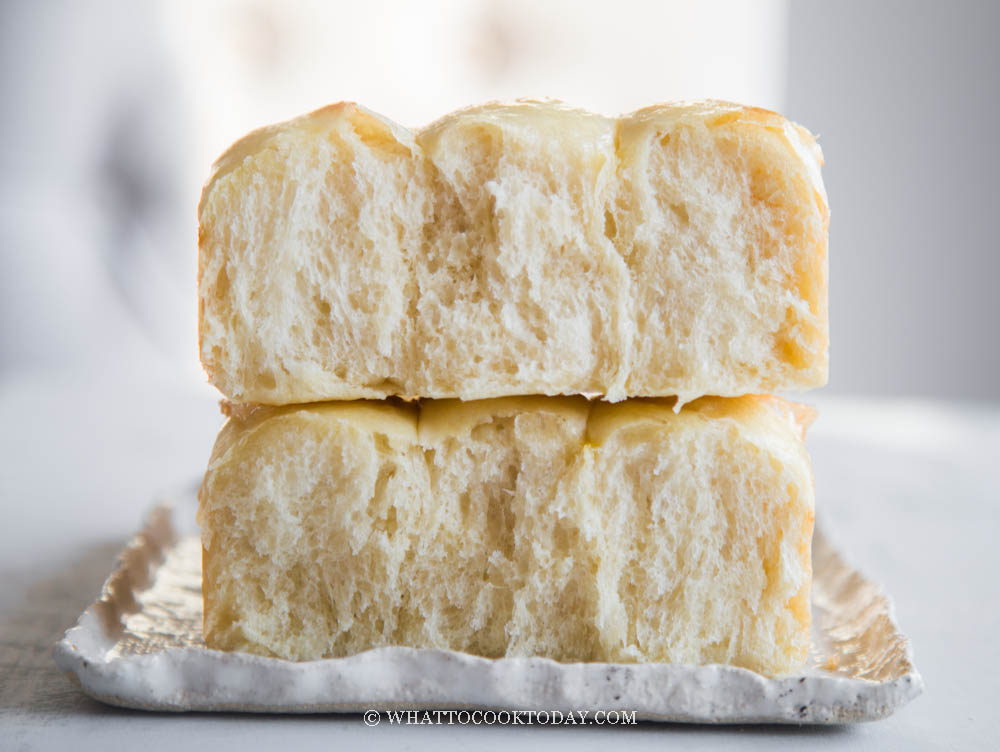
If you like soft fluffy milk buns/bread/dinner rolls without having to prepare tangzhong and do all the kneading, this recipe does it. It yields a very soft texture and it’s incredibly easy to put together.

There are days when I just want to make easy yet soft and fluffy buns or bread without much fuss. I do have a stand mixer to help me knead the dough, but you know, I can be lazy to even mess with that sometimes LOL! I really like this no-knead milk buns/bread recipe because of how easy it is. Most no-knead bread/buns recipe requires long hours of resting or even overnight, but not this. You still need about 2 hours total from beginning to the end, but I think it’s a reasonable amount of time considering we don’t knead, no tangzhong, and it’s yeasted.
A NO-KNEAD BREAD/BUNS YOU “KNEAD” (NEED) IN YOUR LIFE 🙂
1. It’s super easy
I can’t stress enough how easy this recipe really is. You just need to stir the dough and proof it twice like you would making bread or buns (except for steamed buns) and bake you go!
2. No tangzhong
Tangzhong method is known to produce one of the softest fluffiest bread/buns. It’s not hard to prepare tangzhong, but it’s an additional step and I know sometimes, we just don’t feel like doing it!
3. No kneading
Yes, this is probably a lot of relief for those of you who do not have a stand mixer or hand mixer to knead the dough. No elbow grease is needed, well, only for stirring the dough, but I think we can handle that
4. No resting overnight
You don’t need to rest the dough for 8-12 hours or longer with this recipe either.
5. You can use butter or oil
If you are concerned about using butter in the recipe, you can use cooking oil of your choice instead.
6. Soft and fluffy buns/bread
And it is really soft and fluffy! My family was blown away!

HOW IN THE WORLD THE BUNS ARE SOFT AND FLUFFY THEN?
I know right? how in the world? It’s like it’s too good to be true.
1. SIMPLE TECHNIQUE INSTEAD OF KNEADING
By stretching and folding the dough, we are giving the dough strength, by developing gluten. This is usually done by kneading manually by hands or with a machine. The process is very simple. 2 rounds of resting the dough for 20 minutes and then 2 sets of foldings. It’s nothing vigorous like manual hand kneading that requires some elbow grease
2. HYDRATION AND FAT
The liquid and the amount of butter/oil used in the recipe also contribute to the softness of the bread.
HOW TO MAKE NO-KNEAD NO-TANGZHONG SOFTEST MILK BUNS/BREAD
1. Combine all the ingredients in a mixing bowl until you don’t see any more pockets of dry flour. Cover and let the dough rest for 20 minutes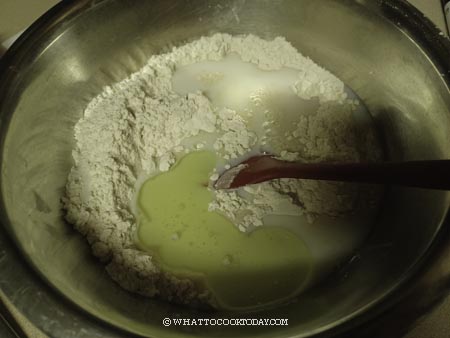
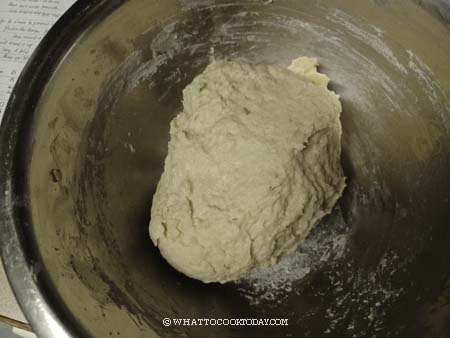
2. Use your spatula to scoop the edge of the dough over to the center to fold. Do this around all the edge of the dough, about 25-30 times. This motion helps to build the dough’s strength so the baked buns will be light and airy. Then cover again and let it rest for another 20 minutes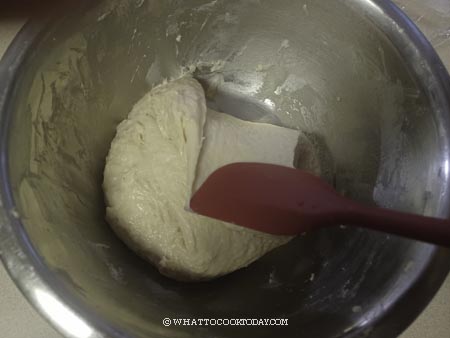
3. Do the same motion again by scooping the edge of the dough over to the center to fold over. This round you may only need about 20-25 folds. You will notice that the dough gets smoother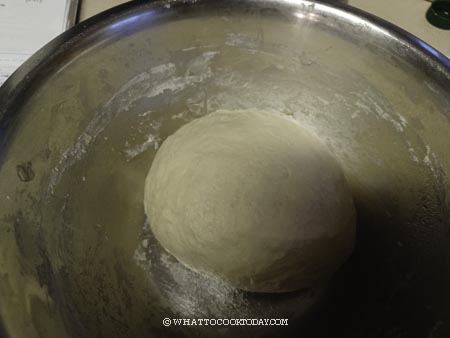
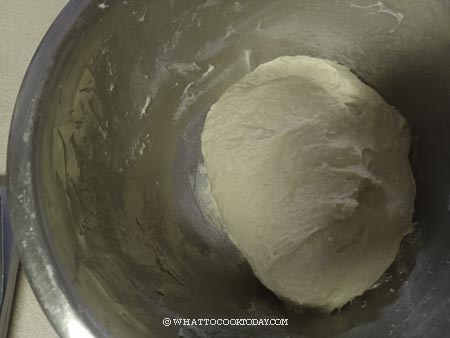
4. Lightly oil your palms with a bit of oil and then pick up the dough and give it a few short knead to round up the dough and you will see that the dough is smooth now. Proceed to the first proofing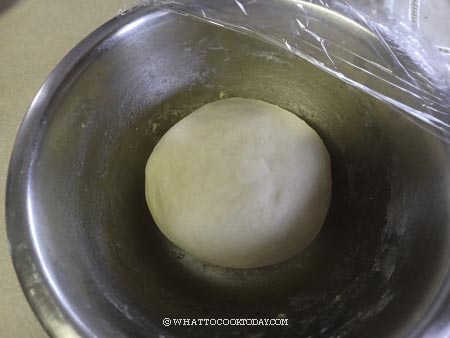
5. Spray the side of the bowl with non-stick cooking spray or you can use a bit of oil to smear the side of the bowl. Cover and let the dough rise in a warm place for about 1-1 1/2 hours or until it doubles in size. It may longer too if the temperature is cooler. Line a 9 x 9 inch pan with a parchment paper. Alternatively, you can grease the pan with some oil. After first proofing, the dough should double in size, if not, let it proof a bit longer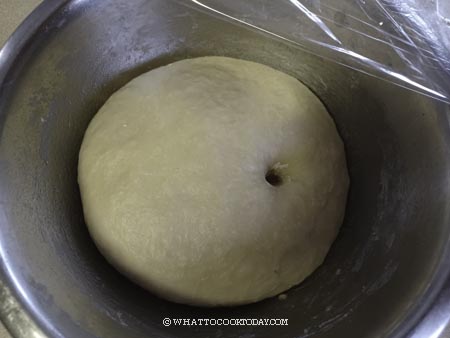
6. Punch the air out and give it a kneading a few times and shape the dough into a dough ball. Divide the dough into 9 or 12 smaller dough balls. Keep them covered and rest for 10 minutes to relax the gluten
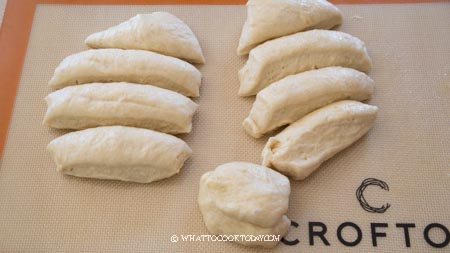
7. Work with one dough at a time. Gently flatten the dough and then pull and tuck the dough from the edge to the center to form a tight dough ball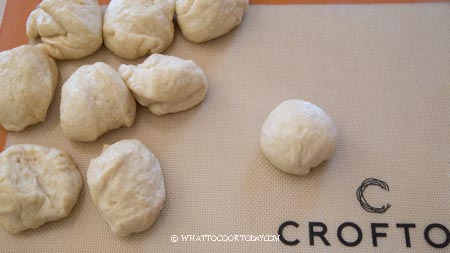
8. Place this inside a pan, seam side down. Continue with the rest of the dough. In the photo here I did 12 buns, but you can also do 9 buns (like in the video)
9. Cover and let them proof again until it doubles in size, about 40 minutes or longer. If you gently press on the dough, it bounces back gradually and leaves a bit of indentation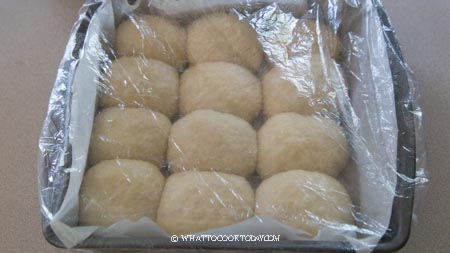
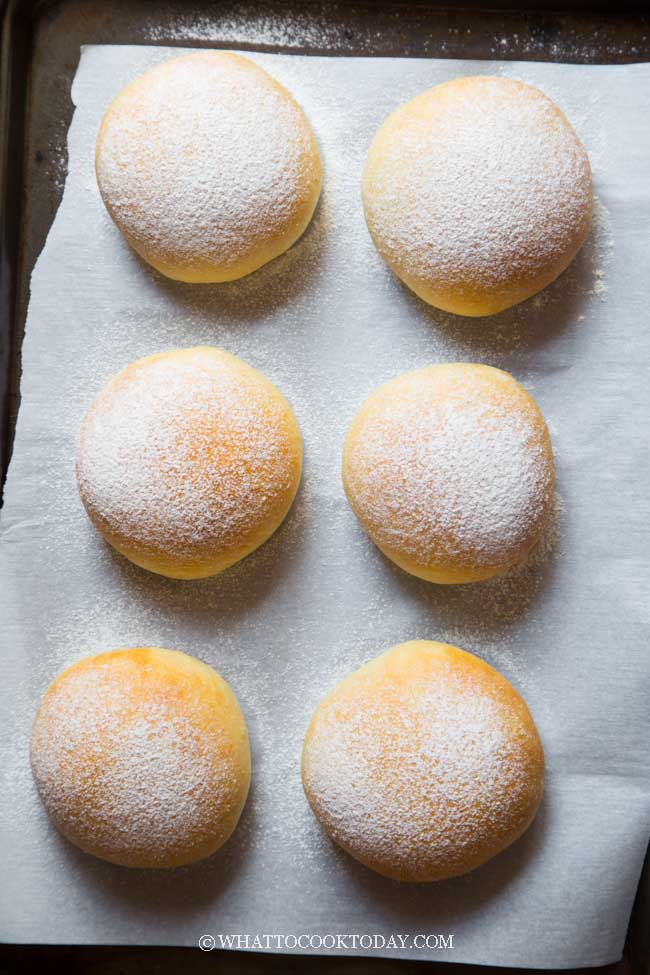
10. If you plan to use egg wash, whisk the egg with milk for egg wash. 10 minutes before the end of second proofing, preheat your oven to 375 F (190C) for a conventional oven. For a convection oven, reduce baking temperature by 20 F or 15 C. Brush the proofed buns with egg wash and then sprinkle with white sesame seeds if you like OR you can lightly dust the top with some all-purpose flour using a sieve for a more snow-like effect OR just leave them plain and brush with melted butter on top after baking later
11. Place this on the 3rd rack from the top (or middle of the oven) and bake for the next 20 minutes or until the top are golden brown. Remove from the oven and brush them with some melted butter if you like. Transfer to a cooling rack to let them cool down and serve while they are warm or at room temperature

HOW TO STORE AND REHEAT MILK BREAD/BUNS
STORING AT ROOM TEMPERATURE: Let the buns cool down completely. Wrap them up with aluminum foil or put them in a zipper bag. If it’s not humid where you are, they can be kept at room temperature for 3-5 days. If it’s humid, it’s better to keep them for no more than 3 days at room temperature
STORING IN THE FREEZER: For longer storage, after they cool down completely, wrap them up tightly in a cling wrap, then place them in a freezer bag and they can be kept frozen for up to 1-month max.
REHEATING: You can thaw them overnight in the fridge or reheat them straight from the freezer. Loosely wrap them up in aluminum foil and reheat in a preheated oven/toaster oven at 300 F for 10 minutes or until heated through
FREQUENTLY ASKED QUESTIONS
1. CAN I MAKE BREAD LOAF WITH THIS?
Yes, this will fit into 8 1/2″ x 4 1/2″ loaf pan perfectly. Proof until about 90% full. Bake at 375 F (190C) for 30-35 minutes or until the top is golden brown and bread sounds hollow when you tap the bottom
2. CAN I SUBSTITUTE WITH ALL-PURPOSE FLOUR?
Yes, but you may want to hold back on the liquid as all-purpose flour will not absorb as much liquid compare to bread flour
3. CAN I SUBSTITUTE WITH WHOLE WHEAT FLOUR?
Yes and No. I mean, you don’t want to completely use all whole wheat flour, but you can swap about 1/2 of the amount of white flour with whole wheat flour and add 1 Tbsp of more liquid. This flour combination will produce a nuttier buns/bread because of the whole wheat flour. The result is still acceptable, but don’t expect it to be super fluffy and soft compared to using only all-purpose flour.
4. WILL THE BUNS STAY SOFT COMPARED TO TANGZHONG MILK BUNS?
Tangzhong milk buns stay soft for 3-4 days at room temperature when properly wrapped and stored. This version will stay reasonably soft for about a day when wrapped properly to prevent loss of moisture. It is the softest when it’s still warm.
VARIATION
I used the same recipe to make it into larger hamburger buns and they are delicious too. I dusted with a bit of all-purpose flour on top of the buns before baking. Just for aesthetic reasons, you don’t have to do this and brush with egg wash before baking or some butter when they come out from the oven
DID YOU MAKE THIS NO-KNEAD NO-TANGZHONG MILK BUNS/BREAD RECIPE?
I love it when you guys snap a photo and tag to show me what you’ve made 🙂 Simply tag me @WhatToCookToday #WhatToCookToday on Instagram and I’ll be sure to stop by and take a peek for real!
The recipe has been improved and updated on December 4, 2022 with new technique that will give you much better result.
Easiest No-Knead No-Tangzhong Softest Milk Buns/Bread/Dinner Rolls
Ingredients
Dry ingredients:
- 350 g bread flour see notes 4
- 6 g instant yeast see notes 1,2,3
- 40 g sugar
- ½ tsp salt
Wet ingredients:
- 200 g milk (dairy or non-dairy) see notes 5
- 1 large egg about 50 grams without the shell
- 45 g butter melted (or use 40 gr or 3 Tbsp of cooking oil)
If using egg wash:
- 1 large egg beaten
- 1 tsp milk
If using butter to brush on top:
- 1 Tbsp butter (melted)
Instructions
Prepare the dough:
- Mix all the dry ingredients in a large mixing bowl and stir to combine
- In another mixing bowl, whisk eggs with milk, and melted butter until combined
- Pour the wet ingredients into the dry ingredients and use a sturdy spatula (don't use your hands) to stir to mix until you get a mass of dough that is sticky to touch than usual dough. You are on the right track, don't panic. Cover and let the dough rest for 20 minutes
First stretch and fold:
- Use your spatula to scoop the edge of the dough over to the center to fold. Do this around all the edge of the dough, about 25-30 times. This motion helps to build the dough's strength so the baked buns will be light and airy. Then cover again and let it rest for another 20 minutes
Second stretch and fold:
- Do the same motion again by scooping the edge of the dough over to the center to fold over. This round you may only need about 20-25 folds. You will notice that the dough gets smoother
- Lightly oil your palms with a bit of oil and then pick up the dough and give it a few short knead to round up the dough and you will see that the dough is smooth now. Proceed to the first proofing
First Proofing:
- Spray the side of the bowl with non-stick cooking spray or you can use a bit of oil to smear the side of the bowl. Cover and let the dough rise in a warm place for about 1-1 1/2 hours or until it doubles in size. It may longer too if the temperature is cooler. I use my oven "bread proof" function. If you don't have this option, turn the light bulb inside your oven and place the dough in there. The light bulb helps to warm the oven up in a controlled environment, or you can turn on your oven to the lowest temperature and then turn it off and open the door a little bit and wait for 15 minutes or so until it's warm and not hot before proofing the dough in there. We don't want to kill the yeast
Shaping:
- Line a 9 x 9 inch pan with a parchment paper. Alternatively, you can grease the pan with some oil
- After first proofing, the dough should double in size, if not, let it proof a bit longer
- Punch the air out and give it a kneading a few times and shape the dough into a dough ball. Divide the dough into 9 or 12 smaller dough balls. Keep them covered and rest for 10 minutes to relax the gluten
- Work with one dough at a time. Gently flatten the dough and then pull and tuck the dough from the edge to the center to form a tight dough ball
- Place this inside a pan, seam side down. Continue with the rest of the dough
Second proofing:
- Cover and let them proof again until it doubles in size, about 40 minutes or longer. If you gently press on the dough, it bounces back gradually and leaves a bit of indentation
Baking:
- If you plan to use egg wash, whisk the egg with milk for egg wash
- 10 minutes before the end of second proofing, preheat your oven to 375 F (190C) for a conventional oven. For a convection oven, reduce baking temperature by 20 F or 15 C. Brush the proofed buns with egg wash and then sprinkle with white sesame seeds if you like OR you can lightly dust the top with some all-purpose flour using a sieve for a more snow-like effect OR just leave them plain and brush with melted butter on top after baking later
- Place this on the 3rd rack from the top (or middle of the oven) and bake for the next 20 minutes or until the top are golden brown. Remove from the oven and brush them with some melted butter if you like
- Transfer to a cooling rack to let them cool down and serve while they are warm or at room temperature
Storing:
- Let the buns cool down completely. If it's not humid where you are, they can be kept at room temperature for about 3 days in an air-tight container
- For longer storage, after they cool down completely, wrap them up tightly in a cling wrap, then place in a freezer bag and they can be kept frozen for up to 1 month max
Reheating:
- You can thaw them overnight in the fridge or reheat straight from the freezer. Loosely wrap them up in an aluminum foil and reheat in a preheated oven at 350 F (180 C) for 10 minutes or until heated through
RECOMMEDED TOOLS
Marv’s Recipe Notes
- You can use active dry yeast, but make sure to rehydrate the yeast in water or milk with 1 tsp of sugar. It will dissolve and be all foamy, about 10 minutes. If it’s not, your yeast is no longer good. You can add the rest of the sugar into the dough later
- You can also use fresh yeast, the amount would be 4 x the amount of instant yeast. So you’ll need 24 grams of fresh yeast
- I highly recommend testing the yeast for activity before starting to work on this recipe. You don’t want to wait for hours only to find out your yeast is no longer good. Here’s how:Add 1 teaspoon of sugar and 2 1/4 teaspoons of yeast (one envelope) to 1/4 cup of warm water. Wait for 10 minutes and if you see foams and bubbles and you smell that yeast aroma, your yeast is still good to go. If not, then you need to get fresh yeast.
- If using measuring cup: Make sure you spoon the flour into the measuring cups and then level with a knife. The measurement is based on unsifted bread/all-purpose flour. 1 cup of unsifted bread/all-purpose flour is 140 grams
- If you use all-purpose flour, hold back about 30 grams of milk and add as needed.

31 comments
Will this recipe work if the egg is omitted to make it vegan? Could I just add a little bit of extra oil to make up for the fat from the yolk? Thank you
Hi Michelle, I haven’t tried it that way, but I don’t see why not!