This post may contain affiliate links. Please read our disclosure policy.
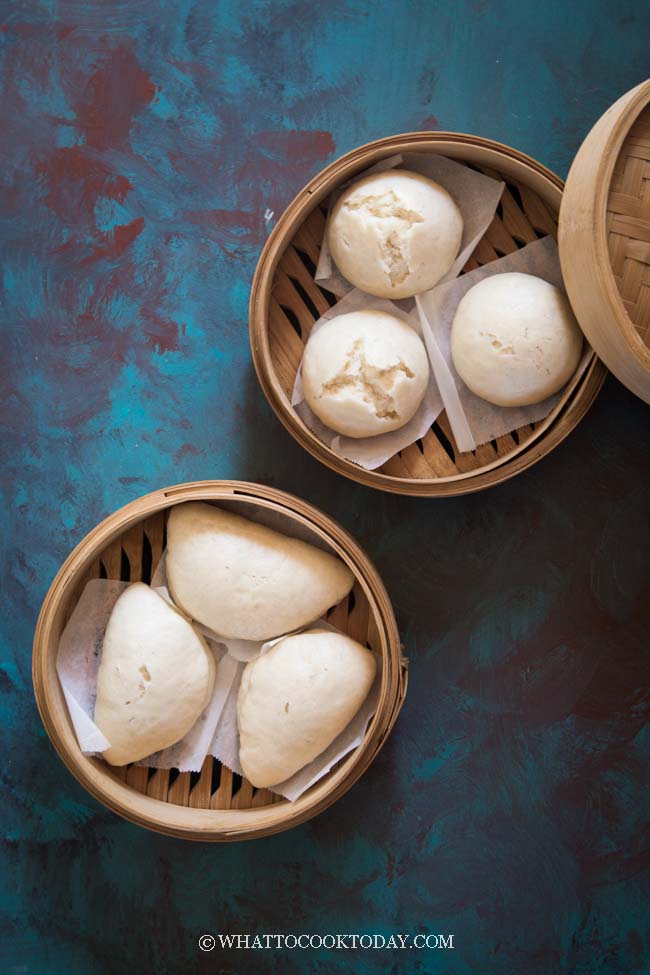
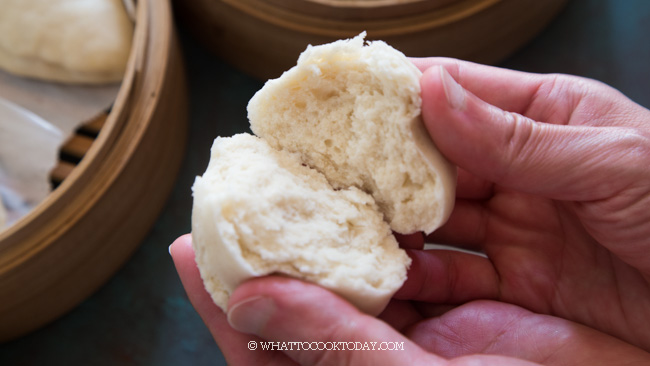
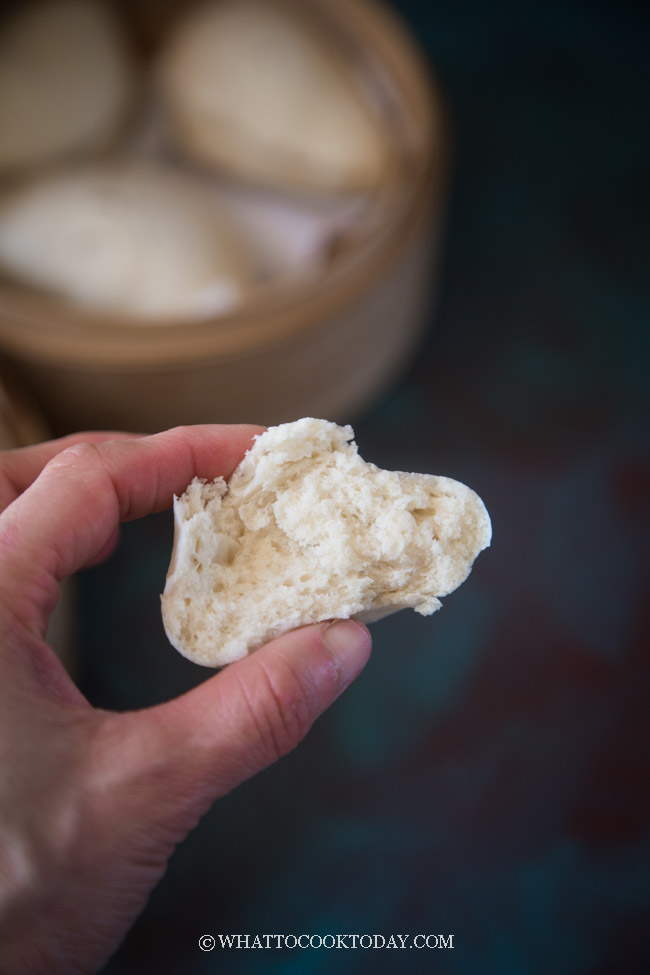
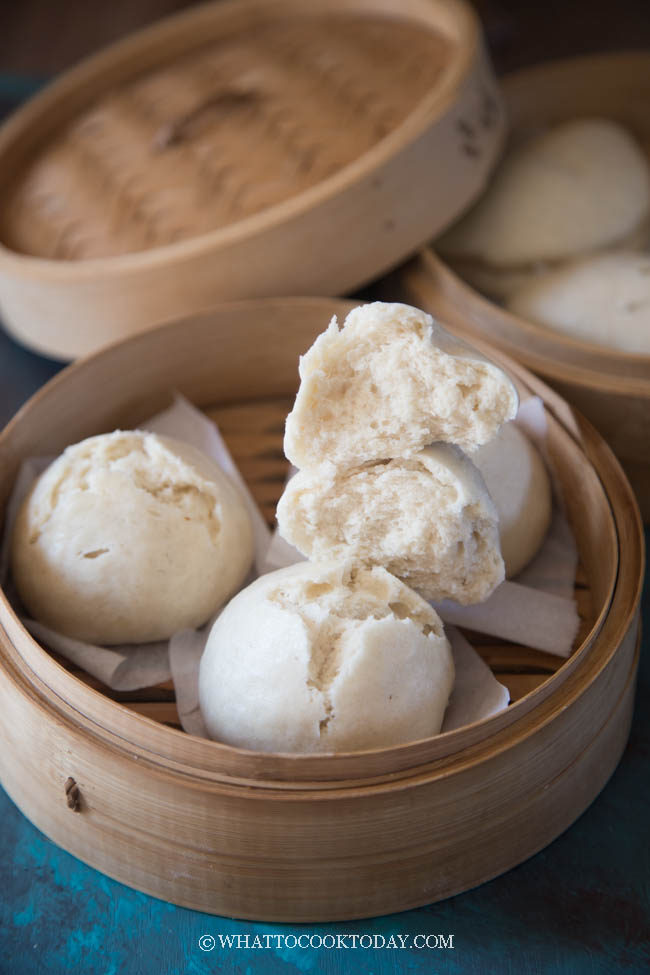
I’m so happy to share with you these super easy Chinese steamed buns (mantou) that are so soft, fluffy, airy and incredibly easy without using yeast. The results are very comparable to regular steamed buns with yeast.
I’m feeling giddy just typing up this recipe for no yeast Chinese steamed buns. I know yeasts, whether they are instant, quick-acting, or active dry yeast, are hard to find these days. So I was tinkering at the kitchen and using my trusted basic soft and fluffy steamed buns recipe I have been using the whole time and tweaked it and I couldn’t be happier with the result.
WHY YOU’ll LOVE THIS NO-YEAST STEAMED BUNS
1. SOFT AND AIRY
The family is impressed! I was blown away by how soft and airy they were. The family couldn’t tell that I made them without any yeast
2. EASY
At first, I thought this recipe might be good for an emergency time when you can’t find any yeast or have any yeast in stock, but I might make my steamed buns this way from now on because it’s incredibly easy and straightforward to make
3. NO WORRIES ABOUT OVERPROOFING THE DOUGH
Working with yeast can be a bit tricky sometimes. With this no-yeast steamed buns, you don’t have to worry about over-proofing the dough (or dough not proofed at all!)
4. HIGHLY ADAPTABLE
This is a basic steamed buns recipe with no filling (which I love to munch just like that), but they can be filled with any sweet or savory filling or shaped into whatever shape you like.
INGREDIENTS YOU CAN USE AND/OR SUBSTITUTE
1. FLOUR
These are the flour or flour combinations I would recommend:
– All-purpose flour + cake flour
The all-purpose flour gives structure and a slightly chewy texture and the cake flour contributes to that soft and fluffy texture. If you want an even softer crumbs, you can replace all-purpose flour with all cake flour
– All-purpose + wheat starch/potato starch
This is my favorite combination as the steamed buns are soft. Chinese wheat starch is not easy to find, so using potato starch as a substitute is very acceptable. You can use cornstarch too but I found that cornstarch gives a “stickier” texture when you eat. The family says it sticks to your teeth a bit more compared to others. If you want an even softer crumbs, replace all-purpose flour with cake flour.
2. MILK
Milk gives a nice subtle aroma to the steamed buns but you can substitute with water if you prefer. I usually use 2% milk. If you use whole milk, the steamed buns will be very soft and tasty. You can also use non-dairy milk like coconut milk or other nut milk or soy milk
3. COOKING OIL
I won’t recommend omitting the oil. The recipe doesn’t call for an excessive amount of oil, but we need it to keep the steamed buns moist or you will get dry steamed buns
4. DOUBLE-ACTING BAKING POWDER OR BAKING SODA
This guy is the STAR ingredient in this recipe. Since we don’t have yeast, we count on baking powder or baking soda (not both) 100% as a leavening agent and it does a wonderful job as that. If you worry that the steamed buns might have that after-taste, I can tell you, they don’t. Like I’ve said, no one in the family knew I didn’t use yeast until I told them. Just make sure you use some sort of acid (distilled vinegar, lemon juice, or apple cider vinegar) to react with baking soda if you choose to use baking soda.
5. SUGAR
The amount of sugar you can tweak here. The amount I wrote in the recipe gives that hint of sweetness and is nice when it comes to plain steamed buns.
6. SALT
A bit of salt kicks it up a notch and brings out the flavor of the finished steamed buns. I love it! You can omit it if you are watching sodium intake.
HOW TO MAKE NO-YEAST CHINESE STEAMED BUNS
1. CHECK BAKING POWDER OR BAKING SODA FOR FRESHNESS BEFORE PROCEED WITH RECIPE
Follow instructions on the recipe card to check on baking powder or baking soda for reactions before proceeding with the recipe
2. PREPARE THE DOUGH
If you use a stand mixer: Mix all ingredients, except for the liquid in a mixing bowl. Use a dough hook attachment. Turn the mixer on medium speed and gradually add the liquid, start with the lowest amount of liquid and then add as necessary until a dough is formed. Don’t dump all the liquid all at once. You can stop kneading when the dough is no longer sticky and smooth. You don’t have to knead until the window-pane stage
If you use hands: Mix all ingredients, except for the liquid in a mixing bowl. Knead with your hands until you get a dough that is no longer sticky to touch and add liquid gradually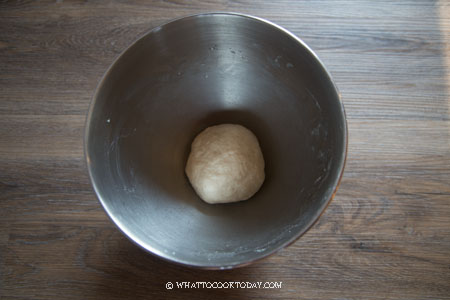
3. REST THE DOUGH
It’s important to rest the dough after all the kneading. This part is to relax the gluten. Cover and rest the dough for at least 15 minutes. Your steamed buns will be softer too.
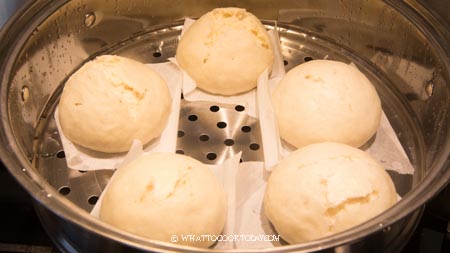
4. PREPARE STEAMER
Bring water in the steamer to a boil
5. SHAPE THE DOUGH
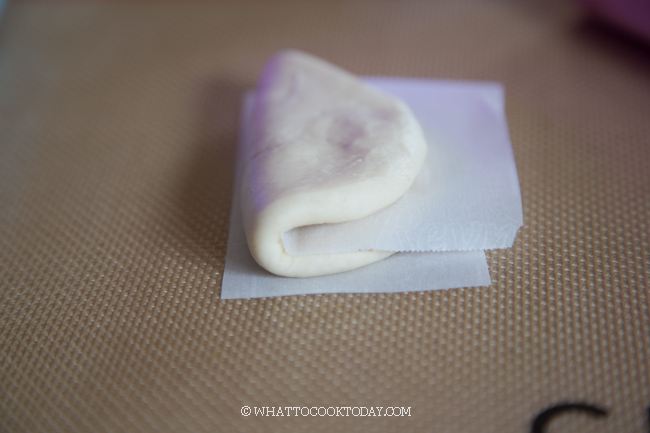
Lightly dust your work surface with a bit of all-purpose flour. Divide the dough into 8-12 equal portions (depending on how big or small you want the buns). Keep them covered and work with one dough at a time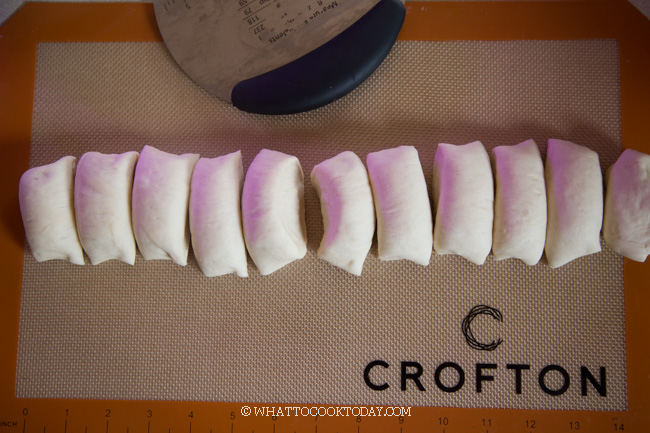
For fold-over steamed buns:
Roll into a round ball. Flatten with your palm and then use a rolling pin to roll it into an oval shape. Fold the dough over and place it on parchment paper. You can place a piece of parchment paper before folding, but it’s not necessary. Repeat with the rest.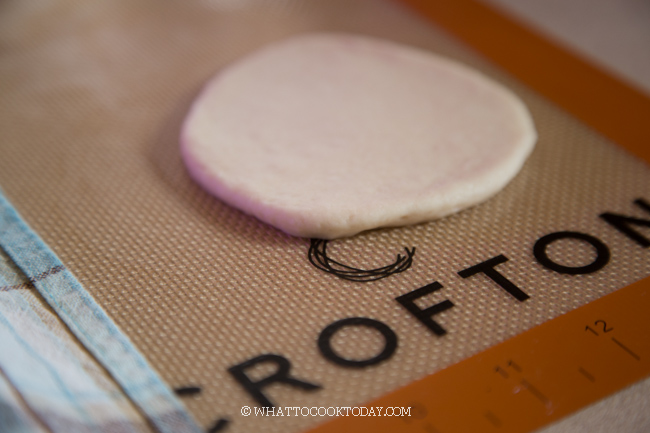

For round steamed buns:
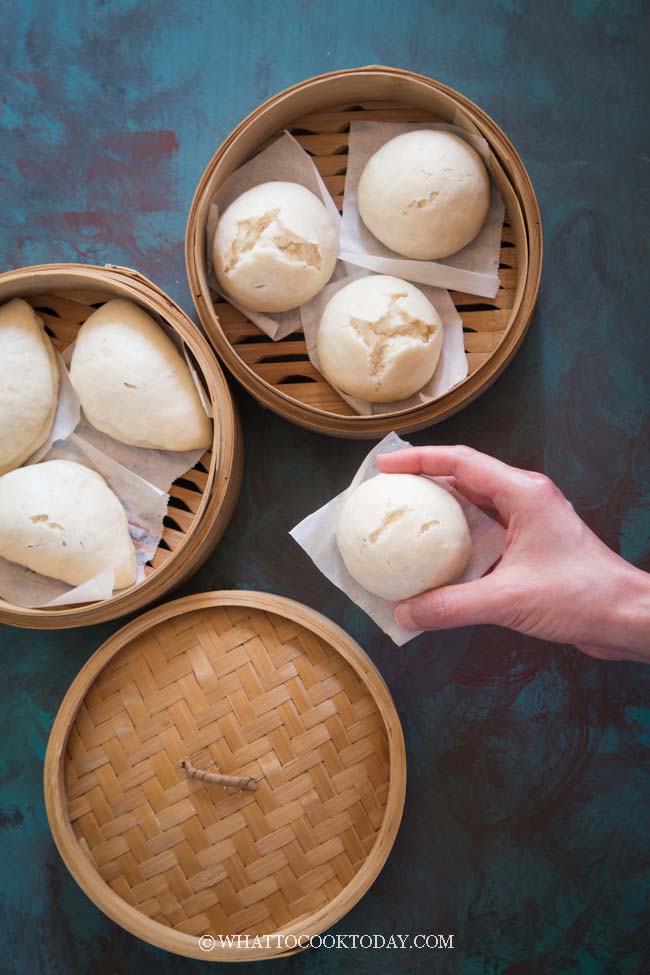
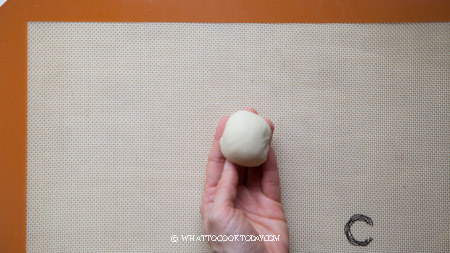
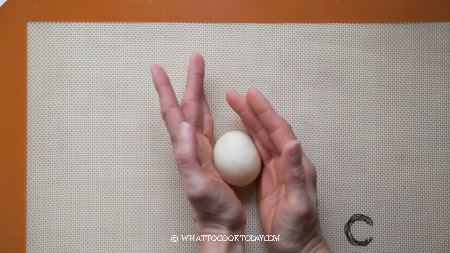
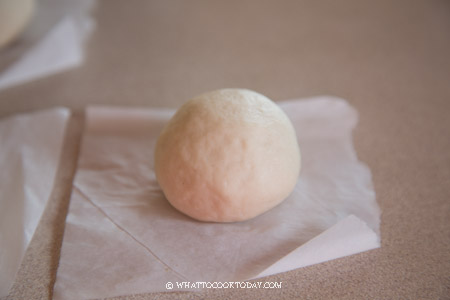
Roll into a round ball. Pull and tuck the dough from top to bottom so the seams are at the bottom and the surface is relatively smooth. Roll the dough into a smooth round ball in between the palm of your hand REALLY make sure the dough is smooth. Cup the dough with both palms and move the dough in a circular motion to shape it taller. This part is important so your steamed buns come out tall instead of spreading to the side after steaming. Place on a piece of parchment paper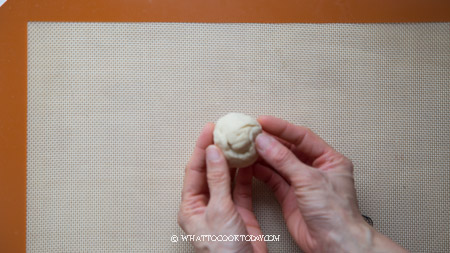
6. STEAMING
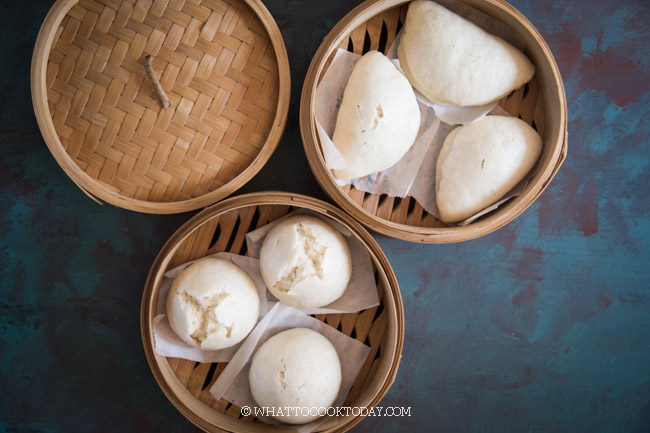
Place the steamed buns in the steamer, giving about 1-inch space in between. Steam over high heat for 10 minutes for small to medium-sized buns and 15 minutes for larger buns
When they are done steaming, turn off the heat and let them sit for 2-3 minutes in the steamer before opening the lid
medium-sized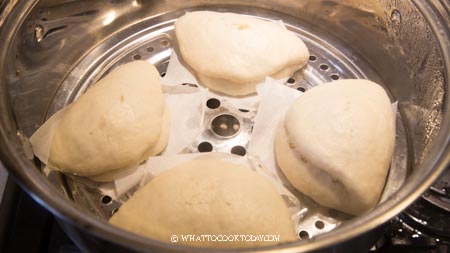
7. COOLING
Remove the steamed buns from the steamer and place them on a cooling rack. This will prevent the bottom of the steamed buns of being wet and soggy
HOW TO STORE STEAMED BUNS
I prefer to freeze cooked steamed buns in the freezer and reheat whatever amount I want to serve on the day I want to serve them. Here’s how:
1. Let the steamed buns cool down completely on a cooling rack so the bottom won’t get soggy and wet
2. Place steamed buns on a baking sheet/pan, not touching each other
3. Place in a freezer for about 1 hour. It won’t be completely frozen yet
4. Transfer to a freezer bag and push out all air and seal the bag. This saves storage space
5. Steamed buns can be kept in the freezer for up to 2 months
HOW TO REHEAT STEAMED BUNS
STEAMER: If you freeze the steamed buns, they can go from frozen to steamer and steam for 10 minutes or so until it’s heated through
MICROWAVE: Wet a clean cloth or an absorbent paper towel and cover the steamed buns with it or mist the steamed buns with some water and microwave on high on a minute increment until they are heated through
This recipe may change your steamed buns life 🙂 We eat steamed buns almost every week and I love how fast this comes together. You can pretty much have steamed buns any time of the day!
TROUBLESHOOTING IF STEAMED BUNS ARE DENSE AND NOT FLUFFY
Few things you might want to look into:
1. CHECK THE BAKING POWDER OR BAKING SODA
This is the only leavening agent in this recipe and we fully depend on it to leaven our buns to make them fluffy and airy. Check the baking powder by pouring boiling water on 1/2 teaspoon of baking powder. To check the baking soda, pour 3 Tbsp of vinegar on 1/2 tsp of baking soda. It should bubble violently immediately if not, the baking powder is no longer good.
2. USE DOUBLE-ACTING BAKING POWDER
Double-acting baking powder reacts twice, once when it comes into contact with liquid and second when exposed to heat. We want this for the maximum result. Most baking powders in the stores are double-acting, but check to make sure it has “double-acting” written on it. If you use single-acting, it only reacts once, that’s when it comes into contact with liquid and that’s about it. If you wait too long, no more action from the baking powder after that, and your steamed buns will fall flat and tough when you steam them because all the action from baking powder is long over by then.
3. THE DOUGH NEEDS A REST
After all the kneading, it’s important to rest the dough for at least 15 minutes. We want to relax the gluten so the dough will be softer and stretchy.
4. STEAMED OVER HIGH HEAT
I used to steam them over medium heat with the thought of trying to maintain their round shape instead of breaking into sections (like a flower top) but this gave me the inconsistent result and the steamed buns sometimes are not fluffy. No-yeast steamed buns behave differently compared to regular soft fluffy yeast steamed buns, which need to be steamed over medium heat. No-yeast steamed buns depend on baking powder/baking soda to leaven the buns and high heat gives the maximum result
CAN I COOK THESE NO-YEAST STEAMED BUNS IN INSTANT POT?
I’ve tried several times with no success. Unlike the Instant Pot Chinese Steamed Buns that use yeast as a leavening agent, the no-yeast steamed buns turned out to be dense when I tried both pressure cook or steamer settings. I was kinda surprised because I thought the high-pressure from the pressure cooker would be sufficient to leaven the buns during steaming just like steaming them on the stove, but nope, no luck so far. I’m still trying to figure out though.
Soft and Fluffy No Yeast Chinese Steamed Buns (Bao Buns/Baozi)
Ingredients
Version 1:
- 300 g all-purpose flour 2 cups + 2 Tbsp, plus more for dusting, see notes 1
- 60 g wheat starch 10 Tbsp, or use potato starch or cornstarch
Version 2:
- 180 g all-purpose flour 1 cup + 5 Tbsp, plus more for dusting, see notes 1
- 180 g cake flour 1 cup + 5 1/2 Tbsp
For both version 1 and 2:
- 60 g sugar 5 Tbsp, you can adjust amount
- ½ tsp salt
- 1 Tbsp cooking oil
- 150 ml -200 ml milk 10 Tbsp – 14 Tbsp , start with the lower amount and add more as needed. See note 4
- 1 tsp vanilla extract optional, if you are making it to use with sweet filling
If you use baking powder:
- 21 g baking powder 1 1/2 Tbsp, double-acting, test your baking powder for freshness-see note 2
If you use baking soda:
- 7 g baking soda 1 1/2 tsp, test your baking soda for freshness-see note 3
- 3 tsp acid: lemon juice, apple cider vinegar, or distilled vinegar
Ideas for sweet fillings:
Ideas for savory fillings:
Instructions
Prepare the dough:
- If you use a stand mixer: Mix all ingredients, except for the liquid in a mixing bowl. Use a dough hook attachment. Turn on the mixer on the lowest speed and gradually add the liquid, start with the lowest amount of liquid and then add as necessary until a dough is formed. Don’t dump all the liquid all at once. Turn on the speed to 2 and knead until the dough is smooth
- If you use hands: Mix all ingredients, except for the liquid in a mixing bowl. Knead with your hands and gradually add in the liquid until you get a dough that is smooth and not sticky. Try to manage not to use too much flour while kneading as it dries out the dough
Rest the dough (to relax gluten):
- It's important to rest the dough after all the kneading. This is to relax the gluten. Cover and rest the dough for at least 15 minutes. The dough will be very soft and flexible after that
Prepare steamer:
- Bring water in the steamer to a rolling boil
Shape the dough:
- For fold-over steamed buns: Lightly dust your work surface with a bit of all-purpose flour. Divide the dough into 8 equal portions. If you want smaller buns, you can divide into 10 or 12 instead. Keep them covered and work with one dough at a time. Roll into a round ball. Flatten with your palm and then use a rolling pin to roll it into an oval shape. Fold the dough over and place it on a parchment paper. Repeat with the rest
- For round steamed buns: Lightly dust your work surface with all-purpose flour. Not too much. If you use a silicone pastry mat, you may not even need to dust with flour.
- Divide the dough into 8 equal portions. Keeping the dough covered and work with one dough at a time
- Pull and tuck the dough from top to bottom so the seams are at the bottom and the surface is relatively smooth
- Roll the dough into a smooth round ball in between the palm of your hand REALLY make sure the dough is smooth
- Cup the dough with both palms and move the dough in a circular motion to shape it taller. This part is important so your steamed buns come out tall instead of spreading to the side after steaming
- Place on a piece of parchment paper and keep them covered with a damp towel or plastic wrap while working on the rest
If you want to add filling to the buns:
- Divide the dough into 8 equal portions. Keep them covered and work with one dough at a time. Roll each one into a round ball.
- If you use sweet fillings I suggested above, you can portion it out into about 30-40 grams of filling per bun
- Flatten the dough with your palm and then use a rolling pin to roll it out to form a circle about 5-6 inches, with a slightly thicker middle part. This is to support the weight of the filling. Don't roll the dough too thin. If you roll the dough too thin, the filling might make the steamed buns "wrinkle" later when you steam
- Place the filling you choose to use on the center. Gather the edge to enclose into a round ball and place the seam side down. Cup the dough with both palms and move the dough in a circular motion to shape it taller.
- Place on a piece of parchment paper. Lightly dab the surface of the bun with some milk using your finger to smooth the surface. Loosely cover with a plastic wrapper to prevent drying. Work with another dough and do the same
Steaming:
- Place the steamed buns in the steamer, giving about 1-inch space in between. (Edited): Steam on high heat for 10 minutes for small to medium size buns and 15 minutes for larger buns. No-yeast buns behave differently compared to yeast buns and need to steam over high heat for maximum fluffiness
- If you use filling with raw meat, steam for 15-18 minutes or until the meat is cooked through
- When they are done steaming, turn off the heat and let them sit for 2-3 minutes in the steamer before opening the lid


Marv’s Recipe Notes
- For even fluffier and soft texture, you can replace all-purpose flour with cake flour or pastry flour for both options 1 and 2.
- Put 1/2 teaspoon of baking powder in a bowl and pour 1/4 (60 ml) of boiling water and it should bubble up immediately. If it doesn’t, the baking powder is no longer good and do not proceed with the recipe until you get a fresh baking powder. DO NOT substitute with the same amount of baking soda, the steamed buns will taste bitter
- Put 3 Tablespoons of vinegar into a small bowl. Add 1/2 teaspoon of baking soda. Give it a stir. The mixture should bubbles up almost immediately. If there is no reaction, your baking soda is no longer active/fresh
- I prefer steamed buns made with milk (dairy, nut milk or coconut milk) instead of just plain water. Steamed buns made with water tend to be drier and get stale much faster because of the lack of fat. If you can use whole milk, it tastes even better as the fat keeps the buns nice and moist

77 comments
Sorry I forgot to add. This version is so much better than the yeast one you did before as it is a timer saver it tastes better too. Something I can quickly whip up when I have unexpected guests.
I try to improve the recipe as I go so, I’m glad you like the updated version.
I have this page bookmarked and I think the recipe keeps changing. Anyhow I tried your edited version but used. 180g wholemeal flour and 180g cake flour. Turns out beautifully soft thank you! I see you increased the sugar amount too it is a lot nicer
These are fantastic. First time making steam buns and they turned out great. Did 4 plain and 4 with a mushroom, garlic, onion filling. The texture was perfect. Will definitely make this recipe again.
That’s awesome Josh! I’m glad the recipe worked out for you! The mushroom, garlic, and onion filling sound soooo good! Thank you for taking time to report back! Made my day 🙂
This are soooo good, they didnt turn white. But I used unbleached flour to make them.
But they were so soft and fluffy, would recomend making these
Note: I didnt have an actual steamer, so I used a pot with a bit water in it. Not too much and put a bowl and plate on top of it. Steamed them for 15 mins and they turned out soo good.
So you can make em without a steamer!
Hi Moa, I usually made mine with unbleached flour too and they won’t be white like the ones you get at the store, but as long as they taste great, that’s all matters 🙂
Your makeshift steamer is spot on! Others who don’t own steamers can benefit from your sharing! Thank you for taking time to leave your feedback!