This post may contain affiliate links. Please read our disclosure policy.
Delicious, soft, and chewy chocolate mochi bread loaf is super easy to put together and no yeast is needed. This has become our family’s new favorite bread.

OUR FAMILY’S NEW FAVORITE
I wasn’t going to share this no-yeast chocolate mochi bread loaf at first because I wasn’t sure if it’s good enough, but I kept baking it every week and the family has voted that this chocolate mochi bread was so good I had to share it!
This is an adaptation from a very popular and delicious super easy no-yeast mini cheddar mochi bread. From there I made an easy no-yeast gluten-free artisan mochi bread.
WHY YOU’LL LIKE THIS RECIPE
1. YOU DON’T NEED GLUTEN-FREE PREMIX FLOUR
You only need glutinous rice flour (mochiko flour) and tapioca starch, which are widely available these days
2. NO STANDMIXER OR HAND MIXER NEEDED
You can mix it with your hands and no kneading necessary either
3. TEXTURE AND TASTE
This bread has a soft, dense, moist and satisfying amount of chewiness. It also has an assertive flavor of chocolate (love you chocolate!!) and not overly sweet. We got so hooked with the texture of this bread it’s hard to explain!

HOW TO MAKE NO-YEAST GLUTEN-FREE CHOCOLATE MOCHI BREAD LOAF
1. Put milk, butter, and sugar in a saucepan. Bring to a boil

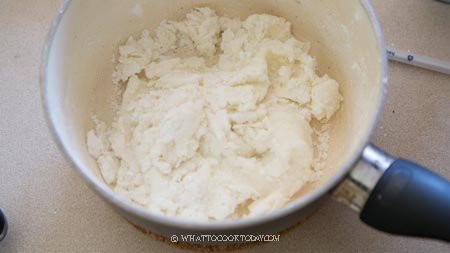
2. Then lower the heat and immediately add the glutinous rice flour and keep stirring until you get a wet dough that is quite lumpy but keep stirring until the liquid gets absorbed. Remove from the heat


3. Sift in tapioca starch, baking powder, and salt and stir with a strong rigid spatula.

4. They will feel dry and won’t come together. The rough dough should feel warm and not hot. We are going to add the eggs and we don’t want th e dough to cook the eggs. So please make sure it’s warm and not hot

5. Add half of the eggs you have beaten and keep stirring. The dough will appear separated at first, but keep stirring


6. If it comes together into a nice non-sticky dough, it means you need to add more eggs. What we are looking for is a dough that is paste-like consistency and when you lift it up with a spatula, it will trail down like a V shape (refer to the photo and video if you are not sure). When you get to this consistency, you are on the right track.

7. Stir in half of the chocolate chips and combine. The chocolate will melt some because it’s warm

8. Transfer half of the dough to a loaf pan, sprinkle with some chocolate chips and then finish with the rest of the dough (I didn’t think of this and stir all the chocolate in and they melt into the dough). Smooth the top with a spatula. Sprinkle with more chocolate if you like.

9. Bake the bread on a middle rack for one hour and then turn off the oven without opening the door and let it cools down for 15 minutes. If you insert a skewer or a tester, it should come out with some smear of chocolate and a few sticky crumbs, it’s normal. As long as it’s not wet anymore, it’s done baking. The time is just a reference. It depends on your oven temperature accuracy too. You may need to bake a little longer if the inside is still wet

VARIATIONS
SWEET VERSION: you can replace chocolate chips with dried fruits like raisins, craisins, chopped pitted dates, etc
SAVORY VERSION: you can reduce the amount of sugar and replace chocolate chips with shredded or grated cheese, salted olives, bacon bits, etc
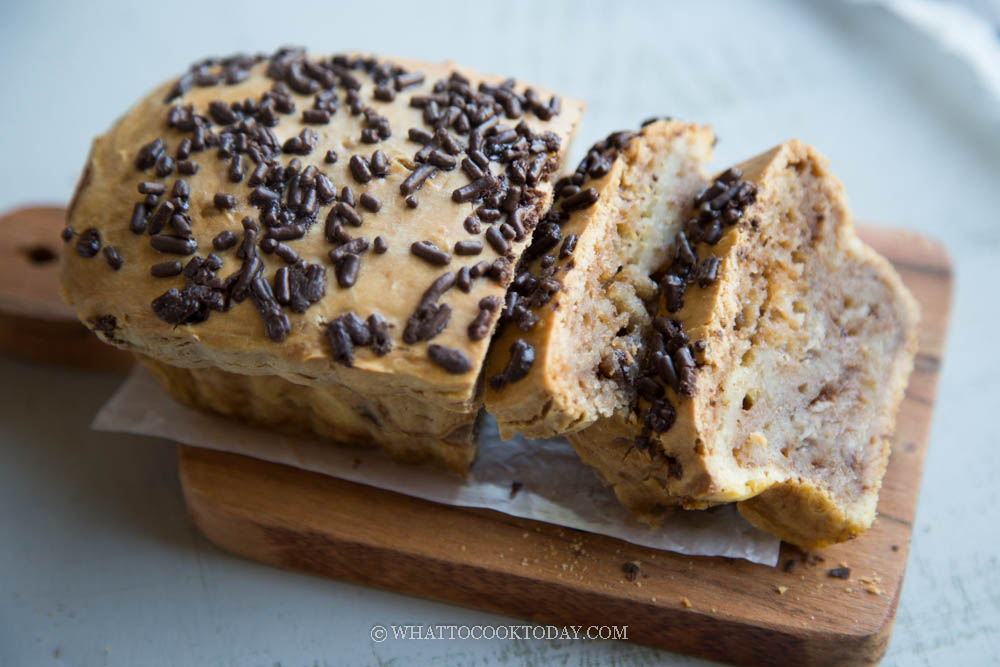
The best part of the day was, of course, slicing this bread and getting to sample it. Though I have to admit that it was more than a sampling! It was more of me eating 2-3 slices!
The bread may not look as elegant, but I love the rustic look of it and for the bread to taste this good, I suppose look can come second 😉

WILL MOCHI BREAD STAYS SOFT FOR DAYS?
No they won’t. That’s why I make small loaf. They taste the best the same day you make them. The will harden next day. You can mist them with water and loosely wrap them in a foil and warm them up in a preheated oven/toaster oven or air-fryer at 350 F for 8-10 minutes or until they are back to their soft chewy self again
HOW TO STORE MOCHI BREAD
Once they cool down completely, wrap them up in a plastic wrap, and put it inside a zipper bag, push all the air out and seal it. They can be kept like this at room temperature for about 3 days. Only slice what you are going to serve. That way you won’t dry out all the slices.
DID YOU MAKE THIS NO-YEAST GLUTEN-FREE CHOCOLATE MOCHI BREAD LOAF RECIPE?
I love it when you guys snap a photo and tag to show me what you’ve made 🙂 Simply tag me @WhatToCookToday #WhatToCookToday on Instagram and I’ll be sure to stop by and take a peek for real!

I’ve been testing many rounds and decided to update this recipe based on my latest “experiment” on June 13, 2021. I used more tapioca starch,less glutinous rice flour, and precooked the dough really made a difference in terms of chewiness in this latest recipe. The bread is soft with a satisfying amount of chewiness IMHO.
Easy No-Yeast Gluten Free Chocolate Mochi Bread Loaf
Ingredients
Dry ingredients:
- 260 gr tapioca starch
- 80 gr glutinous rice flour (also known as mochiko flour/sweet rice flour) plus more as needed
- 1 tsp baking powder
- ½ tsp salt
- 100 gr semi-sweet chocolate plus more to sprinkle on top (optional)
Wet ingredients:
- 260 ml milk You can use low or full-fat dairy or nut milk
- 60 gr sugar
- 60 gr butter before melting
- 2 large eggs beaten (you may not need all)
Instructions
Make the dough:
- Preheat oven to 350 F (180 C). My oven is a conventional oven with bottom heat. Brush the loaf pan with a bit of oil on all sides and set aside. Put milk, butter, and sugar in a saucepan. Bring to a boil and then lower the heat and immediately add the glutinous rice flour and keep stirring until you get a wet dough that is quite lumpy but keep stirring until the liquid gets absorbed. Remove from the heat
- Sift in tapioca starch, baking powder, and salt and stir with a strong rigid spatula. They will feel dry and won't come together. The rough dough should feel warm and not hot. We are going to add the eggs and we don't want the dough to cook the eggs. So please make sure it's warm and not hot. Add half of the eggs you have beaten and keep stirring. The dough will appear separated at first, but keep stirring
Dough consistency to look for:
- If it comes together into a nice non-sticky dough, it means you need to add more eggs. What we are looking for is a dough that is paste-like consistency and when you lift it up with a spatula, it will trail down like a V shape (refer to photo and video if you are not sure). When you get to this consistency, you are on the right track. Stir in half of the chocolate chips and combine. The chocolate will melt some because it's warm
Bake the bread:
- Transfer half of the dough to a loaf pan, sprinkle with some chocolate chips and then finish with the rest of the dough (I didn't think of this and stir all the chocolate in and they melt into the dough). Smooth the top with a spatula. Sprinkle with more chocolate if you like. Bake the bread on a middle rack for one hour and then turn off the oven without opening the door and let it cools down for 15 minutes. If you insert a skewer or a tester, it should come out with some smear of chocolate and a bit of sticky crumbs, it's normal. As long as it's not wet anymore, it's done baking. The time is just a reference. It depends on your oven temperature accuracy too. You may need to bake a little longer if the inside is still wet
- Gluten-free bread doesn't rise high and has a denser and heavier texture compared to non-gluten-free bread
- Transfer to a cooling rack to let it cools down for at least one hour before slicing
Serving:
- The bread taste the best on the same day it is baked. They tend to harden a little bit, but still chewy. Simply reheat for few seconds in the oven or loosely wrap in a foil and bake at 350 F for 8-10 minutes and it will taste soft and chewy again
Storage:
- Once the bread cools down completely, wrap it up or put in a zipper bag and push all the air out and store at room temperature for 3-4 days


28 comments
This has become one of my go-to comfort recipes! It’s definitely best fresh, so I like to slice it and store it in the freezer. Then I can just pop a slice in the toaster oven whenever I want, and it’s practically as good as the first day. ^_^
To the author: thank you for sharing this recipe with us!
I’m happy to know that you like this mochi bread loaf April! Great idea to freeze them and when toast them, it’s heavenly good!!! Thank you for taking time to report back 🙂
I’m wondering if this recipe was changed since I made it the first time. In my notes I said that I used 200 g of rice flour but that’s nowhere near the amount listed in the recipe. Scratching my head…I guess I will try it as written and see how it goes.
Hi Melanie, yes, I’ve retested the recipe and updated it. I hope it turned out for you!
Hi. In parentheses next to tapioca starch it says “also known as mochiko flour or sweet rice flour.” I thought that the glutinous rice flour was also known as mochiko flour, not the tapioca starch. Is this correct? I just want to make sure I use the correct amount of each before starting. Thank you very much.
Hi Noa, sorry for the typo. That was supposed to be for the glutinous rice flour and NOT the tapioca starch. Thank you for letting me know.
Oh dear, I see that I should’ve read the bottom of your post–I see that you did update the recipe. 🙂 I’m trying it today.