This post may contain affiliate links. Please read our disclosure policy.
This pumpkin sourdough artisan bread is an easy and no-knead bread with its tangy, earthy, and subtly sweet flavor that captures the essence of autumn in every bite.

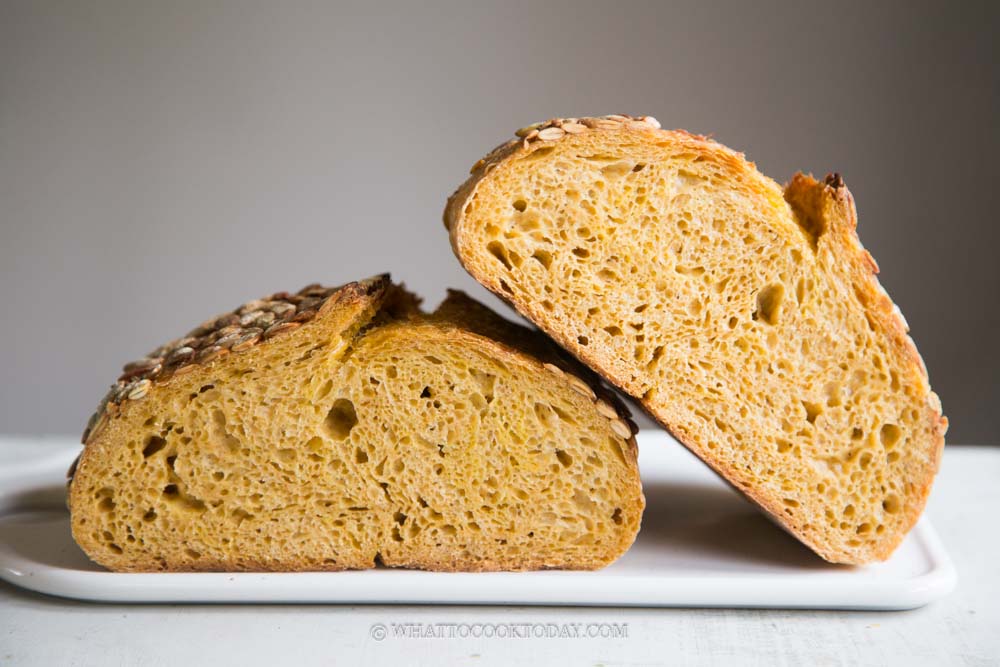
As the crisp autumn air rolls in and the leaves turn shades of red and gold, there’s nothing quite like the comforting aroma of freshly baked bread wafting through the kitchen. Pumpkin sourdough artisan bread is the epitome of fall, combining the earthy sweetness of pumpkin with the tangy complexity of sourdough. The pumpkin puree gives the bread its moist crumbs and I just love that hint of pumpkin in the bread.
Why you’ll like this recipe
- It’s a no-knead recipe
Most of my artisan sourdough bread is no-knead. It seems like a long process, but lots of passive waiting time. The only inconvenience is you need to be around to do few stretches and folds - The dough is easy to work with
I’m not sure exactly what the hydration of this dough is, but it’s definitely not one of those high-hydration or above 80%. So the dough is pretty easy to work with and the crumbs are soft, moist, and close crumbs
Ingredients for Pumpkin Sourdough Artisan Bread
- Sourdough Starter: The heart and soul of any sourdough bread, a mature sourdough starter provides the unique flavor and leavening for the bread. If you don’t have a starter, you’ll need to create one a few days in advance.
- Bread flour and whole wheat flour: A mixture of bread flour and whole-wheat flour gives a bit of that extra nuttiness from the whole wheat without weighing down the bread
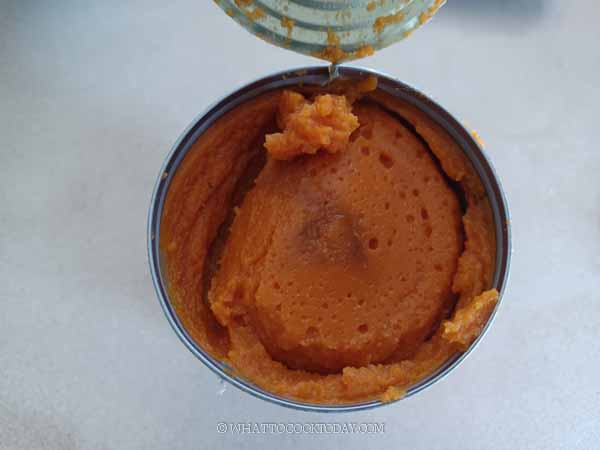
- Pumpkin Puree: I used canned pumpkin puree. You can also use fresh pumpkin puree, but you may need to cut back a bit on water. Canned pumpkin puree has less water

- Water: As with any bread, water is crucial for hydrating the dough and activating the yeast.
- Salt: A pinch of salt enhances the flavors and helps control the fermentation process
- Honey : I use raw honey. A touch of sweetness balances the sourness of the sourdough and enhances the pumpkin flavor.
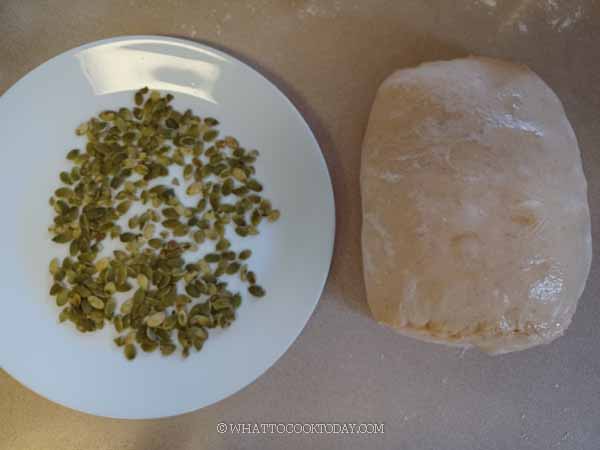
- Optional Addition: I added pumpkin seeds on the outside, which gives a nice texture and flavor to the pumpkin bread.
No-Knead Pumpkin Sourdough Country Bread
Ingredients
- 270 g bread flour (12.7% protein content) 90%
- 30 g whole wheat flour 10%
- 170 g water 57%
- 120 g pumpkin puree 40%, I use canned pumpkin puree. See notes
- 60 g active starter (100% hydration) 20%
- 6 g salt 2%
- 10 g honey 3.3 %
Optional:
- ½ cup Pumpkin seeds or more as needed, for coating the bread
Instructions
- Remember that you want to use your starter at its peak, meaning it has doubled or tripled when you are ready to use it
- You can watch a similar process of how I made the basic sourdough bread. Just click on the "video" button on the top. Some of the steps may not be applicable to this recipe, but it gives you an idea on how the whole process goes
Fermentolyse:
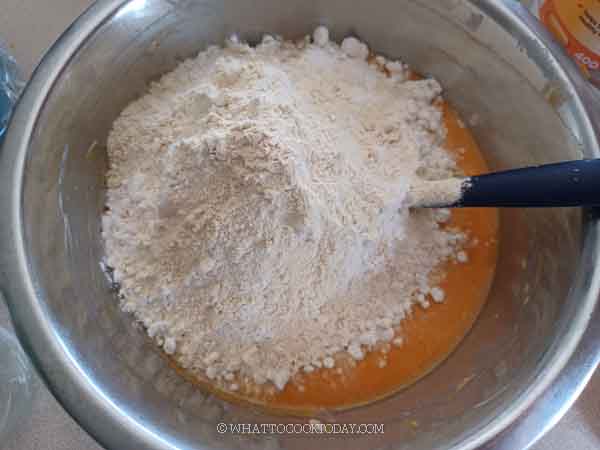
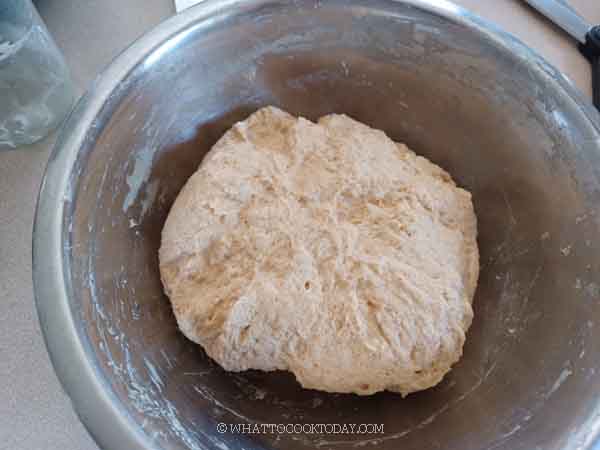
- Weigh 60 grams of your active starter into a mixing bowl. Feed the starter as per your normal routine. Combine starter, water, pumpkin puree, honey, and salt and stir to combine. Add bread flour and whole wheat flour to a mixing bowl. If you have a dough whisk, you can use that, otherwise, a sturdy spatula or your hand would work too. Stir to combine into a rough wet dough. The whole process probably take about 3-5 minutes. It is important that there shouldn't be any visible dry bits. All flour needs to be fully hydrated. Cover and let it sit for 1 hour. Maintain dough temperature at 70-72 F (21-22 C) at this stage if possible
- If it's really warm where you are, you may want to put it in a cooler bag with a pack of ice. Because the starter is already added at this point, we don't want it to start fermenting way too early before we have a chance to strengthen the dough during bulk fermentation
- Bulk fermentation begins when you innoculate starter (adding starter) into the dough. In this case, it starts at this fermentolyse step
Stretch and folds:
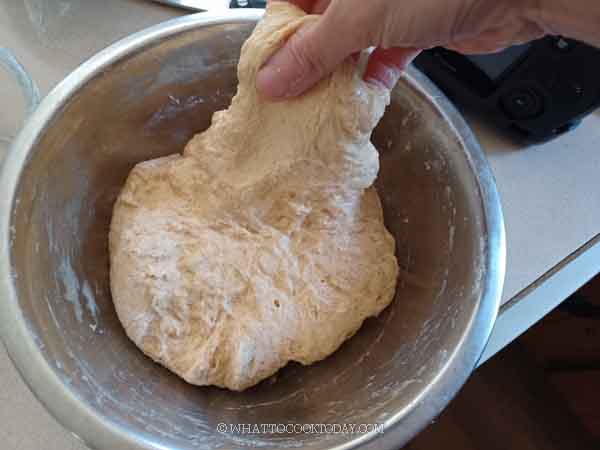
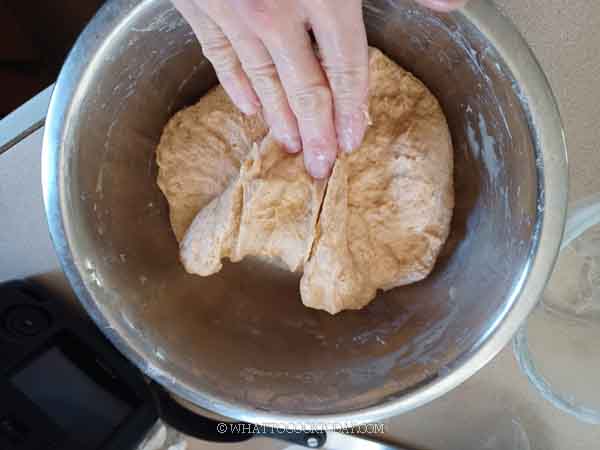
- We will do 4 sets of stretch and folds every 30 minutes. From this point on, I maintain the temperature a bit warmer, at 75-78 F (24-26C). Please watch the video to see the step-by-step tutorial there. Wet your fingers lightly. Pick up the dough from one of the edges, kinda wiggle it and stretch it up and fold it over. Repeat this throughout the edge of the dough. You may end up with 5-6 stretches
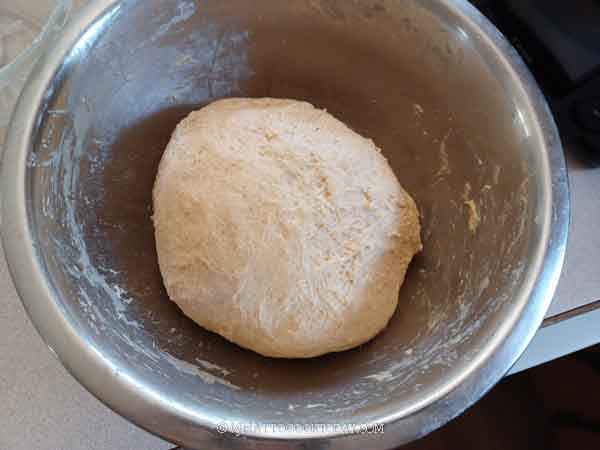
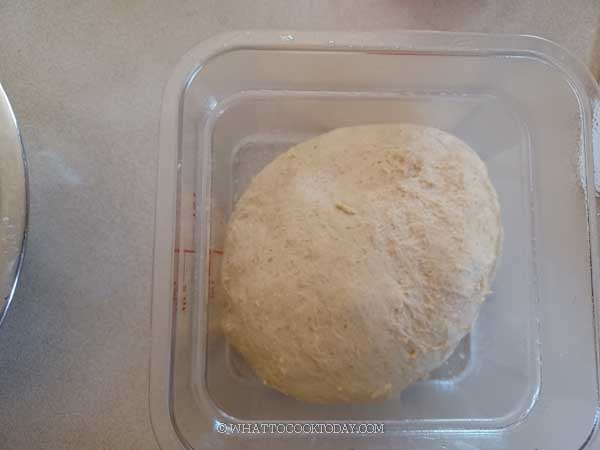
- Only stretch as far as the dough allows you too, don't force it. Flip it to the smooth side. Cover and rest for 30 minutes. Repeat with stretch and fold #2, #3 every 30 minutes. After the 3rd stretch and fold, transfer the dough to a baking dish or pan, about 9 x 9 inch and spray the container with non-stick spray. You can also use a straight-sided 2-quart container so I can see how much the dough has grown during bulk fermentation
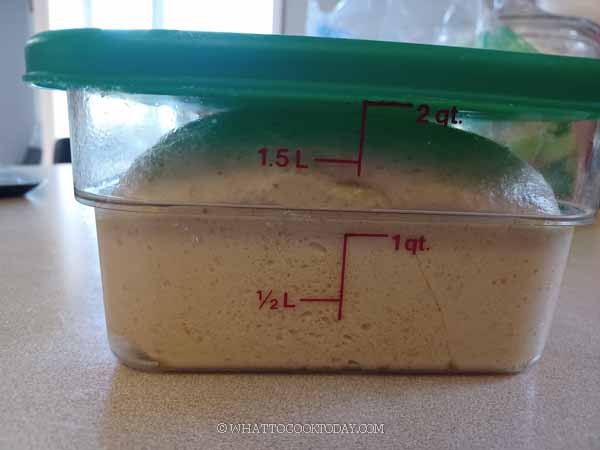
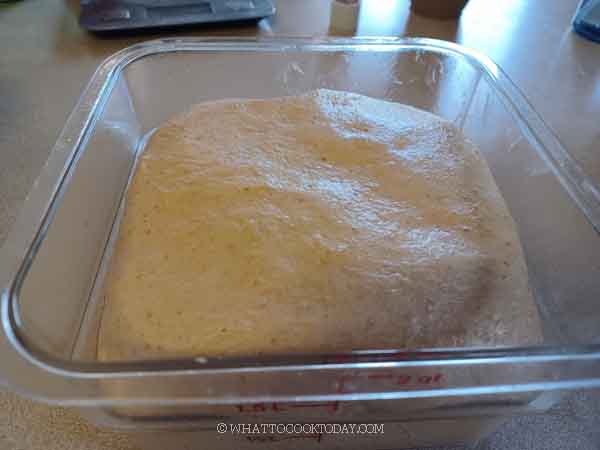
Let it continue to bulk ferment:
- After about 2 hours since the last fold, check and see how much the dough has grown. You can also just visually observe how much the dough has grown in size. It should look about 50% puffier than before. Total bulking time from the time the starter is added to this end of bulk fermentation is about 3.5-4 hours at 75-78 F (24-26 C). Again, you need to observe the dough, not the clock. It may take longer or faster depending on the temperature
Shaping:
- My banneton is lined with a cloth. Dust your banneton with some flour
- I don't do pre-shaping since I only bake one small loaf and the dough usually seems pretty strong after all those stretch and folds. I also try not to handle the dough too much near the end of bulk fermentation, to avoid degasing the dough too much
- Lightly flour the surface of the dough in the container. Tip the container upside down to let the dough gently slide down upside down. Dust the surrounding of the dough with flour. Since I use a square container, the dough will be sort of "squarish". If you use a round container, the dough will be "roundish"
- Just use a bench knife to help you stretch the dough out a bit to make it more "squarish". It doesn't have to be a picture-perfect square. Use a bench knife to tuck in the flour underneath the four edges of the dough
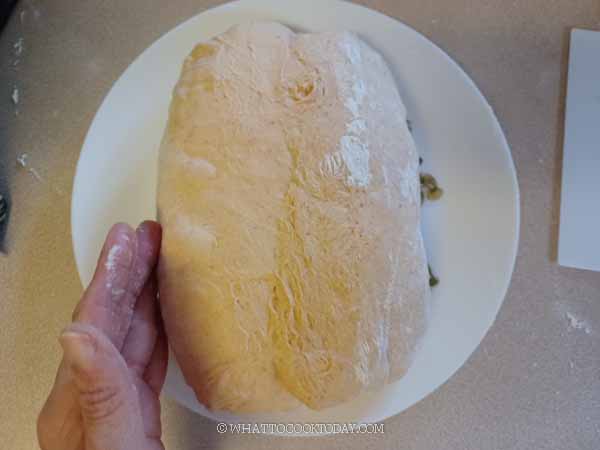
- Gently fold half of the dough over towards you to the center. Repeat with the opposite half, overlapping the first half. Then roll the dough over from one end to the other. You can feel that the dough is jiggly and full of air
- Tuck a bench knife under one side of the dough and push gently to tighten the dough a bit. Seal both ends
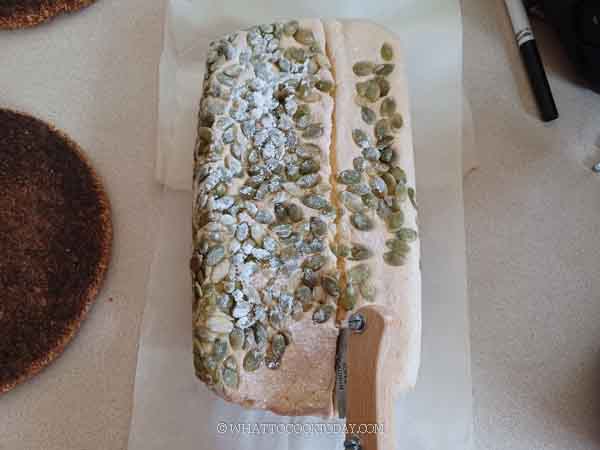
Coat with some pumpkin seeds:
- If you choose to use pumpkin seeds, scatter about 1 cup of pumpkin seeds on a flat surface. Mist the top and sides of the dough with some water and then use a bench knife to help you gently lift the dough and place the wet side on top of the pumpkin seeds and gently kinda roll it side to side a bit to let the seeds stick to the dough and then use a bench knife to help you transfer this to the prepared banneton. The side coated with pumpkin seeds should be facing down.
- The seam side is up. I like to tighten and seal the seam by pulling a bit of the dough from both sides
Cold retard the dough:
- Place the dough inside a produce plastic bag and twist the bag and secure with a clip. Any large ziploc bag would work too. Put this inside the coldest part of your fridge. Make sure the fridge is cold enough at 37-38 F (3-4 C). This is important so the dough won't continue to ferment and you end up with an over-proofed dough. Let the dough cold retard for 15-18 hours
Preheating oven:
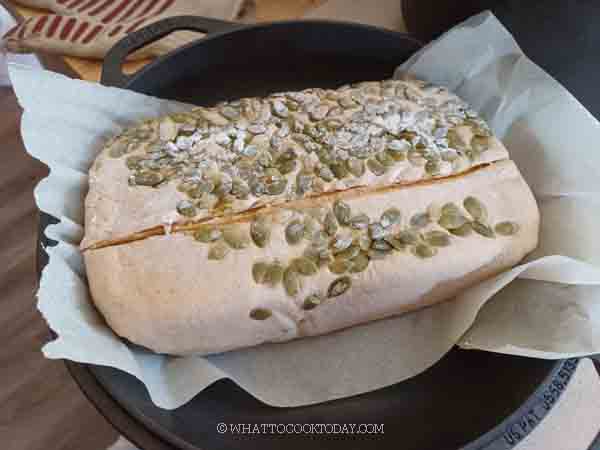
- I bake using a cast-iron dutch oven. 45 minutes before you plan to bake, position one oven rack at the lowest level and then another one rack above it. Place the dutch oven and its lid at the 2nd rack. I keep the pot and the lid separated during preheating. Preheat the oven together with the dutch oven to 485 F (250 C) for 30 minutes
- Cut a parchment paper about 2 inches bigger than the size of your banneton. I have a combo cooker Dutch oven, which is nice because I can load the dough with less risk of getting burnt on my arms. If you have a regular Dutch oven pot, you want to cut parchment paper so that it has a "handle" so you can lift the handle and lower the dough into the pot without getting burnt.
Scoring the dough:
- When the oven has preheated for 45 minutes, get the dough out from the refrigerator. There is no need to let it come to room temperature.
- Place the parchment paper covering the top of the banneton and turn it over so the dough is now sitting on top of the parchment paper
- Use a bread lame and make a slash, about 1/2-inch deep at 45 degree angles on the dough, kinda off-center a bit. It can be a bit challenging to score because of the pumpkin seeds, but just do your best. Mist the dough with water. This creates nice crackling all around the crust later
Baking:
- Wear a mitten and carefully get the Dutch oven pot and its lid out from the oven and place one baking sheet on the lowest rack and quickly but carefully close the oven's door back to prevent too much heat loss. This helps to prevent the bottom crust of your bread from being too thick and tough
- Carefully load the dough by lifting the parchment paper and lower it into the pot or the combo cooker. Close the lid. Open the oven door again and carefully transfer the pot into the oven again and close the oven door. Lower the temperature to 450 F (230 C) and bake for 35 minutes. I added 5 minutes extra since this loaf is more moist because of the pumpkin puree
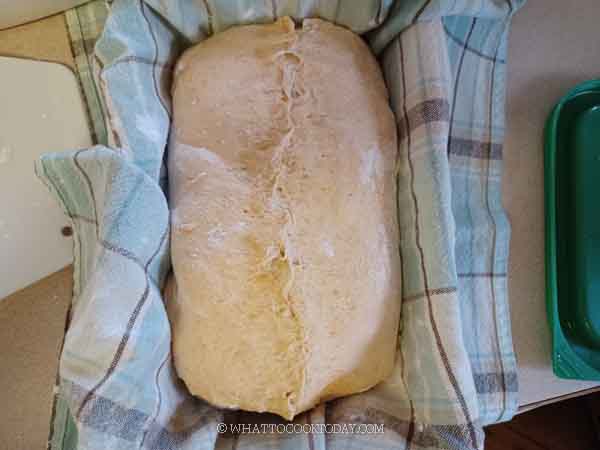
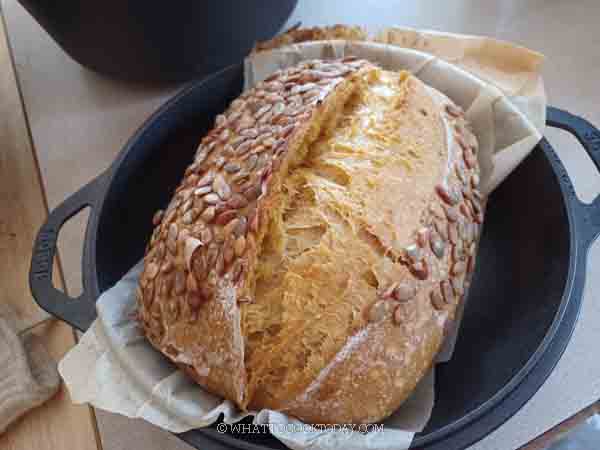
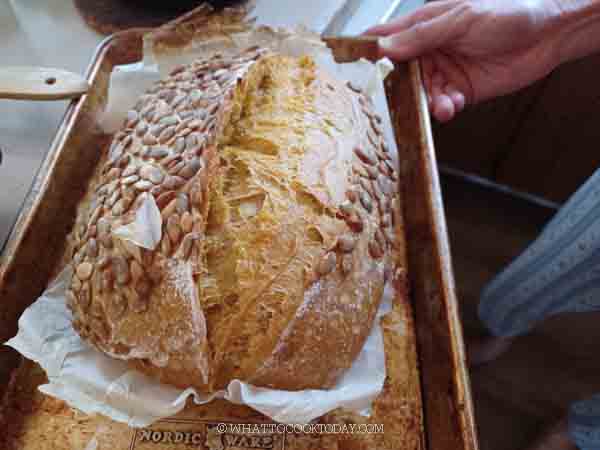
- After 35 minutes remove the Dutch oven from the oven. Transfer the half-baked bread to a regular baking sheet and put this back inside the oven. Again, this is to help create a nice thin crust all around
- Lower the oven temperature to 425 F (220 C) and bake for 15 minutes. Rotate the bread halfway during this second portion of baking
- Turn off the oven and open the oven door slightly to let the hot air out and let the bread sit in the oven for 10 minutes. This helps to "cure" the bread without overcooking it, so the inside won't be wet and gummy
Cooling down:
- After that, get the bread out of the oven and transfer it to a cooling rack immediately and now comes the hardest part! You need to wait for at least 3-4 hours or longer before you slice it. If you slice into warm bread, you will end up with gummy crumbs
Store:
- Once the bread has cooled down completely, you can store it in a bread box if you plan to consume it in the next few days. You can also put it inside a paper bag
- For longer storage, you can wrap the whole loaf or sliced bread in plastic wrap and then put inside a freezer bag. Push all the air out and seal. It can be kept frozen for 1-2 months. Simply thaw at room temperature before serving and then reheat them in toaster or air-fryer. Most toasters these days can toast frozen sliced bread. So you may not even need to thaw it completely


Marv’s Recipe Notes
*Nutrition facts are just estimates and calculated using online tools*

The overall process
- Prepare Your Sourdough Starter: Ensure that your sourdough starter is active and ready to use. If not, feed it a few hours before starting your bread-making process.
- Fermentolyse: Combine the sourdough starter, flour, pumpkin puree, water, honey, and salt in a large bowl.
- Add bread flour and whole wheat flour to a mixing bowl. If you have a dough whisk, you can use that, otherwise, a sturdy spatula or your hand would work too. Stir to combine into a rough wet dough. The whole process probably take about 3-5 minutes. It is important that there shouldn’t be any visible dry bits. All flour needs to be fully hydrated. Cover and let it sit for 1 hour. Maintain dough temperature at 70-72 F (21-22 C) at this stage if possible
- Stretch and folds: Do 4 sets of stretch and folds every 30 minutes. This step helps develop the gluten structure. Wet your fingers lightly. Pick up the dough from one of the edges, kinda wiggle it and stretch it up and fold it over. Repeat this throughout the edge of the dough. You may end up with about 4 stretches
- Only stretch as far as the dough allows you too, don’t force it. Flip it to the smooth side. Cover and rest for 30 minutes. Repeat with stretch and fold #2, #3, #4 every 30 minutes.
- After the 3rd stretch and fold, transfer the dough to a baking dish or pan, about 9 x 9 inch and spray the container with non-stick spray. You can also use a straight-sided 2-quart container so I can see how much the dough has grown during bulk fermentation.
- After about 2 hours since the last stretch and fold, check and see how much the dough has grown. You can also just visually observe how much the dough has grown in size. It should look about 50% puffier than before or if you put it in a straight-sided container, it should be about 1/5-2x in volume. Total bulking time from the time the starter is added to this end of bulk fermentation is about 3.5-4 hours at 75-78 F (24-26 C). Again, you need to observe the dough, not the clock. It may take longer or faster depending on the temperature
- Shaping: After the bulk fermentation, gently shape the dough into an oval shape. You can also add optional ingredient, which is the pumpkin seeds at this stage.
- If you choose to use pumpkin seeds, scatter about 1 cup of pumpkin seeds on a flat surface. Mist the top and sides of the dough with some water and then use a bench knife to help you gently lift the dough and place the wet side on top of the pumpkin seeds and gently kinda roll it side to side a bit to let the seeds stick to the dough
- Then use a bench knife to help you transfer this to the prepared banneton. The side coated with pumpkin seeds should be facing down.
- Cold retard: The dough is transferred to a banneton and then cold retard in the fridge for 15-18 hours
- Baking: I bake using a cast-iron dutch oven. 45 minutes before you plan to bake, position one oven rack at the lowest level and then another one rack above it. Place the dutch oven and its lid at the 2nd rack. I keep the pot and the lid separated during preheating. Preheat the oven together with the dutch oven to 485 F (250 C) for 30 minutes
- When the oven has preheated for 45 minutes, get the dough out from the refrigerator. There is no need to let it come to room temperature. Place the parchment paper covering the top of the banneton and turn it over so the dough is now sitting on top of the parchment paper.
- Use a bread lame and make a slash, about 1/2-inch deep at 45-degree angles on the dough, kinda off-center a bit. It can be a bit challenging to score because of the pumpkin seeds, but just do your best. Mist the dough with water. This creates nice crackling all around the crust later
- Carefully load the dough by lifting the parchment paper and lower it into the pot or the combo cooker. Close the lid. Open the oven door again and carefully transfer the pot into the oven again and close the oven door. Lower the temperature to 450 F (230 C) and bake for 35 minutes. I added 5 minutes extra since this loaf is more moist because of the pumpkin puree
- After 35 minutes remove the Dutch oven from the oven.
- Transfer the half-baked bread to a regular baking sheet and put this back inside the oven. Again, this is to help create a nice thin crust all around
- Cooling: Once your pumpkin sourdough bread is baked to perfection, allow it to cool on a wire rack for at least 2-3 hours before slicing.


By following the steps outlined in this article, you can create your own masterpiece and savor the taste of fall in a loaf of homemade pumpkin sourdough bread. Whether enjoyed as toast with your morning coffee or as the star of your Thanksgiving table, this bread is sure to become a seasonal favorite. Happy baking!
Did you make this no-knead pumpkin sourdough country bread recipe?
I love it when you guys snap a photo and tag it to show me what you’ve made. Simply tag me @WhatToCookToday #WhatToCookToday on Instagram and I’ll be sure to stop by and take a peek for real!

