This post may contain affiliate links. Please read our disclosure policy.
Learn how to bake a small loaf sourdough country loaf with open crumbs and medium hydration without kneading. I’m also sharing how to do a 7-minute scoring for sourdough ear, and how to shape a batard in two different ways in my video tutorial.
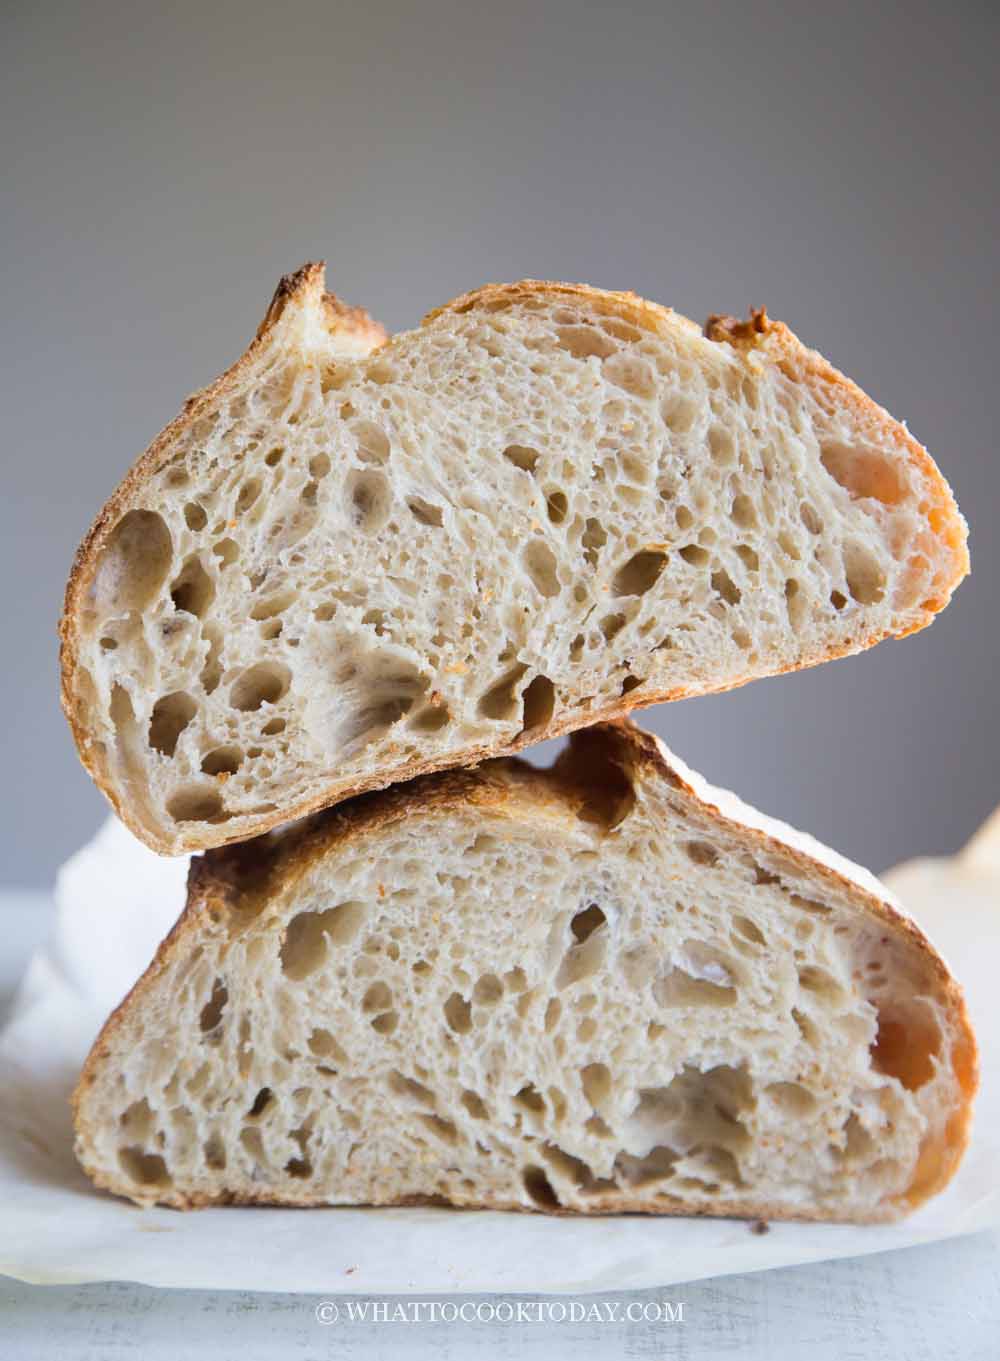
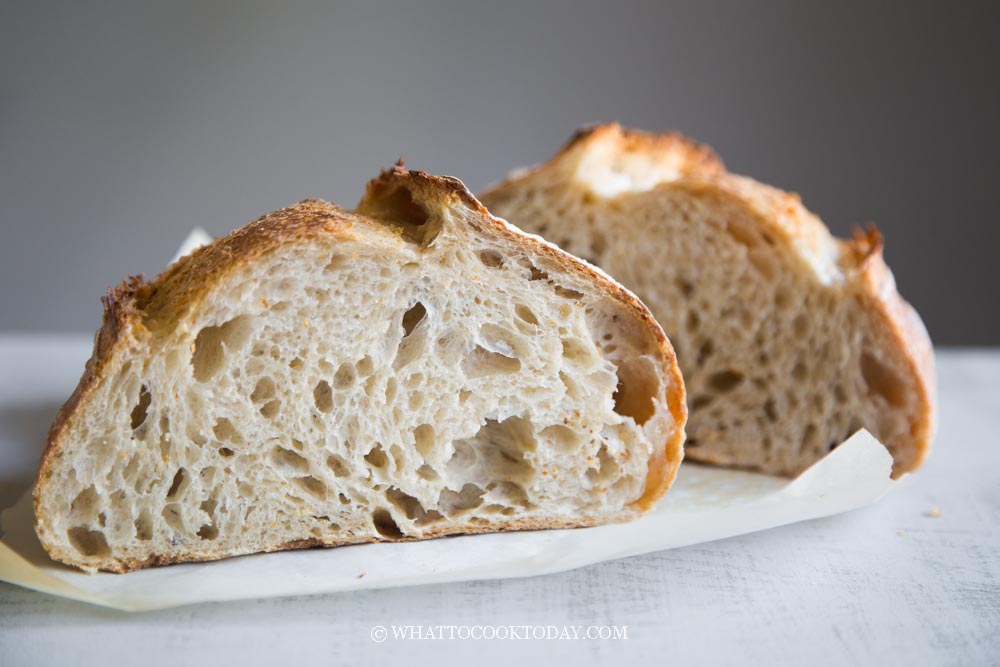
It has been my obsession trying to learn how to bake sourdough bread with nice airy open crumbs. It took me over 2 months (and MANY MANY sourdough breads!) to finally understand sourdough, the techniques, and why things need to be done the way they are so that I can finally produce a decent sourdough bread with open crumbs. It’s not the most perfect yet, mind you! but I’m happy to see those wild open crumbs!
What is open-crumb sourdough bread?
Open-crumb sourdough bread literally means crumbs with a lacy open structure. You know, that mixture of large, medium, and small holes evenly distributed throughout the crumb of the bread!
How to achieve an open-crumb sourdough bread
After baking way too many failed sourdough artisan bread and finally consistently successful, If I may say that, I’ve learned that it’s not only one thing that produces open-crumb sourdough bread. It is a combination of pretty much everything from the ingredients (the flour you use, etc) all the way to the techniques applied in making the dough and baking the bread. If I were to summarize it, here are a few critical points to take note of to be able to achieve an open crumb:
1. Strong starter
This is perhaps one of the most important criteria. In fact, nothing really matters if you don’t have a strong active starter. The wild yeast does the heavy lifting here and if it’s not up to the task, the result shows!!
2. Type of flour
The quality and protein content in the flour we use is important. I use bread flour with at least 12.7%-13% gluten content. The dough needs to develop enough gluten to be able to give the bread its structure and hold the gas produced by the yeast to leaven our bread. If you use more whole grain flour, it’s less likely that you will get open crumbs. It’s just the nature of whole grain flour. Whole grain flour gives more flavor though compared to using just bread flour. This recipe incorporates about 10% whole wheat flour. The more whole-grain flour you use, the less open crumbs you get.
3. Hydration
You certainly do not need high hydration to achieve open I used to think I needed at least 80% and above to be able to get open crumbs. Dough hydration between 70-80% is enough to achieve open crumbs with proper techniques and other elements mentioned
4. Temperature control
The fermentation usually doesn’t actively take place until the last 2 hours during bulk fermentation. So you want to make sure that the temperature is not too high that the fermentation happens too quickly that you don’t have enough time to do all the stretch and fold and coil folding to develop that gluten to strengthen the dough
5. Gentle handling
You want to be firm yet gentle when you handle the dough. You want to make sure you stretch enough during the early stage when we do all the stretch and fold and bench fold to develop gluten and get more and more gentle as the time progresses because the fermentation gets more active towards the end
6. Skip preshaping if possible
I’ve learned that by baking a small loaf and usually only one loaf, I can skip preshaping if I have developed enough strength in the dough. The more you handle the dough, the more you break air pockets that you have built during bulk fermentation. So I usually just gently shape the dough right away after bulk fermentation
Techniques and terms used in sourdough baking and this recipe
If you watch the video or look at the recipe card, there are a series of techniques that are applied to the dough. They are mainly to help strengthen the dough. I highly recommend watching the video to understand the process and why things need to be done the way they are.
1. Bulk fermentation
This is one of the most important steps in bread making. This is also sometimes referred to as the first proofing. Bulk fermentation begins once you mix in the starter. In this recipe, I allow the dough to proof until about 50% growth in volume. Bulk fermentation takes about 5-6 hours at a temperature of about 75-78 F (24-26 C). The activity of the starter is highly dependent on temperature. So it is important to monitor the temperature throughout the process to make sure it’s not too warm that the dough ferments too quickly before we have a chance to strengthen the dough during bulk fermentation
2. Autolyse or Fermentolyse
Autolyse is a process of mixing water and flour and then allowing it to rest for 30 minutes to 1 hour or longer. The water and starter are added later after autolyze. During this time the flour and water work together for early gluten development. The dough becomes extensible and less kneading is needed to develop that elasticity later.
Fermentolysde is usually the process of mixing pretty much everything from the beginning, flour, water, starter, and salt. I prefer this because I won’t forget to add salt later and also it’s easier because everything gets mixed and so much easier.
I’m no expert, but I’ve tried both autolyse and fermentolyse and didn’t see much difference.
2. Stretch and fold
Stretch and fold is usually applied at the early stage of bulk fermentation, right after autolyse or fermentolyse. Its purpose is to develop strength on the dough and it also helps to smooth out the dough
3. 5 or 7-minute scoring
What is a 7-minute scoring? It is a delayed scoring. Some do it at 5 minutes. Usually, we do the expansion score (deep score) before we bake the bread, with 7-minute scoring, we bake the dough for 7 minutes and then get it out from the oven and do the expansion score and then put it back into the oven and continue to bake.
What are the benefits of delayed scoring or 7-minute scoring for sourdough ear?
I consistently find a good oven spring and get the sourdough “ear” when I do 7-minute scoring, especially with high-hydration dough. I have baked more than 10 loaves using 7-minute scoring and each one of them hasn’t failed to give me a good oven spring and nice ear. Of course, you need to score the dough properly too (at a 45-degree angle and about 1/2-inch deep), but I have been very impressed with this technique.
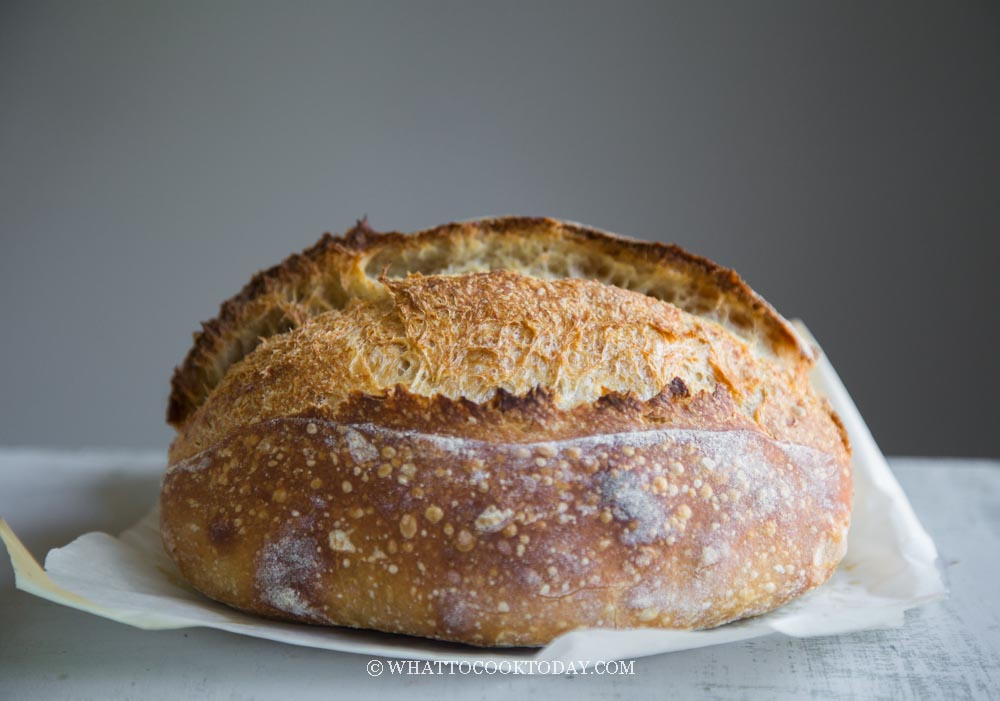
Shape into a boule or a batard
It’s really up to you. I have learned from the article written by Maurizio Leo from the Perfect Loaf that a batard gives you an open crumb compared to a boule shape. I have put this to the test myself and it’s true! None of my boule shape country loaves could achieve nice open crumbs like the batard shape could. Perhaps the way the boule is shaped is more “rough” so the crumbs are more even and small, which doesn’t mean a bad thing too. It’s more of a personal preference. Some people prefer nice closed even crumbs, some, like myself, like the airy open crumb artisan bread!
What is a “Caddy Clasp”?
I learned of this sourdough bread shaping term called “caddy clasp”, invented by Wayne Caddy. He shapes the dough in just two moves. I have started using this caddy clasp method for the past few months and I like it. Mine is not exactly in two moves, sort of modified a bit, but I found it much easier. You can watch my video tutorial for more details.
Sample of baking timeline
The night before – prepare a starter that will peak right at the time you are going to use it for baking. Temperature was maintained at 75-77 F (24-25 C)
8:00 am– fermentolyse (mix everything and rest for 1 hour) bulk fermentation starts here
9:00 am– stretch and fold #1
9:30 am– stretch and fold #2
10:00 am– stretch and fold #3 and transfer to bulking dish and mark the container with the height of the dough. Continue with bulk fermentation until dough has doubled in volume.
2:30-3 pm -shape the dough and transfer dough to the fridge for cold retard 15-18 hours
The next day – score and bake the cold dough
If I may offer some advice
1. Don’t give up if the bread doesn’t turn out the way you want it. Sourdough artisan bread takes a lot of practice and patience.
2. Practice with the same recipe over and over and take note each time so you can find out what works and what doesn’t
3. If you were to change something, change one thing at a time so you know exactly what works and doesn’t
4. Even if your bread doesn’t end up with open crumbs, it is still delicious bread!
Did you make this Small No-Knead Sourdough Country Bread/Pain de Campagne recipe?
I love it when you guys snap a photo and tag to show me what you’ve made 🙂 Simply tag me @WhatToCookToday #WhatToCookToday on Instagram and I’ll be sure to stop by and take a peek for real!

Small No-Knead Sourdough Country Bread/Pain de Campagne (with 7-minute scoring)
Ingredients
Recipe with 10% whole wheat flour:
- 270 gr bread flour (12.7% protein content) 90% (plus more for dusting)
- 30 gr whole wheat flour 10%
- 230 gr water 79% final hydration
- 60 gr active starter (100% hydration) 20%
- 4 gr fine sea salt 1%
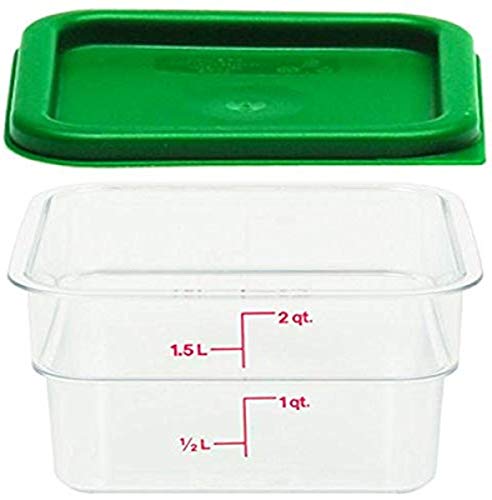
For dusting banneton:
You will need:
Instructions
Prepare levain (the night before):
- I strongly encourage you to have an active starter that is at least one month old before you attempt to bake this recipe. You can try using your young starter that is at least 2-week old, but the result may not be as satisfactory
- Since I know I will be baking the next day, I will prepare more starter the night before. I will feed at 1:7:7 ratio so it will last me until the next morning, about 10 hours to double or triple at 75-77 F (24-25C). This also depends on the strength of your starter and the room temperature the starter is at. It may be faster or longer.I use 5 grams starter + 35 grams flour + 35 grams water. I usually prepare a bit more as some may get stuck to the glass jar, spatula, etc.
- Ideally, you want to use your starter at its peak, meaning it has doubled or tripled when you are ready to use it. If for some reason you can't use the starter right away, store it in the fridge and try to use it within 12 hours for the best result.
Fermentolyse (around 8:00 am):
- Weigh 60 grams of starter into a mixing bowl. Feed the starter as per your normal routine. Combine starter, water, and salt and stir to combine. Add bread flour and whole wheat flour to a mixing bowl. If you have a dough whisk, you can use that, otherwise, a sturdy spatula or your hand would work too. Stir to combine into a rough wet dough. The whole process probably take about 3-5 minutes. It is important that there shouldn't be any visible dry bits. All flour needs to be fully hydrated. Cover and let it sit for 1 hour. Maintain dough temperature at 70-72 F (21-22 C) at this stage if possible
- If it's really warm where you are, you may want to put it in a cooler bag with a pack of ice. Because the starter is already added at this point, we don't want it to start fermenting way too early before we have a chance to strengthen the dough during bulk fermentation
- Bulk fermentation begins when you innoculate starter (adding starter) into the dough. In this case, it starts at this fermentolyse step
Stretch and fold #1 (around 9:00 am):
- From this point on, I maintain the temperature a bit warmer, at 75-78 F (24-26C).Please watch the video to see the step-by-step tutorial there. Wet your fingers lightly. Pick up the dough from one of the edge, kinda wiggle it and stretch it up and fold it over. Repeat this throughout the edge of the dough. You may end up with 4-6 stretches
- Only stretch as far as the dough allows you too, don't force it. You can clean up the side of the bowl using a bench scraper and round the dough up flipping it to the smooth side (Not shown in the video). Cover and rest for 30 minutes
Stretch and fold #2,and #3 (every 30 minutes):
- Do the same stretch and fold again with your slightly wet fingers. You may notice the dough is a bit tighter this round as gluten has developed a bit more. Cover and rest for 30 minutes and repeat until you've done 3 sets of stretch and fold every 30 minutes
Continue with bulk fermentation:
- I recommend using a see-through container or bowl to help you gauge how much the dough has risen so you know when to call an end to bulk fermentation. I also mark the container with a marker to see where the level of the dough is. This helps me to roughly gauge how much it has grown. I usually proof until the dough has doubled in volume or at least close to double
- During this time you can do 1-2 coil fold if you feel that the dough needs to develop more gluten. Coil fold is a gentler way to strenghten the dough without deflating it during bulk fermentation.
- Total bulking time from the time the starter is added to this end of bulk fermentation is about 6 hours at 78-80 F (26-27 C). Again, you need to observe the dough, not the clock. It may take longer or faster depending on the temperature
Shape into batard (around 2:30 pm):
- I don't do pre-shaping since I only bake one small loaf and the dough usually seems pretty strong after all those stretch and folds and coil folds. I also try not to handle the dough too much near the end of bulk fermentation, to avoid degasing the dough too much
- Lightly flour the surface of the dough in the container
- Tip the container upside down to let the dough gently slide down upside down. Dust the surrounding of the dough with flour. Since I use a square container, the dough will be sort of "squarish". If you use a round container, the dough will be "roundish"
- Just use a bench knife to help you stretch the dough out a bit to make it more "squarish". It doesn't have to be a picture-perfect square
- Use a bench knife to tuck in the flour underneath the four edges of the dough
- Gently fold half of the dough over towards you to the center. Repeat with the opposite half, overlapping the first half. Then roll the dough over from one end to the other. You can feel that the dough is jiggly and full of air. You can also refer to my video for alternative batard shaping call "caddy clasp"
- Tuck a bench knife under one side of the dough and push gently to tighten the dough a bit. Seal both ends
Transfer to an oval banneton:
- I use an 8-inch oval banneton lined with a cloth. 9-inch banneton would work too. Lightly dust the cloth with rice flour on the bottom and the side of the cloth. Lightly dust the top of the shaped dough. Dust off some excess. Very gently, using the help of the bench scraper to flip the dough onto your palm. So the seam side is facing you now. Gently put the dough into the prepared banneton. The seam side is up. I like to tighten and seal the seam by pulling a bit of the dough from both sides
Cold retard the dough:
- Place the dough inside a produce plastic bag and twist the bag and secure with a clip. Any large ziploc bag would work too. Put this inside the coldest part of your fridge. Make sure the fridge is cold enough at 37-38 F (3-4 C). This is important so the dough won't continue to ferment and you end up with an over-proofed dough. Let the dough cold retard for 15-18 hours
Preheating oven:
- I bake using a cast-iron dutch oven combo cooker. 45 minutes before you plan to bake, position one oven rack at the lowest level and then another one, one rack above it. Place the dutch oven and its lid at the 2nd rack. I keep the pot and the lid separated during preheating. Preheat the oven together with the dutch oven to 485 F (250 C) for 45 minutes
- Cut a parchment paper about 2 inches bigger than the size of your banneton. I have a combo cooker Dutch oven, which is nice because I can load the dough with less risk of getting burnt on my arms. If you have a regular Dutch oven pot, you want to cut parchment paper so that it has a "handle" so you can lift the handle and lower the dough into the pot without getting burnt.
- Place the parchment paper covering the top of the banneton and turn it over so the dough is now sitting on top of the parchment paper
If you choose to do 7-minute scoring: (score after baking for 7 minutes)
- Wear a mitten and carefully get the Dutch oven pot and its lid out from the oven and place one baking sheet on the lowest rack and quickly but carefully close the oven's door back to prevent too much heat loss. This helps to prevent the bottom crust of your bread from being too thick and tough
- Carefully load the dough by lifting the parchment paper and lower it into the pot or the combo cooker, mist with some water. Close the lid. Open the oven door again and carefully transfer the pot into the oven again and close the oven door. Lower the temperature to 450 F (230 C) and bake for 7 minutes
- After 7 minutes, remove the Dutch oven from the oven, carefully open the lid and use a bread lame to score the dough, kinda off-center a bit, about 1/2-inch deep at a 45-degree angle
- Cover it back with the lid and put it back in the oven and bake for the next 33 minutes
- After 33 minutes, remove the Dutch oven from the oven. Transfer the bread to a regular baking sheet and put this back inside the oven
- Lower the oven temperature to 425 F (220 C) and bake for 5 minutes. This part is just to brown the crust. I like to use digital instant-read thermometer and the internal temperature should be at least 200 F (93 C)
If you choose to score the dough before baking:
- Wear a mitten and carefully get the Dutch oven pot and its lid out from the oven and place one baking sheet on the lowest rack and quickly but carefully close the oven's door back to prevent too much heat loss. This helps to prevent the bottom crust of your bread from being too thick and tough
- Use a bread lame and make a slash, about 1/2-inch deep at 45 degree angles on the dough, kinda off-center a bit. Mist the dough with water. This creates nice crackling all around the crust later
- Update: Bake at 450 F (230 C) for 45 minutes.
- I like to use digital instant-read thermometer and the internal temperature should be at least 200 F (93 C)
Cooling down:
- Get the bread out of the oven and transfer it to a cooling rack immediately and now comes the hardest part! You need to wait for at least 3-4 hours or longer before you slice it. If you slice into warm bread, you will end up with gummy crumbs
Store:
- Once the bread has cooled down completely, you can store it in a bread box if you plan to consume it in the next few days. You can also put it inside a paper bag
- For longer storage, you can wrap the whole loaf or sliced bread in plastic wrap and then put inside a freezer bag. Push all the air out and seal. It can be kept frozen for 1-2 months. Simply thaw at room temperature before serving and then reheat them in toaster or air-fryer. Most toasters these days can toast frozen sliced bread. So you may not even need to thaw it completely