This post may contain affiliate links. Please read our disclosure policy.
Soft and fluffy milk bread loaf naturally leavened with sourdough starter and flavored with aromatic pandan leaves. The bread stays soft for days and has a nice complex flavor, a characteristic of sourdough bread.

This beginner sourdough pandan milk bread was one of the few that I baked when I first learning how to bake with natural yeast. It’s a pretty straightforward recipe using the aid of a stand mixer to knead the dough until it is smooth and flexible. The recipe also use a liquid starter (which is another term for a 100% hydration sourdough starter you regularly maintain). The whole process pretty much mimics how you would bake bread using commercial yeast. It’s just take natural wild yeast much longer to ferment the dough. That’s all! But, I like the complex flavor of sourdough bread. I have learned to enjoy the slight tang of sourdough.
What to expect
1. Longer fermentation
This is an enriched dough, meaning there are fat and sugar added. These two will naturally slow down fermentation. We are using a liquid starter here and so naturally also takes longer compared to the dough without any fat and sugar added. Any 100% hydration starter is usually also referred to as a regular starter (100% hydration)
2. Consider adding commercial yeast if your starter is less than one-month old
I have tried baked this bread when my starter was only 2-week old without adding any commercial yeast and it took 5 hours for first fermentation and 8 hours for final proofing. Just so you know what to expect
3. Sour taste
Sourdough starter imparts a sour taste to the final product. The longer fermentation takes, the more sour the result would be too. Young starter also gives more sour taste. But don’t worry that the sourness is not to the point where you would find it unbearable, at least not to me. It’s all about preference too. Some don’t mind a stronger sour taste, some prefer not to be too sour
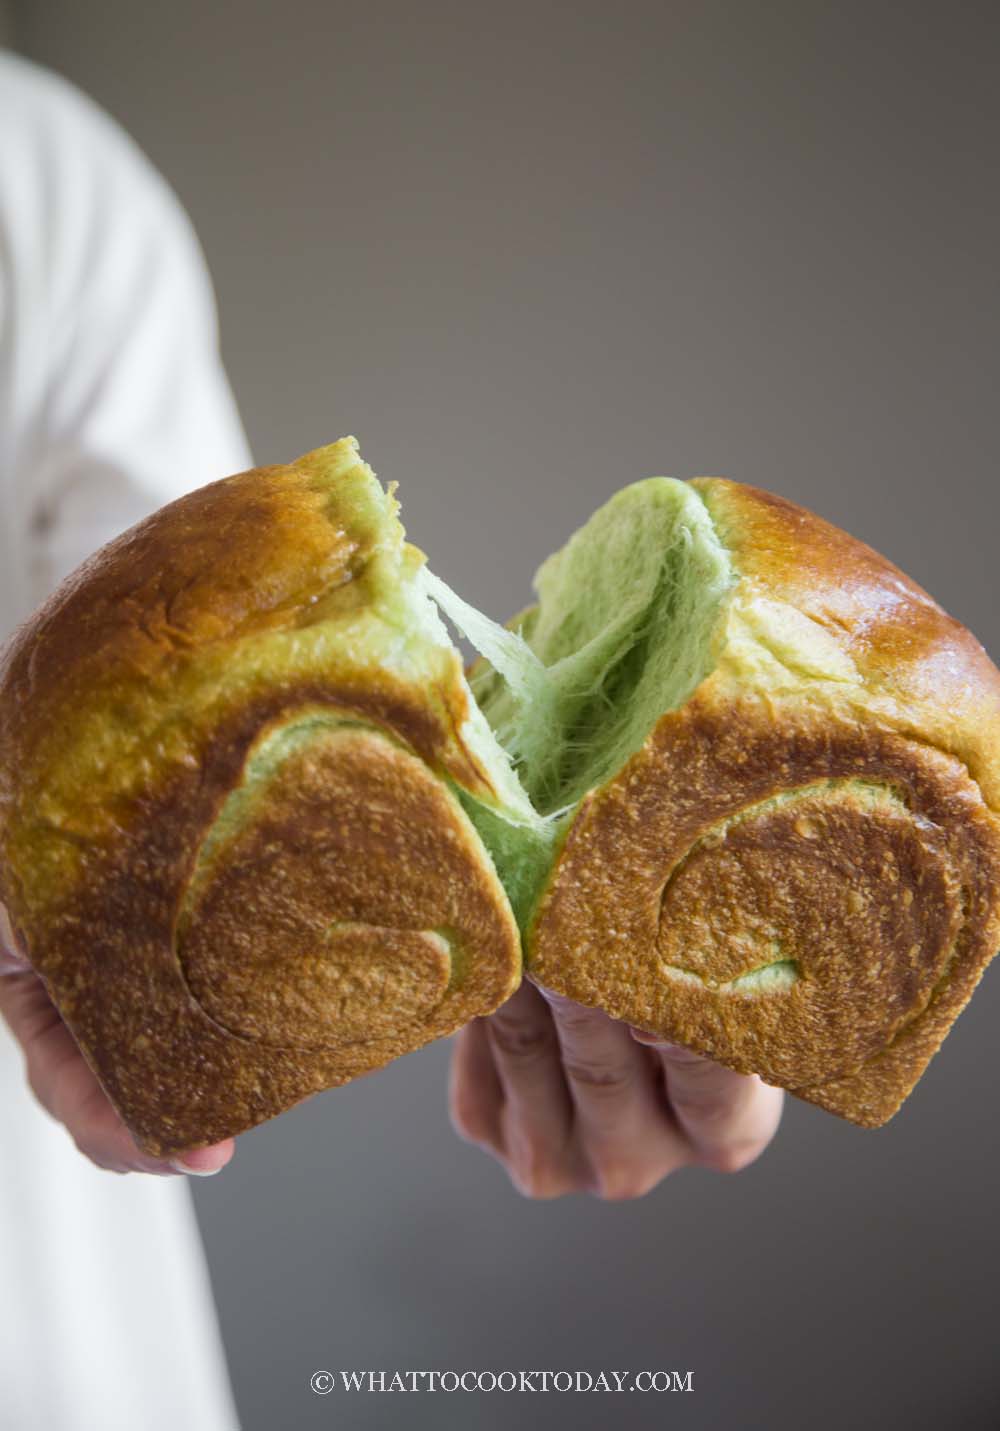
Easy Beginner Sourdough Milk Bread Loaf
Ingredients
For the dough:
- 120 gr active starter (100% hydration)
- 25 gr egg about 1/2 egg
- 110 gr whole milk plus more as needed
- 1 Tbsp pandan concentrate or use store-bought 1 tsp pandan essence
- 45 gr sugar
- 250 gr bread flour (12.7% protein content)
- ½ tsp salt
- 25 gr softened butter plus more to brush on the bread
If your starter is less than one month old: (optional)
- 2 gr active dry yeast optional
For egg wash:
- ½ egg
- ½ tsp water
Instructions
- This recipe yields a small loaf. It's a good practice if you just want to test out making enriched sourdough bread. If you want a larger loaf, you can 1.2 x the recipe
Build levain the night before:
- I recommend using active starter that is at least 1-month old to bake this recipe for the best result. If your starter is less than 1-month old, you might want to consider adding commercial yeast to help with the job. This is an enriched dough and it takes much longer to ferment because of the fat and sugar added in the dough
- I use 1:6:6 ratio so the levain will be ready for me the next morning to use at its peak. It takes about 10 hours at 73-75 F to double/triple. Mix 10 grams active starter with 60 grams of flour mix + 60 grams of water. I build a bit extra to account for the loss during transferring etc. Stir until no dry bits left. Loosely cover with a lid
Make the dough:
- In a bowl of a stand mixer fitted with a dough hook attachment, add 120 grams starter and feed your starter following your routine as usual. Add milk, egg, sugar, pandan concentrate and then add the flour and salt to the mixing bowl
- Knead on the lowest speed to incorporate the ingredients for about 3 minutes and then increase speed to 2 (on KA) and continue to knead for about 5 minutes. Add the softened butter, pat by pat until absorbed and then increase speed to 4 and continue to knead for 8-10 minutes or until you reach a window pane. When you gently and slowly stretch the dough thin, it won't break easily. The dough will be smooth and elastic
Bulk fermentation:
- Place the dough in a lightly oiled bowl. Cover and let it proof at a warm place, between 77-82 F (25-28 C). I don't recommend temperature higher than this. If it's cold where you are, you can put it in the oven with a light on and the door slightly ajar to maintain the temperature at around 80-82 F (27-28 C)
- Let it proof for about 2-3 hours or until almost double in size. Sourdough starter is highly dependent on temperature. Lower temperature takes longer to ferment. And of course, the strength of your starter matters too. The younger your starter, the longer it takes to ferment too. If you do not add any commercial yeast and your starter is very young, it may take 5 hours or longer to double
- When you poke your finger into the dough, the indentation stays, the dough is done with first fermentation
Shaping:
- I use a small and tall loaf tin that measures 7 1/2 x 4 1/2 x 4 1/2 inches. You can also use 8 1/2 x 4 1/2 x 2 1/2 inch loaf pan (or more commonly just refer to as 8 x 4 inch loaf pan, which is a standard-size loaf pan)
- Punch down the dough and divide into two equal by-weight doughs. Round them up into dough balls, cover and let them rest for 15 minutes
- Take one dough and roll it out into and oval, fold the two sides in and then roll tightly into a pillow shape. Repeat with the other dough.
If you choose NOT to bake on the same day (recommended if your starter is young and no commercial yeast added):
- Arrange the dough in an oiled loaf pan. If you can't bake on the same day, simply put the shaped dough into the fridge. Make sure to cover it tightly to prevent the dough from drying out and let it sit until the next day when you are ready to bake it. You can keep it in the fridge for max about 48 hours, no longer than that. Please note that the long cold retard in the fridge also produces a more sour bread because the bacteria thrive in a cold environment. I personally like the extra tang. So, keep this in mind.
- When you are ready to bake, take the dough out from the fridge and let it proof at room temperature. This may take 4-6 hours (or 8-10 hours for young starter) because the dough needs to come to room temperature and then need to final proof until it reaches about 90% of the height of the pan
If you choose to bake on the same day, proceed to final proofing:
- Arrange the dough in an oiled loaf pan. Cover the pan and let the dough rise again until about 90% of the height of the pan. This may take somewhere 3-4 hours at 78-82 F (26-28 C) for a very active starter. Expect much longer if your starter is young, it may take 8-10 hours
How to know if the dough is done proofing:
- Test the dough if it has been sufficiently proofed or not. Lightly flour your finger and gently poke into the dough. If it bounces back very gradually, leaving a bit of indentation, the dough is done proofing. If it bounces back almost immediately, proof another 15 minutes and test again. If it never bounces back, you have overproofed and there's nothing you can do at this point other than to bake them immediately and the result will be heavy and dense bread
Baking:
- 15 minutes before the end of final proofing, preheat oven to 375 F (190 C) for conventional oven and lower the temperature by about 20 degrees if you use convection oven
- Brush the surface of the dough with the egg wash and place the pan in the middle rack and bake for 25-30 minutes or until golden brown or internal temperature is at least 190 F. For larger loaf, about 35-40 minutes or until golden brown on top. If the bread brown too quickly, loosely tent with aluminum foil, shiny side facing out
Cooling:
- When the bread is done breaking, remove from the oven and remove from the loaf pan to a cooling rack. Brush with some melted butter on top for a softer crust if you like. Let it cool down completely before slicing
RECOMMEDED TOOLS
*Nutrition facts are just estimates and calculated using online tools*
Sample of baking timeline if you bake on the same day
The night before – prepare a starter that will peak right at the time you are going to use it for baking. The temperature was maintained at 75-77 F (24-25 C)
8:00 am– Combine all ingredients in a mixing bowl using a stand mixer. Knead dough until window pane
8:25 am– Cover and let the dough start its bulk fermentation (may take 3-4 hours)
11:30 am– Punch down the dough and divide it into two doughs. Rest for 15 minutes
11:45 am– Shape the dough and put in an oiled loaf pan and let it begin the final proofing (may take another 3-4 hours)
4:15 pm– Preheat oven to 375 F (190 C)
4:30 pm – Brush the dough with an egg wash and bake
5:10 pm – Remove dough from the oven and loaf pan, brush with butter and cool down on the rack completely before slicing
Sample of baking timeline if you bake the next day
Sometimes I feel like it is less stressful to divide sourdough baking into two days. Fermentation takes longer with natural wild yeast compared to using commercial yeast. So, don’t be shocked to discover that it takes so long to proof the dough.
The night before – prepare a starter that will peak right at the time you are going to use it for baking. The temperature was maintained at 75-77 F (24-25 C)
8:00 am– Combine all ingredients in a mixing bowl using a stand mixer. Knead dough until window pane
8:25 am– Cover and let the dough start its bulk fermentation (may take 3-4 hours)
11:30 am– Punch down the dough and divide it into three doughs. Rest for 15 minutes
11:45 am– Shape the dough and put it in an oiled loaf pan, cover tightly, and put in the fridge
8:00 am the next day– Bring the dough out from the fridge to let it start final proofing, this may take 4-6 hours or longer since the dough is cold
2:00 pm– Preheat oven to 375 F (190 C)
2:15 pm – Brush the dough with an egg wash and bake
2:55 pm – Remove dough from the oven and loaf pan, brush with butter and cool down on the rack completely before slicing
How to bake sourdough pandan milk bread loaf
1. In a bowl of a stand mixer fitted with a dough hook attachment, add 120 grams of starter and feed your starter following your routine as usual. Add milk, egg, sugar, pandan concentrate and then add the flour and salt to the mixing bowl. Knead on the lowest speed to incorporate the ingredients for about 3 minutes and then increase speed to 2 (on KA) and continue to knead for about 5 minutes. Add the softened butter, pat by pat until absorbed and then increase speed to 4 and continue to knead for 8-10 minutes or until the dough is soft and elastic. The dough should reach a window pane stage. When you gently and slowly stretch the dough thin, it won’t break easily. The dough will be smooth and elastic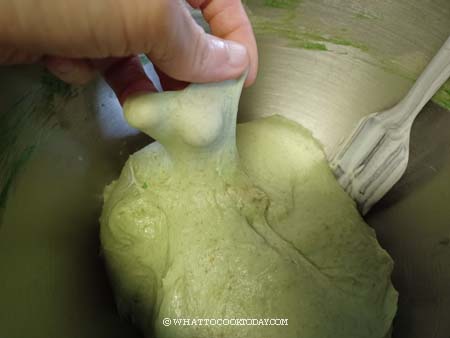
2. Place the dough in a lightly oiled bowl. Cover and let it proof at a warm place, between 77-82 F (25-28 C). I don’t recommend a temperature higher than this. If it’s cold where you are, you can put it in the oven with a light on and the door slightly ajar to maintain the temperature at around 80-82 F (27-28 C)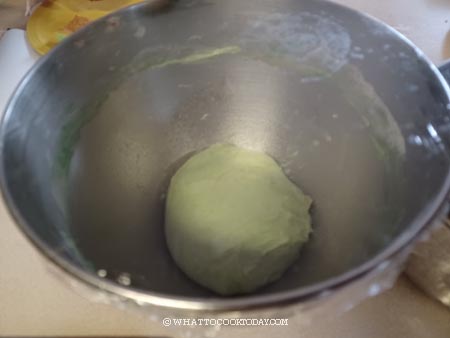
3. Let it proof for about 2-3 hours or until about or almost double in size. Sourdough starter is highly dependent on temperature. Lower temperature takes longer to ferment. And of course, the strength of your starter matters too. The younger your starter, the longer it takes to ferment too. When you poke your finger into the dough, the indentation stays, the dough is done with first fermentation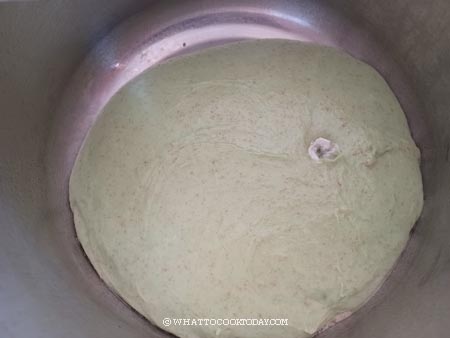
4. Punch down the dough and divide into two equal by-weight doughs. Round them up into dough balls, cover and let them rest for 15 minutes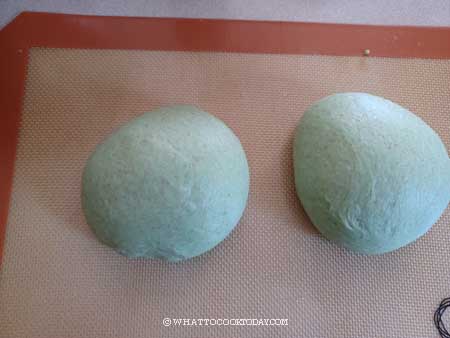
5. Take one dough and roll it out into and oval, fold the two sides in and then roll tightly into a pillow shape. Repeat with another two doughs.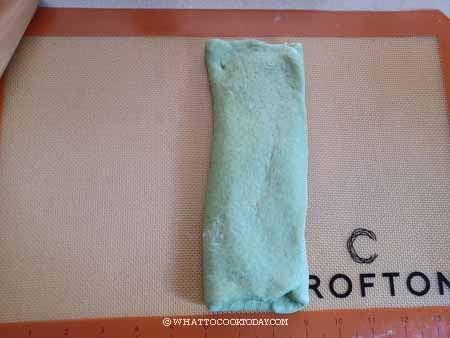
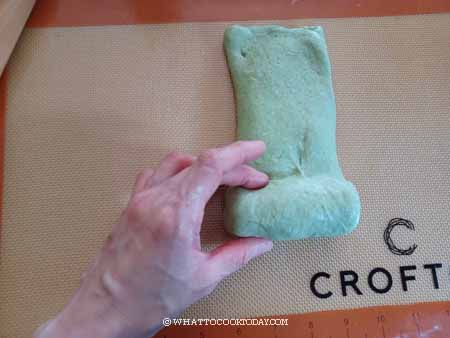
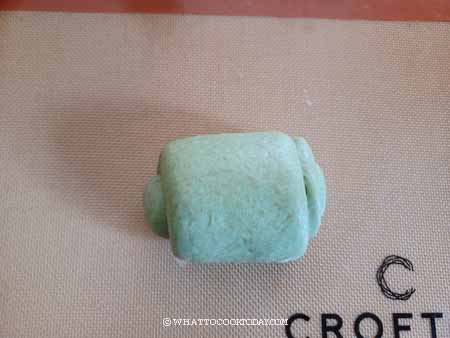
6. Arrange the dough in an oiled loaf pan. Cover the pan and let the dough rise again until about 90% in volume. This may take somewhere 3-4 hours at 78-82 F (26-28 C)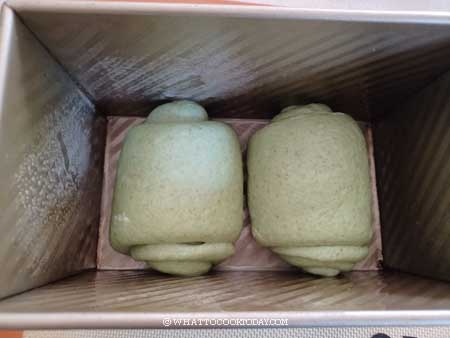
7. Test the dough if it has been sufficiently proofed or not. Lightly flour your finger and gently poke into the dough. If it bounces back very gradually, leaving a bit of indentation, the dough is done proofing. If it bounces back almost immediately, proof another 15 minutes and test again. If it never bounces back, you have overproofed and there’s nothing you can do at this point other than to bake them immediately and the result will be heavy and dense bread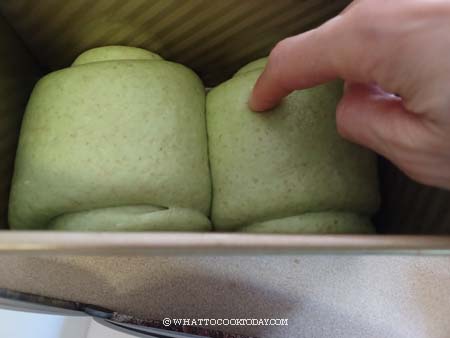
8. 15 minutes before the end of final proofing, preheat oven to 375 F (190 C) for conventional oven and lower the temperature by about 20 degrees if you use convection oven
Brush the surface of the dough with the egg wash and place the pan in the middle rack and back for 35-40 minutes or until golden brown on top. If the bread brown too quickly, loosely tent with aluminum foil, shiny side facing out
9. When the bread is done breaking, remove from the oven and remove from the loaf pan to a cooling rack. Brush with some melted butter on top for a softer crust if you like. Let it cool down completely before slicing

I was so tempted to tear the bread layer by layer and stuff it into my mouth and finished that whole loaf right then and there LOL! but I didn’t! Instead, I asked my husband to help me pose and slowly tore the bread while I was drooling on the other side trying to focus hard to take at least one decent photo!!
Did you make this beginner sourdough pandan milk bread recipe?
I love it when you guys snap a photo and tag to show me what you’ve made 🙂 Simply tag me @WhatToCookToday #WhatToCookToday on Instagram and I’ll be sure to stop by and take a peek for real!


2 comments
Turned out soft and fluffy, thank you for the recipe!
I’m glad the recipe turned out great for you 🙂