This post may contain affiliate links. Please read our disclosure policy.
The easiest Chinese crispy pork belly recipe that gives you those beautiful cracklings. Truly a no-fuss recipe. Never fails to give you those nice crispy cracklings EVERY TIME! You can use an oven or air fryer to cook.
CANTONESE CRISPY PORK BELLY
Another thing I wanted to check off the to-cook-list. And finally, I got to check it off. I’ve done this roast pork belly with cracklings for handful of times and failed that many times too !! The most desirable thing to me (and many others) when it comes to roasted pork belly is the cracklings. I had never been able to create those crispy cracklings on the skin. I’ve tried many methods. Poking the skin and then dehydrate the skin overnight. Didn’t turn out good. Then I tried scoring the skin with a knife and then dehydrate the skin overnight. Still the same result. I even use a hairdryer to blow-dry the skin because I thought it wasn’t dry enough!!!! I was a little bit devastated. Read on to see why this recipe will be your go-to after you are done reading!
OVEN VS AIR FRYER FOR COOKING ROAST PORK BELLY
There are pros and cons to using either the oven or an air fryer to cook siu yuk.
Oven method
Pros for using an oven: less mess
Cons for using an oven: when using the broiler function (top heat) to crackle the pork belly skin, some parts may get darker than the others, creating an uneven color.
Air-fryer method
Pros for using an air fryer: the skin crackles very evenly without any burn spots
Cons for using an air fryer: the salt that you pour on top of the skin will fly all over inside the air fryer at the beginning of cooking. You will hear the salt grains whirling inside, but will die down after a while as the salt forms crust. Don’t be panic. The mess is contained inside the air fryer. You will see salt all over at the bottom of the air fryer. It’s not too bad.
INGREDIENTS FOR CRISPY CHINESE ROAST PORK BELLY
1. PORK BELLY
You need a slab of pork belly, at least about 5-6 inches in width and choose the one with nice layers of fat
2. COOKING WINE
I use Shaoxing wine, but you can use dry sherry or other cooking wine of your choice if you want
3. CHINESE FIVE-SPICE POWDER
This aromatic Chinese five-spice powder is often used with pork and it adds a nice flavor to it
4. BROWN SUGAR
This dish isn’t meant to be sweet, but a bit of sugar sure brings out the flavor
5. SALT
We don’t need a whole lot of salt in the marinade, but it helps to enhance the flavor. You do need A LOT of salt later to pour on top of the skin before baking though, like LOTS OF IT!
6. COOKING OIL: We just need a bit of oil to brush on top of the skin before broiling so that the skin will crackle nicely
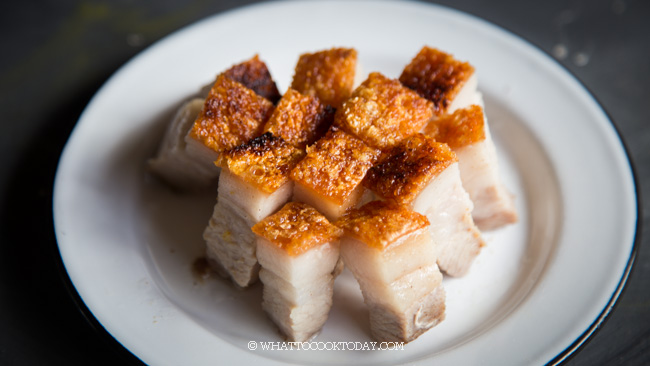
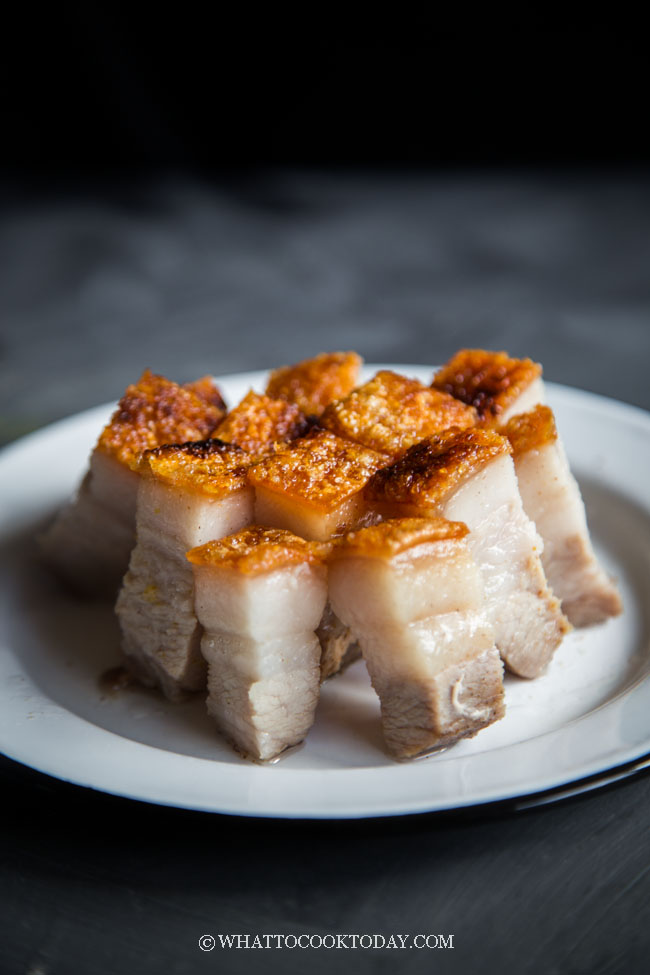
The Easiest Crispy Roast Pork Belly (Siu Yuk / Sio Bak) – Salt Crust Method
Ingredients
- 1.5 kg pork belly with skin still attached
- Cooking oil for brushing
Type of salt to use (choose either one):
- Fine salt for cooking (not table salt)
- Rock salt / Coarse salt (recommended). See notes 3
Marinade:
- 2 Tbsp shao xing wine/dry sherry
- 1 tsp Chinese five-spice powder
- 1 Tbsp brown sugar
- ½ tsp Salt
You will also need:
- Aluminum foil (heavy duty)
- Apple cider vinegar or regular white vinegar
Instructions
Choosing the pork:
- Try to get pork belly with smooth and even skin as much as possible. The one without much wrinkles and folds. Those areas tend to have not much crackle because they dip down and don't get much exposure to the heat, which is the key to get the good cracklings
To prepare the day before:
- If you plan to use an air fryer, you may need to choose a smaller size pork belly so it fits into your air fryer
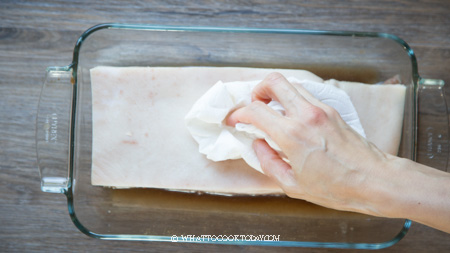
- Mix the wine, brown sugar, five-spice powder (if using) and salt in a small bowl. Place the pork belly in a container and gently pour in the marinade and use your hand to kinda rub the marinade into the meat and leave the skin out. Once you are done, pat the skin dry and put it in the refrigerator without cover for at least 8-12 hours. The drier the skin, the better the cracklings are going to be
When ready to roast the pork:
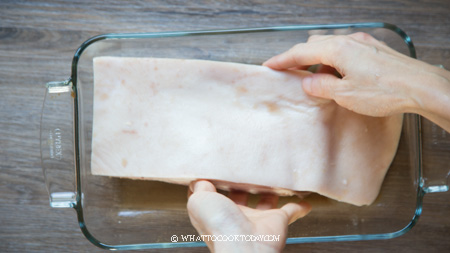
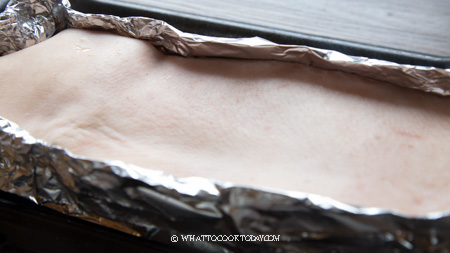
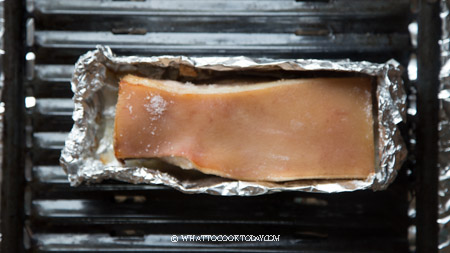
- When ready to be roasted, preheat your oven to 350 F (180 C). Line your baking sheet with heavy-duty aluminum foil. Place another one to two layers of heavy-duty aluminum foil on top . Transfer the pork belly to the aluminum foil and fold all the sides up, leaving about 1/2-inch on top
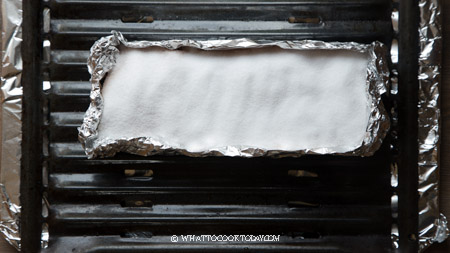
- Brush a thin layer of apple cider vinegar on the skin. Very gently pour the salt on top of the skin to form about 1/4-inch of salt layer, if using fine salt. Use your hands to keep the aluminum foil as close to the pork as much as possible while pouring the salt to minimize any gap to prevent salt dripping through the gap too much (that will make the pork very salty especially if you use fine salt). I highly recommend using rock salt for this reason, especially if you are going to cook with an air-fryer, less messy
- If you use rock salt, cover the surface of the skin evenly, leaving no gap
To cook in the oven:
- Pop it into the oven, 3rd rack from the top (middle of the oven) and let it roast for the next 1 hour and 30 minutes
- After 1 hour and 30 minutes, remove from the oven. If you used fine salt, the salt will form a crust. Gently remove the crust of salt off the skin. If you use rock salt, they crusted but won't form sheet of crust. Use a knife to gently scrape the rock salt off from the top and the sides if any
- Change to a new aluminum foil and brush off the salt from the side and underneath the meat with some vinegar or apple cider vinegar. Wrap it back up as you did before. Brush the skin with some cooking oil evenly. Carefully fold the aluminum foil down to expose the skin this time while covering the meat part to retain moisture
Level the surface of the meat if necessary:
- The pork shrinks after cooking and the surface may become uneven. If this is the case, you can ball up some aluminum foil and tuck under the meat to prop any area that dip down so the surface is level and gets even heat distribution. If it doesn't get expose much to the heat, it won't crackle and you will just get area with no crackles and those areas are rubbery and tough
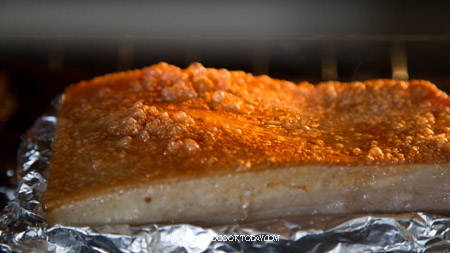
- Place the pork belly at the lowest rack or start with 2nd lowest rack of the oven and turn the broiler to a low setting (this is about 450 F or the highest heat your oven can get to if you don't have broiler function). This is the part when the cracklings start to form. Watch it carefully, as you don't want them to burn. Some spots may get burn quicker than the others, I use aluminum foil to cover the part that has crackled and started to get burn or you can move it down further from the fire. Let it broils until you are happy with the cracklings, may take 10-15 minutes or longer. Remove from the oven and let it sit for at least 10 minutes before slicing
If cooking with an air fryer:
- Remove the basket from the air fryer if you need to so the pork belly can fit into the air fryer. Preheat the air fryer at 375 F (190 C) for 5 minutes. If you don't need to, then just leave the basket in there. Put a metal trivet inside and put the pork belly on top. Close the air fryer and let the pork belly cook for the next 40 minutes or until it's cooked through
- WARNING: If you use fine salt, the salt will fly all over inside the air fryer at the beginning, but will settle down as the time goes and the salt forms crust. This is the part I don't like about cooking it in the air fryer, but the mess is not as bad as I thought
- After 40 minutes, carefully remove the pork belly from the air fryer and gently remove the salt crust. If too much salt has fallen through the cracks on the side during cooking, change to a new aluminum foil. Brush off any excess salt on the skin and at the bottom of the pork belly. Brush with some vinegar to minimize of the saltiness. Wrap it back up as you did with an aluminum foil
- Fold the aluminum foil down to expose the skin. Brush the skin with some oil. Put it back on top of the trivet inside the air fryer and let the skin crackles at 375 F (190C) for 15-20 minutes or until you are happy with the crackles
To serve:
- Carefully unfold the aluminum foil down and remove the pork onto a chopping board. Discard the extra oil collected in the foil during baking. You can use apple cider vinegar to brush the sides of the pork belly to get rid of any excess salt that might get in the gap when you pour the salt earlier
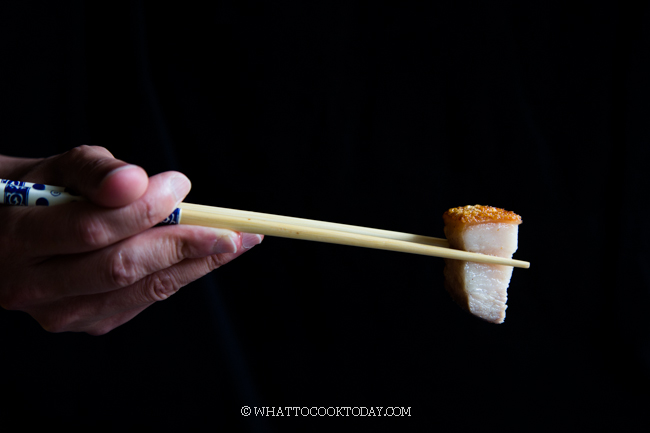
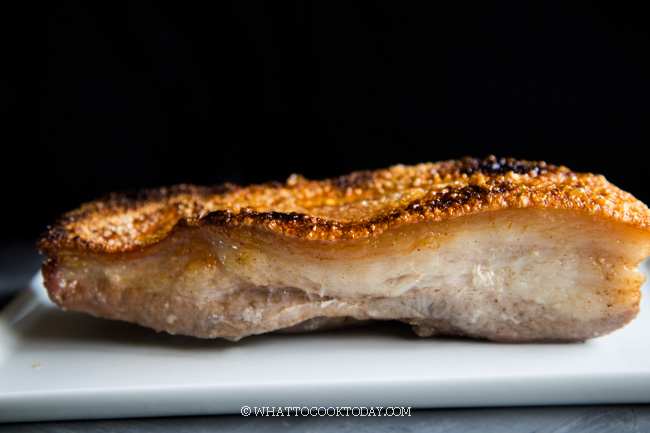
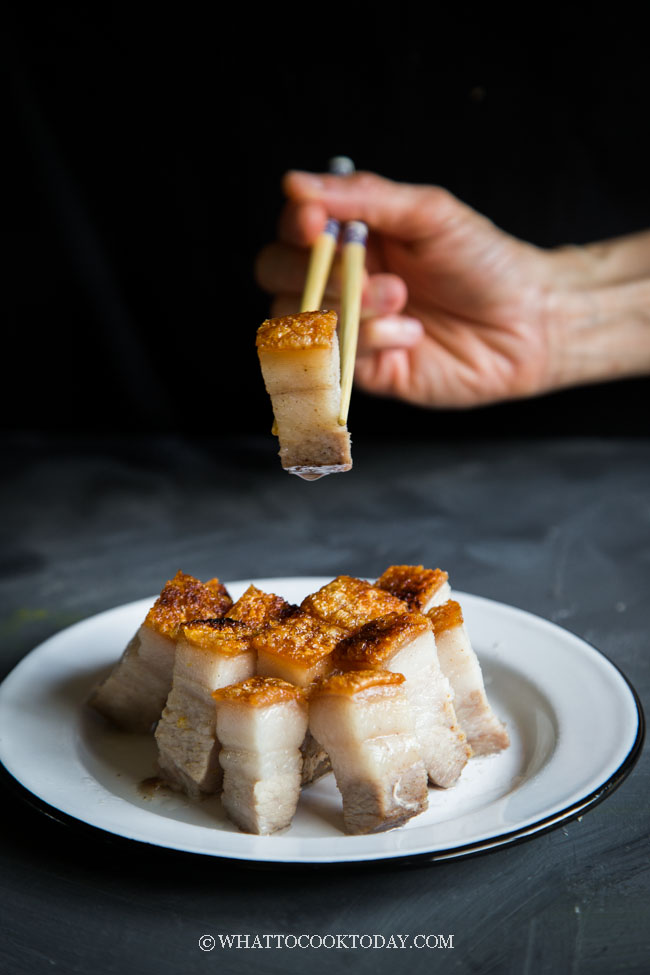
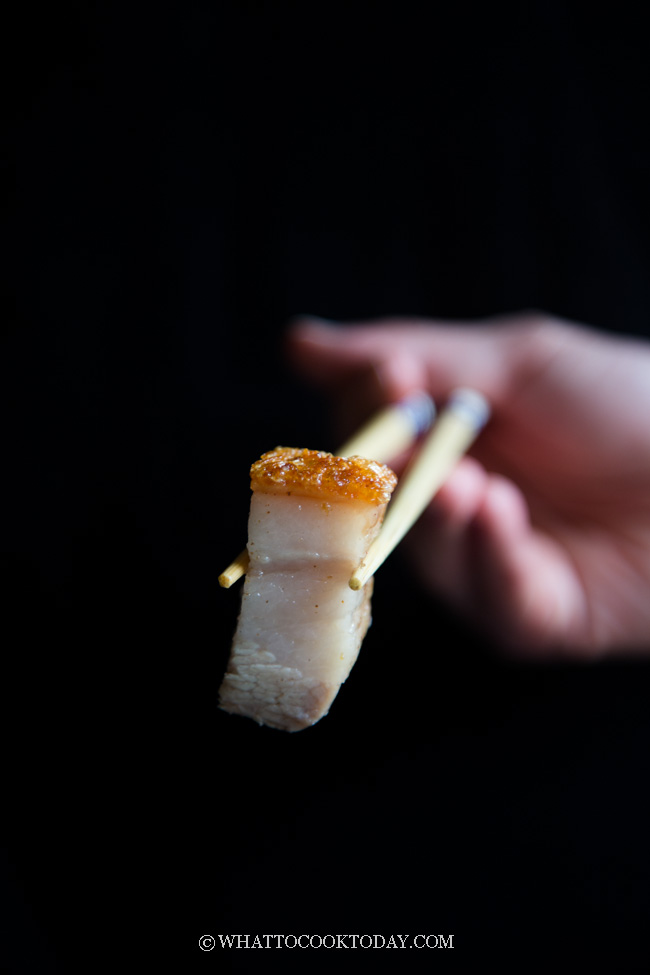
- When ready to slice them, I found it easier to turn the skin side down on the chopping board and slice while applying gentle pressure on the knife to break off the pieces. Serve with your favorite chili sauce or on its own
RECOMMEDED TOOLS


Marv’s Recipe Notes
- Choose pork belly with smooth skin (not many wrinkles).
- Really dry out the skin by placing it in the refrigerator. The drier the skin, the better the cracklings
- Rock salt or coarse salt used for grinder has larger grains and so if it falls through the gap on the side during baking, it won’t melt easily making the meat too salty VS when you use fine salt
- Evenly salt the surface of the skin. The salt will dehydrate the skin further
- The pork will shrink after roasting. Prop any areas that have dipped down by balling up some aluminum foil and tuck under the meat to level the surface so they get exposed to the heat evenly. No heat, no crackling top. You will end up with a rubbery flat surface on those areas
- Cover up areas that have started to darken and continue to broil the areas that haven’t gotten much cracklings yet
*Nutrition facts are just estimates and calculated using online tools*
WHY THIS SIU YUK RECIPE GIVES YOU CRISPY CRACKLINGS WITHOUT MUCH FUSS
Seriously, what’s so difficult about this crackling thing!! I’ve failed so many times before! It’s all in the science. The salt draws moisture out from the skin, which is important for forming crackles. I have made this siu yuk using this method at least 10 times and it hasn’t failed me so far!!!! I seriously don’t know why people are still poking, scoring, and deep-frying the pork belly when all you need to do is pour that salt on top of the skin 🙂
I didn’t even bother to poke or score the skin or blow dry it this time. I didn’t even pre-boil the meat or do other extra work I used to do. The meat underneath the skin comes out still moist and the skin crackles perfectly. FINALLY !! I almost cried with joy when I saw the crackles! Who wouldn’t !! My husband said I finally nailed it!! Yes I DID !! BOOKMARK IT if you haven’t already !!
HOW TO MAKE THE EASIEST CRISPY ROAST PORK BELLY IN THE OVEN
1. MAKE THE MARINADE: Combine cooking wine, sugar, salt, and five-spice powder in a bowl and stir to mix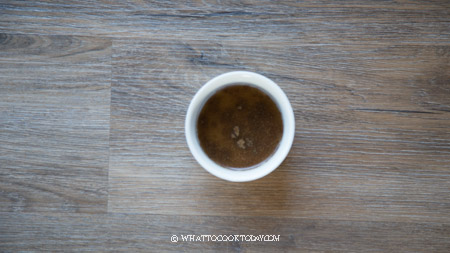
2. MARINATE THE PORK BELLY OVERNIGHT: Rub the marinade all over the pork, except for the skin. Pat the skin dry with paper towel. Refrigerate uncover and let it marinate overnight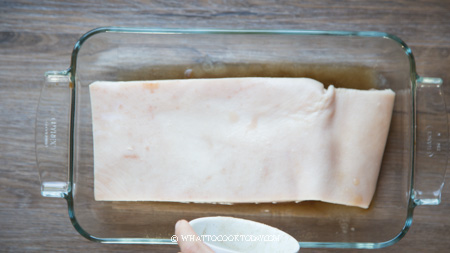
3. SET UP THE BAKING TRAY:
Line a baking sheet with aluminum foil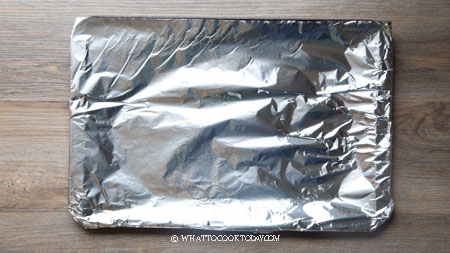
Get 2 sheets of aluminum foil, about 10×12 inch. Place the pork belly on top of the foil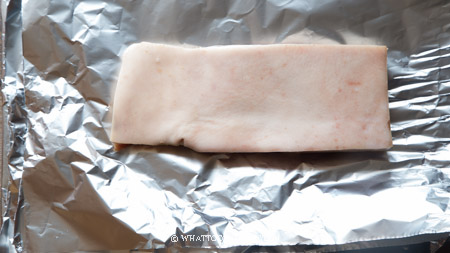
Fold all four sides up and then roll them down. Leave about 1/2-inch height from the skin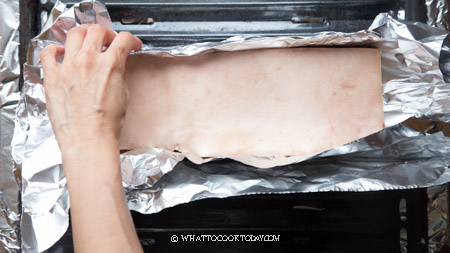
4. POUR SALT: Brush a thin layer of apple cider vinegar on the skin and then pour about 1/4-inch of salt all over the skin very carefully. Try not to get the salt to fall through the gap on the sides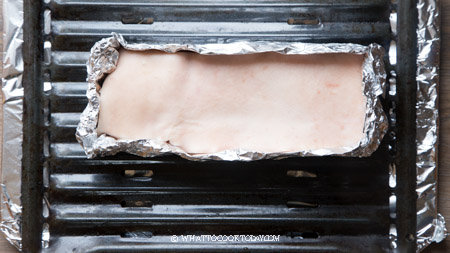
5. BAKE: Bake the pork belly at 350 F for 1 1/2 hours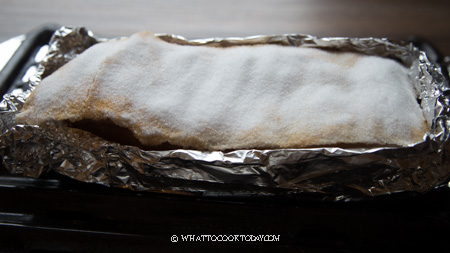
6. REMOVE THE SALT CRUST: After 1 1/2 hours, the salt will form a crust that you can gently remove and discard. Change to a new piece of aluminum foil and scrape/dust off as much salt as possible from the sides and bottom of the meat, if any.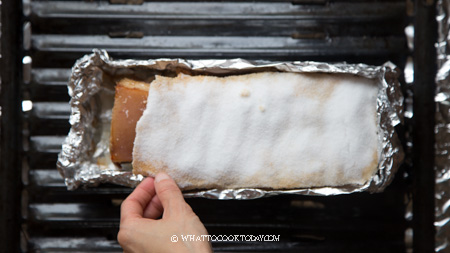
7. BRUSH WITH SOME COOKING OIL: Brush the skin with a bit of cooking oil all over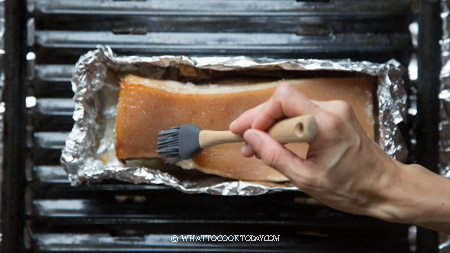

Fold the foil down to expose the skin for broiling
8. BROILING:
Broil on low until the skin crackles. Try to put the meat from 2nd lowest rack. If it gets brown too quickly before the skin crackles,move the pan further down from the fire. DO NOT WALK AWAY during this process. Some parts may get brown faster than others. You can cover those parts with foil to prevent burning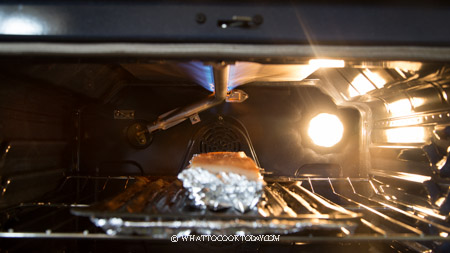
9. REST BEFORE SLICING: Once you are happy with the crackles, remove them from the oven. Rest for 10 minutes and then place the skin side down on a chopping board (easier to cut this way) and cut into the desired size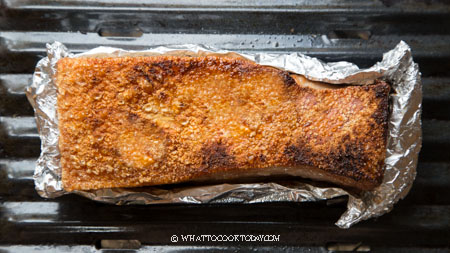
My kids never say no to this crispy siu yuk. NEVER! 🙂 and I’m happy to make them now because it’s truly no fuss and easy recipe!
WHAT TO SERVE WITH SIU YUK
They are usually eaten with rice as part of a multi-course meal in a Chinese family (at least my family). You can serve them with noodles too if you like. They can be used in other recipes like : kua chai pui, crispy roast pork black garlic rice
HOW TO STORE LEFTOVER AND REHEAT ROAST PORK BELLY
Refrigerator: Wrap them up in a foil and they can be refrigerated for up to one week.
Freezer: You can freeze the cooked roast pork for up to one month. Thaw before reheating
HOW TO CRISP UP ROAST PORK WITH CRACKLINGS
Preheat oven or air fryer to 375 F. Cover the meat part with foil, exposing the crackling top and reheat until the crackling part is crispy, about 10 minutes or until it’s crispy again
DID YOU MAKE THIS EASIEST CRISPY ROAST PORK BELLY RECIPE?
I love it when you guys snap a photo and tag to show me what you’ve made 🙂 Simply tag me @WhatToCookToday #WhatToCookToday on Instagram and I’ll be sure to stop by and take a peek for real!

65 comments
I’m trying this soon! Just curious if the pork remains in the foil (with the sides folded down a little) during the broiler step. Thanks!
Hi Nancy, yes, the foil stays during the broiler step, with the sides folded down 🙂 Good luck and please let me know how it turns out for you when you have a chance!
I have been meaning to come and leave you a note for almost ten days now. I roasted four pounds of pork belly using your method described here and OMG, it really works!! My husband couldn’t compliment me enough. It was perfectly roasted and the crackings….the cracklings were the best ever! I love the shaoxing wine marinade too. So now we have bought more pork belly and I am thinking we will be eating it much more often now that I learned from you how to get it to be perfect!!! Thank you so much.
OHHH…I’m so happy to hear that the method works for you too! I just made it again last week! My kids couldn’t get enough of it! Thank you for trying and for giving me the feedback 🙂
Hi! My boyfriend is Cantonese and he LOVES roast pork. (He actually gets up early on Sat to go to the local grocery store so he can buy the roast pork while it is still warm…) We have tried making roast pork at home including trying to poke holes in the skin. All we managed to achieve was skin so tough that we physically couldn’t eat it and setting off the smoke alarm in our apartment.
We tried your recipe this weekend on a small piece of pork belly and it worked like a dream!!! At first I couldn’t figure out what your picture was showing about the salt, but as the pork cooked, the salt formed into a sheet exactly like your picture! David loved the texture of the skin. We plan on getting a larger piece next weekend to make a full batch! Thank you for posting this recipe!
Ohh Merry!!! I’m so happy it works for you!! You know..I’ve poked the skin before, scored it..or whatever else you could imagine !! but like you said, it’s so tough ,it could break some teeth!!!! This method is just so easy and nobody needs to be breaking no teeth and only delicious cracklings 🙂 Thank you so much again for letting me know. That makes my day!!!!! At least I know it’s not only me bragging about it ha.ha…
I am drooling now. I will definitely try that salting technique for sure.
Yes…try it out. It works like magic!!!
Looks delicious Marvellina, good for you for giving this dish another try. Who would of known salt would do the trick. Have a great week-end!