This post may contain affiliate links. Please read our disclosure policy.
Learn how to make this absolutely delicious and easy no-knead sourdough cinnamon raisin swirl bread baked in a loaf pan. It’s perfect for sourdough bakers of any level.

There’s nothing quite like the aroma of freshly baked bread wafting through your home, especially when it’s a delightful combination of sweet and tangy flavors. Sourdough cinnamon raisin swirl bread is a culinary masterpiece that marries the rich, tangy notes of sourdough with the comforting warmth of cinnamon and the sweet burst of raisins.
Why you’ll like this recipe
1. It’s easy and not fussy
This recipe requires no kneading by machine or manually! You just need to add all ingredients together and do a few series of stretch and folds
2. Dough is easy to handle
The dough is about 63% hydration, which makes it easy to handle
3. The timing is flexible
You can bake it on the same day or cold ferment it (which I recommended) for a deeper flavor
4. Soft and fluffy crumbs
The dough only has about 2.8% of oil, but still yields very soft and fluffy crumbs
5. Amazing flavor
I like the complexity of the flavor that sourdough delivers. This loaf is mildly flavored and not sour at all if you are concerned about that since the bread goes through cold fermentation in the fridge. My two kids who don’t like overly sour sourdough bread think this cinnamon raisin swirl loaf is awesome.
6. Sourdough in a loaf pan
Most people own a basic bread loaf pan. Not everyone has a Dutch oven or cast-iron bread pan. You don’t need the latter with this recipe
Ingredients and substitutions
1. Active sourdough starter
A mature sourdough starter is the heart and soul of this bread, providing that distinctive tangy flavor and rise. I strongly encourage you to have an active starter that is at least one month old before you attempt to bake this recipe. You want to use a starter that has just been fed
2. Bread flour
I usually use King Arthur’s bread flour, which has about 12.7% protein content
3. Honey
The recipe is sweetened with about 6% of honey. You can omit if you want to or use agave nectar for a vegan version
4. Oil
The recipe also includes 2.8% of oil, which is pretty minimal. I use avocado oil. You can use any oil of your choice
5. Salt
I use fine sea salt. You can use any table salt or any salt of your choice
6. Raisins
I use dark raisins, but you can use combinations of golden and dark raisins. I have tried it with prunes too and it’s equally delicious (unless you don’t like prunes lol)
7. Cinnamon
I use ground Ceylon cinnamon. You can use any of your favorite ground cinnamon
8. Light brown sugar
You can also use coconut sugar or dark brown sugar
Overnight method vs. same-day method
I personally prefer the overnight method simply because I feel like it’s easier and I don’t have to stay at home the whole day so I can attend to the bread. I just need about 2 1/2 hours of time to make the dough and then put it in the fridge. Then bake the next day when I have the time
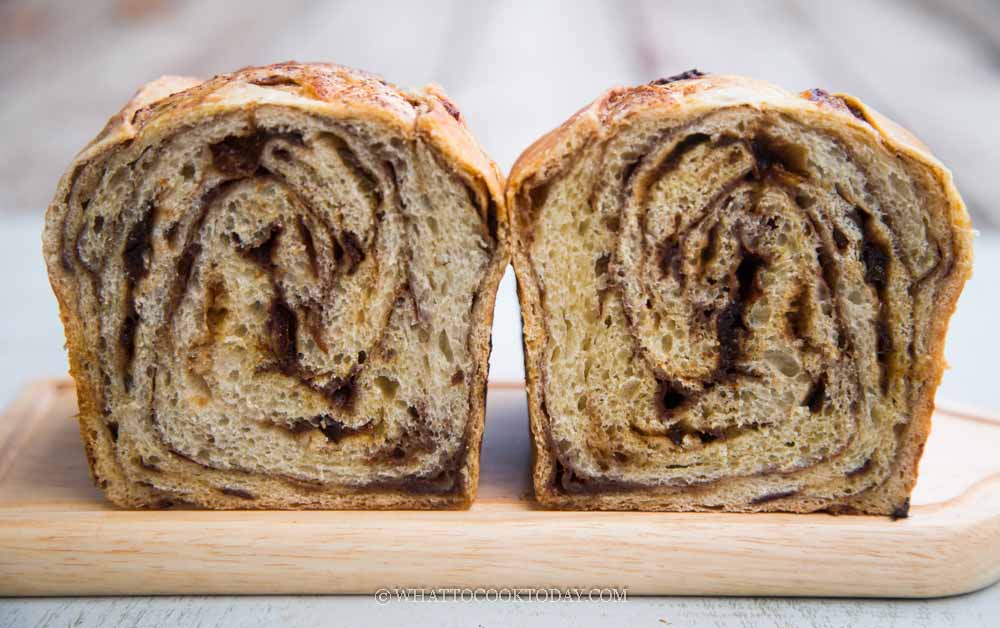
No-Knead Sourdough Cinnamon Raisin Swirl Bread (in a Loaf Pan)
Ingredients
For the dough:
- 110 g active starter (100% hydration)
- 220 g liquid from soaking raisins see notes 1, you can use water too
- 20 g honey
- 10 g oil
- 350 g bread flour (12.7% protein content)
- 7 g salt
- 100 gr raisins
For the cinnamon sugar filling:
- 14 g ground cinnamon
- 70 g light brown sugar
Instructions
- I strongly encourage you to have an active sourdough starter that is at least one month old before you attempt to bake this recipe.
- Since I know I will be baking the next day, I will prepare more starter the night before. This also depends on the strength of your starter and the room temperature the starter is at. It may be faster or longer.
- Remember that you want to use your starter at its peak, meaning it has doubled or tripled when you are ready to use it
Soak the raisins:
- Soak the raisins in some hot boiling water for at least 30 minutes. Keep the soaking liquid and gently squeeze out and excess liquid from the raisins and set aside
Fermentolyse:
- My ambient room temperature is 77-79 F. Weigh out 110 grams of starter into a mixing bowl. Combine starter, water from soaking the raisins plus more to measure out 220 grams, honey, oil, and salt and stir to combine and to loosen the starter so it mixes well.
- Add bread flour and stir to combine into a rough wet dough. The whole process probably take about 3-5 minutes. It is important that there shouldn't be any visible dry bits. If the dough feels dry add another teaspoon of water and mix again. All flour needs to be fully hydrated. Cover and let it sit for 1 hour.
Do 4 sets of stretch and fold every 30 minutes:
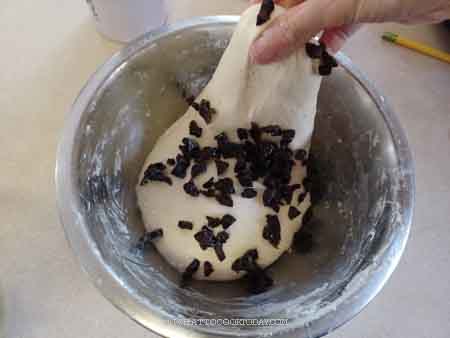
- Stretch and fold # 1: Wet your fingers lightly. Pick up the dough from one of the edge, kinda wiggle it and stretch it up and fold it over. Repeat this throughout the edge of the dough. You may end up with 4-5 stretches. Only stretch as far as the dough allows you too, don't force it. I like to flip the smooth side of the dough over. Cover the dough again and rest for 30 minutes
- Stretch and fold # 2: Wet your fingers lightly again. Scatter 1/2 of the pre-soaked raisins on top of the dough and then do the stretch and fold all around the edge of the dough again. The raisins won't be evenly distributed yet. Round up the dough and flip it to the smooth side. Cover the dough again and rest for 30 minutes
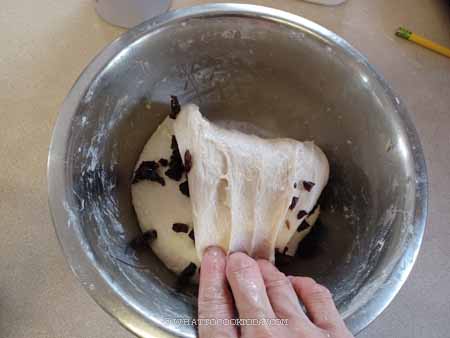
- Stretch and fold # 3: Repeat the same process as stretch and fold # 2. Scatter the remaining pre-soaked raisins on top of the dough again and do the stretch and fold. The raisins would be more evenly distributed at this point, but I won't worry about it because when we shape the dough, it will be distributed more evenly
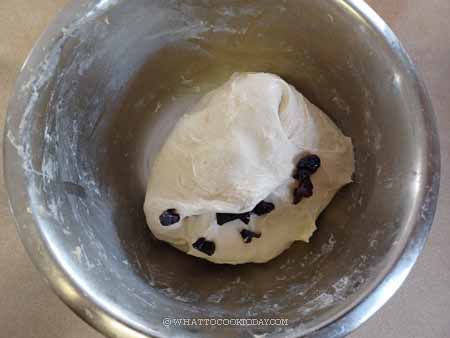
- Stretch and fold # 4: Do this last stretch and fold. You will notice that the dough is getting tighter now, which is normal as the gluten is developing.
Cold fermentation: (if not baking on the same day)
- Once you are done with the last set of stretch and fold, you can cover the bowl and put it in the fridge. I like to move it to a lightly oiled container that has tight-fitting lid. Push the dough down to fill up the container and then mark the side of the container to give me an idea where the height of the dough roughly is. So when it doubles in volume, I can easily see it. Store it in the fridge overnight or up to 24 hours. The dough will not rise much in the fridge
- The next day, remove it from the fridge and let the dough sit at room temperature for 2 hours. The dough doubles in volume after that. Proceed to the shaping step
If baking on the same day:
- Once you are done with the last set of stretch and fold, cover the bowl and let it proof until it doubles in volume. I like to move it to a lightly oiled container that has a tight-fitting lid. Push the dough down to fill up the container and then mark the side of the container to give me an idea where the height of the dough roughly is. So when it doubles in volume, I can easily see it. Proceed to the shaping step after that
Shaping:
- I use 8 1/2 x 4 1/2 inch loaf pan. You can use 9 x 5 inch loaf pan too, the bread will be a bit shorter. Oil the pan on all sides
- Mix all ingredients for the filling in a bowl. Remove the dough and place on a lightly floured countertop. Degas by gently pushing all the air out and use a rolling pin to roll it out into a rectangle, about 10 x 14 inches in size roughly. Spread 2/3 of the filling on the dough surface, leaving about 1/2-inch around the edges. From the long side of the dough, fold the top side down and the bottom side up to meet in the middle. Then sprinkle the rest 1/3 of the filling on top and then roll the dough tightly into a log shape. I seal both ends by pinching the dough to seal
Final proofing:
- Place the shaped dough into a prepared pan. Gently press the dough down to fit the pan and to even out. Cover with a plastic wrap and let it ferment again until it reaches the rim of the pan. It took mine about 2 hours at 82 F (28 C). Depending on your room temperature, it may take longer if it's cooler
Preheat oven:
- UPDATES: 30 minutes before the end of proofing, preheat the oven to 425 F (220 C) for conventional oven, 400 F (200 C) for convection oven, with a baking stone or a baking pan on a middle rack and place a cast-iron pan or pot, or a thick heat-resistant pan next to the baking stone so the steam can reach the bread easily. Pour in 2 cups of water. The water will gradually heat up as the oven is preheating. We will do a steam bake.
- Why I bake with a baking stone and do steam bake (eventhough the bread is baked in a loaf pan): If you don't want to use a baking stone/baking steel, you can skip it. The reason why I use it because for a lean dough like this, the stone/steel retains heat very well and give the bread a really good rise. The steam bake also helps to keep the dough moist so it has time to rise tall before a crust is formed.
Baking:
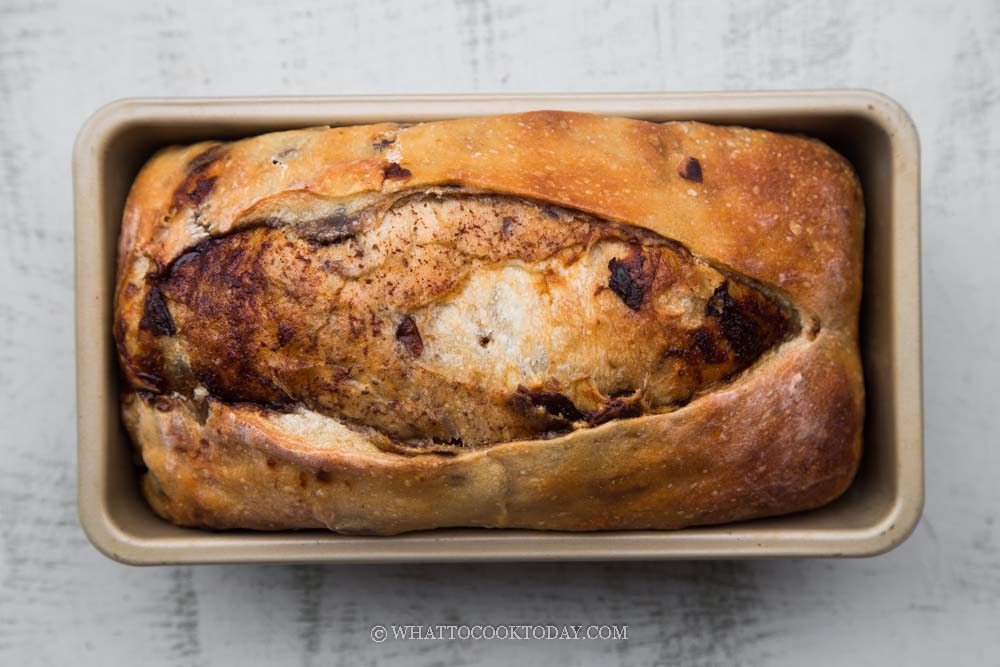
- When the oven is ready, use a bread lame or very sharp pointy knife to make a score in the middle of the loaf, about 1/2-inch deep. The bread will burst nicely following this score line. Spray the dough with some water. Put this inside the oven on top of the preheated baking stone/pan.
- Lower the temperature to 400 F (200 C) for conventional and 385 F (195 C) for convection, and bake for 15 minutes. After 15 minutes, remove the pan with water. Continue baking for the next 30 minutes (start checking at around 30 minutes) or until an instant-read thermometer inserted into the dough reads at least 200 F (93 C). If it's not done, bake another 5 minutes and check again.
Cooling:
- Remove from the oven and place it on a cooling rack. Let it stand for about 1 minute and then gently shake it out from the loaf pan and let it cool on the cooling rack completely. Do not attempt to slice into a hot or warm bread
Storing:
- Slice the bread from the middle when ready to serve and keep the two cut halves facing each other tightly and keep them in a bread bag or an air-tight container for 2-3 days. For longer storage, I recommend storing them in a freezer. Place the sliced bread in a bread bag, push all the air out and seal. Then I like to put this into a freezer bag for double protection. When ready to serve, you can thaw at room temperature or you can toast it while it's still frozen
RECOMMEDED TOOLS


Marv’s Recipe Notes
- The amount of liquid needed is also highly dependent on the humidity level, and the type of flour you use. I highly recommend sticking to using high-protein bread flour.
*Nutrition facts are just estimates and calculated using online tools*
Sample of baking timeline (overnight method)
You can adjust the start time to fit your schedule. This is just a sample of a timeline after dinner
7:00 pm– fermentolyse (mix everything and rest for 1 hour), soak raisins in hot water
8:00 pm– stretch and fold #1
8:30 pm– stretch and fold #2
9:00 pm– stretch and fold #3
9:30 pm– stretch and fold #4 and transfer to a large container with a tight-fitting lid put in the fridge for cold fermentation. Mark the container with the height of the dough so you know when the dough rises
The next day
5 pm–get it out of the fridge for 2 hours
7 pm – shape and put into a loaf pan and let it rise until double
9 pm – score the dough and bake
10 pm – done baking and cool the bread completely and enjoy the next morning
Sample of baking timeline (same-day bake)
8:00 am– fermentolyse (mix everything and rest for 1 hour), soak raisins in hot water
9:00 am– stretch and fold #1
9:30 am– stretch and fold #2
10:00 am– stretch and fold #3
10:30 am– stretch and fold #4 and transfer to a large container and let it proof until double
12:30 pm – shape and put into a loaf pan and let it rise until double
2:30 pm – score the dough and bake
3:30 pm – done baking and cool the bread completely before slicing
How to bake no-knead sourdough cinnamon raisin swirl bread in a loaf pan
1. Soak the raisins ( I used prunes in this step-by-step process photos) in some hot boiling water for at least 30 minutes. Keep the soaking liquid and gently squeeze out and excess liquid from the raisins and set aside
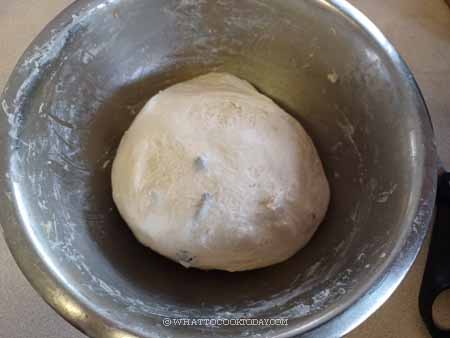
2. My ambient room temperature is 77-79 F. Weigh out 110 grams of starter into a mixing bowl. Combine starter, water from soaking the raisins plus more to measure out 220 grams, honey, oil, and salt and stir to combine and to loosen the starter so it mixes well.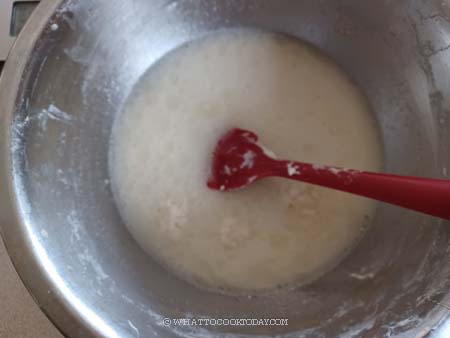
3. Add bread flour and stir to combine into a rough wet dough. The whole process probably take about 3-5 minutes.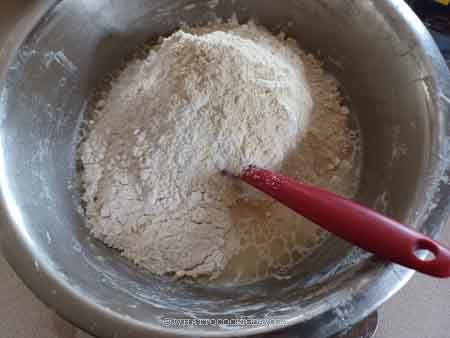
4. Do 4 sets of stretch and fold every 30 minutes. Stretch and fold #1. Wet your fingers lightly. Pick up the dough from one of the edge, kinda wiggle it and stretch it up and fold it over. Repeat this throughout the edge of the dough. You may end up with 4-5 stretches. Only stretch as far as the dough allows you too, don’t force it. 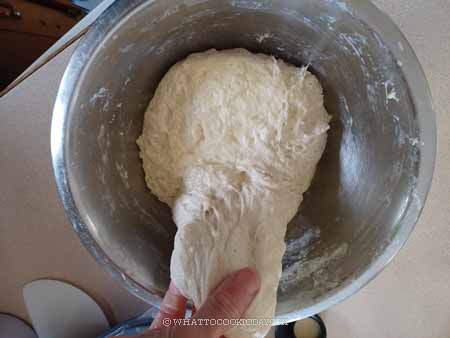

5. I like to flip the smooth side of the dough over. Cover the dough again and rest for 30 minutes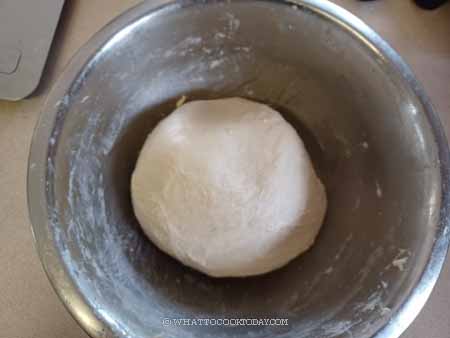
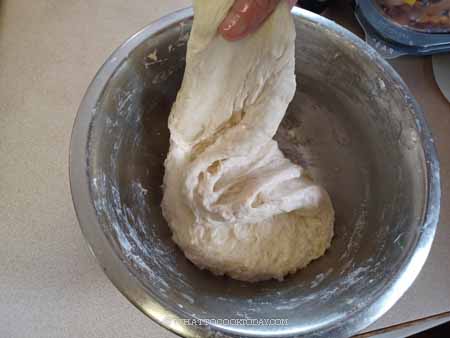
6. Stretch and fold # 2: Wet your fingers lightly again. Scatter 1/2 of the pre-soaked raisins on top of the dough and then do the stretch and fold all around the edge of the dough again. The raisins won’t be evenly distributed yet. 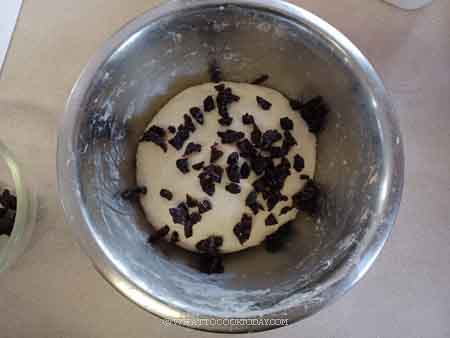
7. Round up the dough and flip it to the smooth side. Cover the dough again and rest for 30 minutes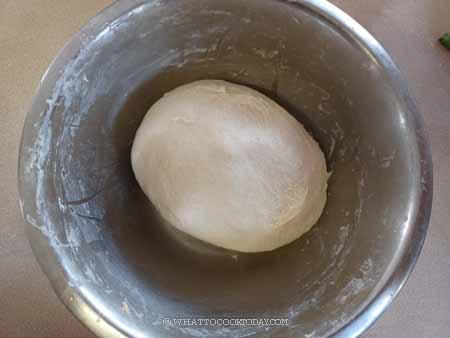
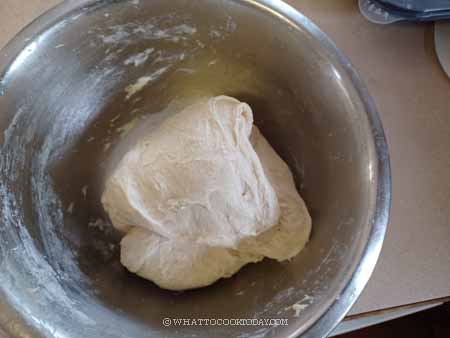
8. Stretch and fold # 3: Repeat the same process as stretch and fold # 2. Scatter the remaining pre-soaked raisins on top of the dough again and do the stretch and fold. The raisins would be more evenly distributed at this point, but I won’t worry about it because when we shape the dough, it will be distributed more evenly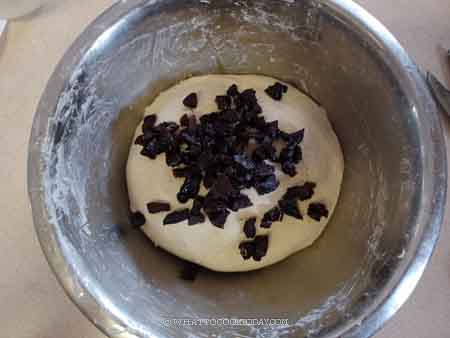
9. Stretch and fold # 4: Do this last stretch and fold. You will notice that the dough is getting tighter now, which is normal as the gluten is developing. Once you are done with the last set of stretch and fold, you can cover the bowl and put it in the fridge. I like to move it to a lightly oiled container that has a tight-fitting lid. Push the dough down to fill up the container and then mark the side of the container to give me an idea where the height of the dough roughly is. So when it doubles in volume, I can easily see it. Store it in the fridge overnight or up to 24 hours. The dough will not rise much in the fridge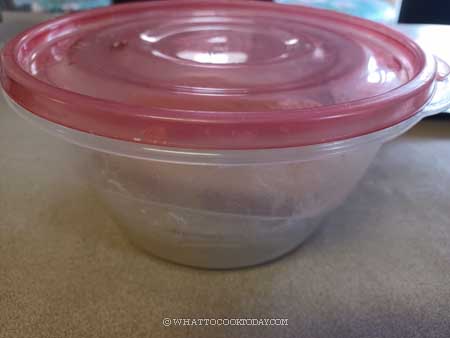
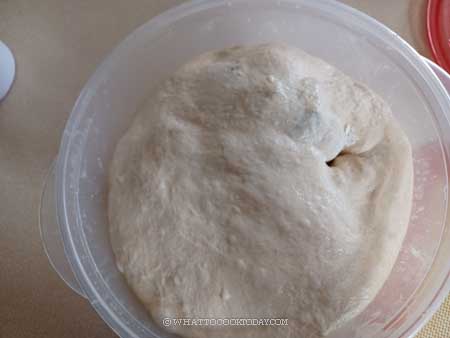
10. The next day, remove it from the fridge and let the dough sit at room temperature for 2 hours. The dough doubles in volume after that. Proceed to the shaping step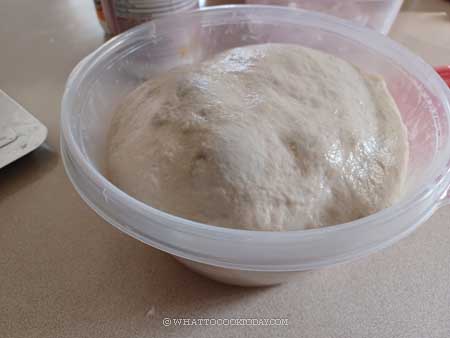
11. Mix all ingredients for the filling in a bowl. Remove the dough and place on a lightly floured countertop. Degas by gently pushing all the air out and use a rolling pin to roll it out into a rectangle, about 10 x 14 inches in size roughly. 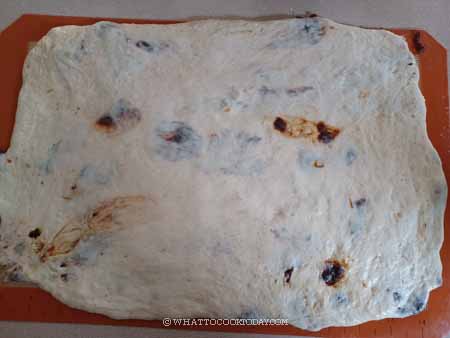
12. Spread 2/3 of the filling on the dough surface, leaving about 1/2-inch around the edges. 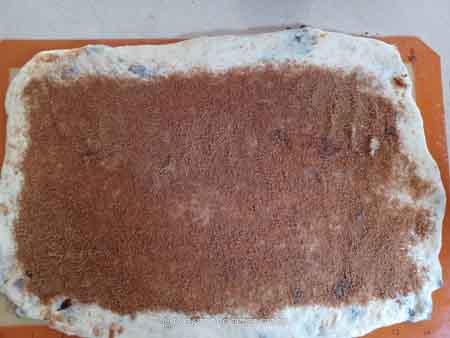
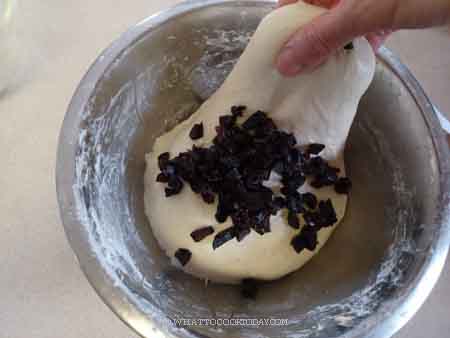
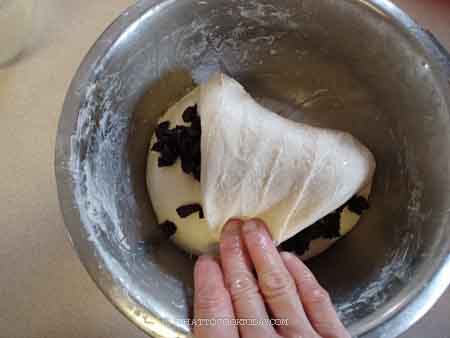
13. From the long side of the dough, fold the top side down and the bottom side up to meet in the middle. Then sprinkle the rest 1/3 of the filling on top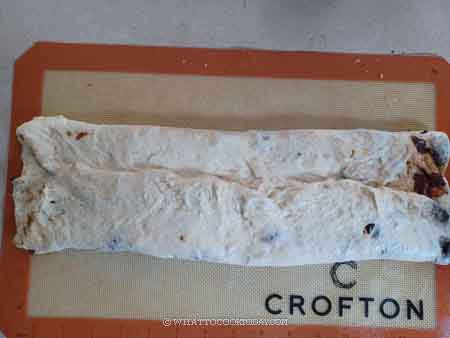
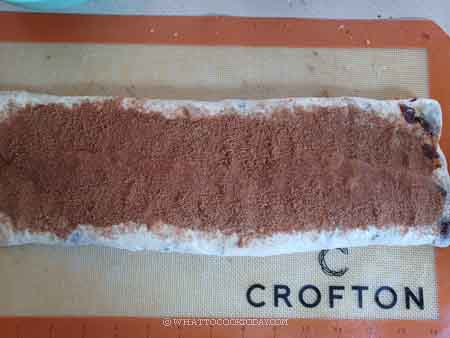
14. Then roll the dough tightly into a log shape. I seal both ends by pinching the dough to seal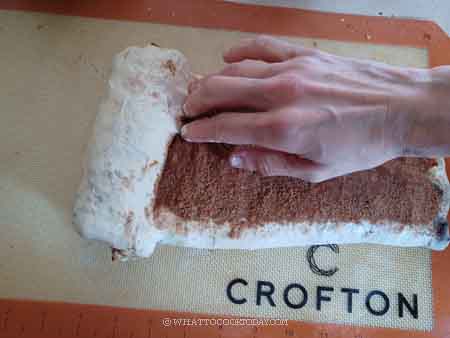
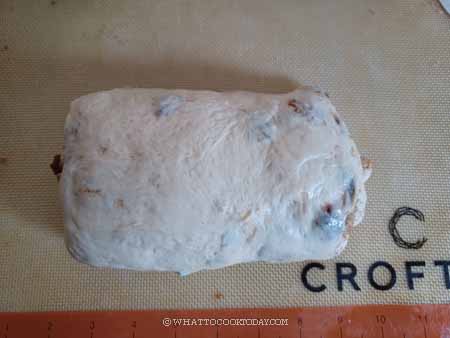
15. Place the shaped dough into a prepared pan. Gently press the dough down to fit the pan and to even out. Cover with a plastic wrap and let it ferment again until it reaches the rim of the pan. 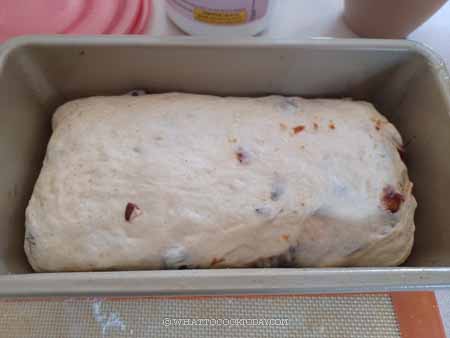
16. It took mine about 2 hours at 82 F (28 C). Depending on your room temperature, it may take longer if it’s cooler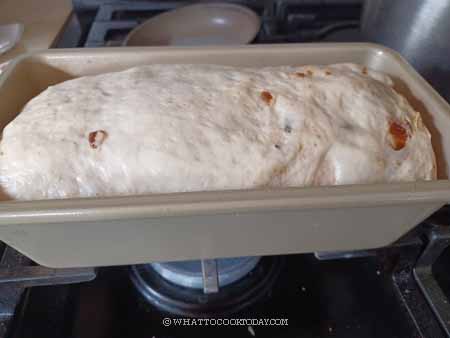
17. 30 minutes before the end of proofing, preheat the oven to 425 F (220 C) for conventional oven, 400 F (200 C) for convection oven, with a baking stone or a baking pan on a middle rack and place a cast-iron pan or pot, or a thick heat-resistant pan next to the baking stone (not pictured here), so the steam can reach the bread easily. Pour in 2 cups of water. The water will gradually heat up as the oven is preheating. We will do a steam bake.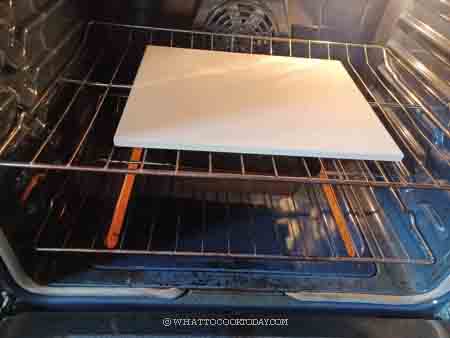
18. When the oven is ready, use a bread lame or very sharp pointy knife to make a score in the middle of the loaf, about 1/2-inch deep. The bread will burst nicely following this score line. Spray the dough with some water. Put this inside the oven on top of the preheated baking stone/pan. 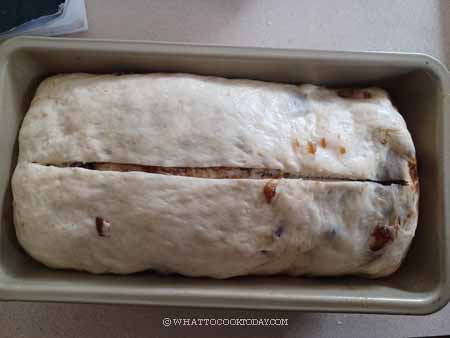
19. Lower the temperature to 400 F (200 C) for conventional and 385 F (195 C) for convection, and bake for 15 minutes. After 15 minutes, remove the pan with water. Continue baking for the next 30 minutes (start checking at around 30 minutes) or until an instant-read thermometer inserted into the dough reads at least 200 F (93 C). If it’s not done, bake another 5 minutes and check again.
20. Remove from the oven and place it on a cooling rack. Let it stand for about 1 minute and then gently shake it out from the loaf pan and let it cool on the cooling rack completely. Do not attempt to slice into a hot or warm bread
Did you make this no-knead sourdough cinnamon raisin swirl bread in a loaf pan recipe?
I love it when you guys snap a photo and tag it to show me what you’ve made. Simply tag me @WhatToCookToday #WhatToCookToday on Instagram and I’ll be sure to stop by and take a peek for real!


27 comments
I made this bread…messed up a little on the water but fixed it with more flour and let me tell you….this is delicious!!!!! Easy to make as well.
Hi Doris, I’m so glad it turned out well and you enjoy the bread 🙂
I messed up! I read it wrong and thought o was supposed to put in the raisin water plus 220 g. When I went you do the first fold it was really wet. I mixed in more flour and hope it will work out. Boy I feel dumb!!
Hi Doris, I hope it turned out for you! Usually it’s pretty forgiving!
It was wonderful!!! Delicious. Great texture!
This turned out so good. I think using the raisin water gave the dough a nice sweet taste. I haven’t been making sourdough very long and really appreciated all the detail in the instructions. Will definitely be making it again.
Hi Wendy, I’m glad you liked it! Yes, the raisin water gives an extra sweetness. This loaf is one of my family’s favorite too 🙂 Thank you for trying and for your feedback 🙂
I made this bread today and it is delicious! The top got a little dark, but it is still soft, just how I want it. I might try the conventional oven instead of the convection next time. I will definitely be making again next week since this loaf won’t last more than 1 day!! Thanks for the great recipe for this new sourdough baker!
Hi Kim, I’m glad the recipe worked out for you! Maybe you can try to lower the temperature by 15 degrees Celcius or 20 degrees Fahrenheit if you are using convection and see if that helps to prevent the top from getting too dark, or you can also try to loosely cover the top with aluminum foil halfway through baking and see!
Can I use discard instead of active starter?
Hi Jessica, yes you can use discard too. Depending on how long the discard has been, that will affect the fermentation time.