This post may contain affiliate links. Please read our disclosure policy.
If you are looking for fun ideas to celebrate Halloween with your family, try these spooky and cute Halloween-themed milk bread ideas, green monster and Jack Skellington. They are delicious, soft and fluffy regardless!

It is always fun to make something fun for the kids to celebrate Halloween. As the kids get older, they aren’t really into trick or treating anymore, but they do enjoy breakfast with something spooky cute 😉 I saw Autumn’s kitchen made the green monsters buns and I thought, that’s a great idea and the kids have always like the melon pan.
Halloween Milk Bread
Ingredients
Main dough: (10 buns for green monsters and 10 for Jack)
- 375 g bread flour (12.7% protein content)
- 75 g all-purpose flour
- 15 g milk powder
- 6 g salt
- 50 g sugar
- 6 g instant yeast
- 200 g whole milk plus more as needed
- 50 g egg
- 50 g unsalted butter softened
For Jack version:
- 10 g cocoa powder
For the crust for green monsters: (enough for 10 buns)
- 120 g all-purpose flour
- 70 g unsalted butter
- 50 g powdered sugar
- 30 g egg
- 10 g milk powder
- 5 g matcha powder
Filling for green monsters: (enough for 10 buns)
- 180 g cream cheese softened
- 45 g powdered sugar
- 15 g milk powder
- 5 g matcha powder
Filling for Jack: (choose either one – enough for 10 buns)
- 150 g semi-sweet chocolate chips or milk chocolate
- 400 g red bean paste
For decorations:
- 20 Eyeball candies
- 30 g semi-sweet chocolate melted
Instructions
- This recipe is enough to make a total of 20 small-size buns. Of course, you can make them smaller or bigger as you wish. You can make half green monsters and half Jack or just one design. It's up to you! If you choose to make only one design, simply double the amount of the filling for whichever design you choose to do
Prepare the dough:
- Add all ingredients for the dough except for the butter and cocoa powder. Use the dough hook to stir the mixture a bit so the flour won't fly around when you start the mixer. Knead on the lowest speed for 2-3 minutes and then increase to speed 2 and knead for 3 minutes and then speed 4 for another 3 minutes or until it forms a dough that clears the side of the bowl, but not smooth yet
- Add the softened butter and knead on speed 2 for about 2-3 minutes and then increase speed to 4 and knead for 5 minutes or until the dough is soft, smooth, elastic, and slightly sticky to the touch. If you stretch a small portion of the dough thinly and gently, it shouldn't break. This is a windowpane stage
- It is important that the dough is soft, meaning, enough hydration. This will ensure you get a soft fluffy bread texture for more than 24 hours. If the dough feels firm, don't be afraid to add a bit more milk, one teaspoon at a time and knead until you get a soft smooth dough.
- Divide the dough into half if you plan to make two designs. One is reserved for green monsters and the other one for Jack.
- For the Jack version, pinch off about 300 grams of the dough, add 10 grams of cocoa powder and use the lowest speed to knead to distribute the color. You may need to add a teaspoon of milk or so if the dough is too dry. Knead until the color is evenly distributed
First proofing:
- Place the green monster dough in a lightly oiled bowl, cover and let rise in a warm place for about 45 minutes to 1 hour, or until double in volume. if it's colder, it may take longer to proof the dough
- Place both Jack doughs in a lightly oiled bowl, separated by an aluminum foil (applied oil to the foil to prevent sticking), cover and let them rise at a warm place for about 45 minutes to 1 hour, or until double in volume. if it's colder, it may take longer to proof the dough
Prepare the cookie crust:
- Combine the flour, salt, and icing sugar. Add butter and egg and combine into a soft dough
- Divide into 10 portions. Roll each one into round balls. Keep them covered tightly in an air-tight container to prevent them from drying out. If it's really warm where you are, keep them in the fridge. Otherwise, you can keep them at room temperature
- We want the cookie dough to be soft and easy to roll out, but not too soft that it's sticky and hard to work with. If it's too sticky or the butter starts to melt, put them in the fridge for a bit to firm it up slightly. We also don't want the cookie dough to be too stiff or cold from the fridge because it's also hard to work with.
- If the cookie dough has been in the fridge, take it out to let it soften a bit for 15 minutes before the end of proofing
Prepare the filling for green monsters and Jack:
- You can use this recipe for red bean paste or simply use chocolate chips for Jack buns
- For green monsters' filling, combine all the ingredients into creamy mixture. Transfer to a piping bag with a piping tip of your choice or no tip is fine too. Keep it chilled in the fridge. Get the filling out of the fridge to soften a bit for about 30 minutes
Shaping the green monsters:
- Line two baking sheets with parchment paper
- Knock out all the gas by giving it some kneading. Divide the dough into 8 equal portions. Round them up into balls. Cover and let them rest for 5 minutes to relax the gluten
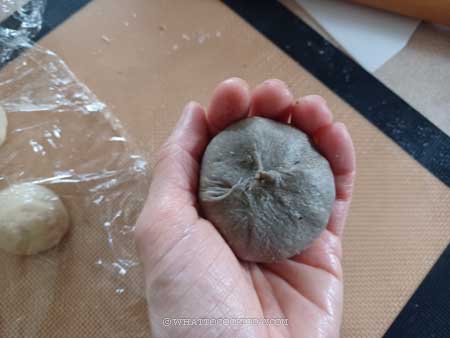
- Work with one dough at a time. Flatten the dough slightly with your palm and then stretch the edge towards the center and round it up into a taut dough ball. Repeat with the rest. Keep them covered
- Work with one cookie dough at a time. Take one dough and roll it out into larger than the main dough. Cover the dough with the cookie dough. Use a bench scraper to score the cookie dough to create that pattern. Dip the cookie dough part in a sugar. Place it on a prepared baking sheet, about 2 inches apart and repeat with the rest of the dough and cookie dough
- Proceed to the final proofing stage:
Shaping the Jack version:
- Line two baking sheets with parchment paper
- Knock out all the gas by giving both dough some kneading. Divide each dough into 10 equal portions (10 white doughs and 10 cocoa dough) . Round them up into balls. Cover and let them rest for 5 minutes to relax the gluten
- If you plan to use red bean paste for filling, use about 40 grams for each bun. Roll it into a round for easier wrapping. If you use chocolate, you can use chocolate chips or bar, about 10-12 grams for each bun
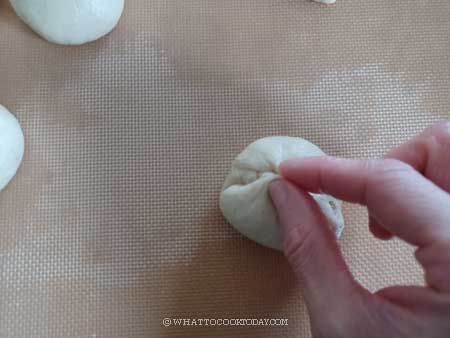
- Get the one cocoa dough, flatten it with your palm slightly and roll into about 4-inch round. Put the filling in the middle and wrap the dough tightly around it. Repeat with the rest of the cocoa dough and the filling
- Roll out the white dough into about 4 inches wide, it doesn't have to be a perfect round. I used a piping tip, about 1-inch wide and cut out two holes (for the eyes). Place the cocoa dough on top of the two holes and wrap the white dough around it. I tried to cut out smaller holes, but it makes Jack looks funny with smaller holes for the eyes LOL! Repeat with the rest of the dough
- Proceed to the final proofing stage
Final proofing:
- Cover and let them proof at a warm place until they are really puffy. This may take about 45 minutes to 1 hour. If it is colder where you are, it may take longer
- When you gently push on the dough, it should bounce back very slowly and leave some indentation. The dough is done proofing and start preheating your oven to 375 F (190 C) for a conventional oven. For a convection oven, lower the temperature by 20 F or 15 C. Place one rack on the 3rd top and another on the 3rd bottom
Baking:
- Place the pan in the positioned racks and bake for 15 minutes, rotate after 7 minutes of baking, front to back, top to bottom. Continue baking for another 8 minutes or a thermometer should register at least 190 F (88 C) at the center of the bread
- Remove from the oven and let them cool down on the rack completely before piping the filling for the green monsters
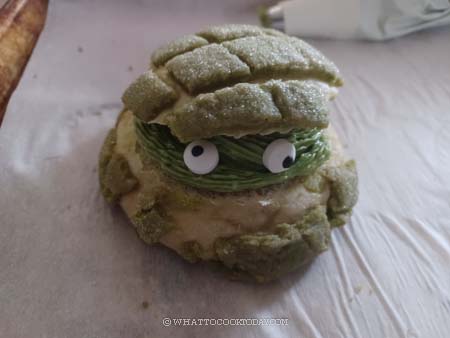
Piping filling for green monsters:
- Slice the bread horizontally. Pipe the filling and then top with other half of the bread. Attach the two eyeball candies
To decorate the Jack version:
- Melt the chocolate in a microwave in a 10-second burst until all chocolate almost melt but you can still see some that have not. Stir until all the chocolate melts. Transfer to a small plastic bag or piping bag. Cut a very small opening at the tip of the plastic bag. Use the melted chocolate to draw the nose and the mouth. Let the chocolate set at room temperature.
Store:
- Unfilled green monsters buns can be kept at room temperature in an air-tight container for 2-3 days. Only put filling on them when you are ready to serve them
RECOMMEDED TOOLS


How to make Halloween Milk Bread
1. Add all ingredients for the dough except for the butter and cocoa powder. Use the dough hook to stir the mixture a bit so the flour won’t fly around when you start the mixer. Knead on the lowest speed for 2-3 minutes and then increase to speed 2 and knead for 3 minutes and then speed 4 for another 3 minutes or until it forms a dough that clears the side of the bowl, but not smooth yet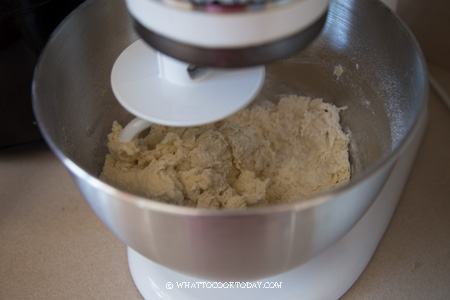
2. Add the softened butter and knead on speed 2 for about 2-3 minutes and then increase speed to 4 and knead for 5 minutes or until the dough is soft, smooth, elastic, and slightly sticky to the touch. If you stretch a small portion of the dough thinly and gently, it shouldn’t break. This is a windowpane stage. It is important that the dough is soft, meaning, enough hydration. This will ensure you get a soft fluffy bread texture for more than 24 hours. If the dough feels firm, don’t be afraid to add a bit more milk, one teaspoon at a time and knead until you get a soft smooth dough.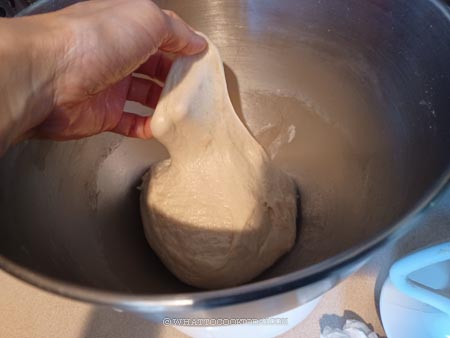
3. Divide the dough into half if you plan to make two designs. One is reserved for green monsters and the other one for Jack. For the Jack version, pinch off about 300 grams of the dough, add 10 grams of cocoa powder and use the lowest speed to knead to distribute the color. You may need to add a teaspoon of milk or so if the dough is too dry. Knead until the color is evenly distributed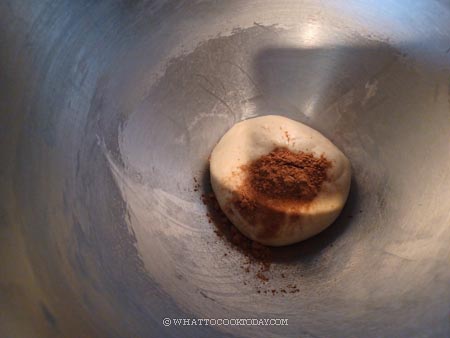
4. Place the green monster dough in a lightly oiled bowl, cover and let rise in a warm place for about 45 minutes to 1 hour, or until double in volume. if it’s colder, it may take longer to proof the dough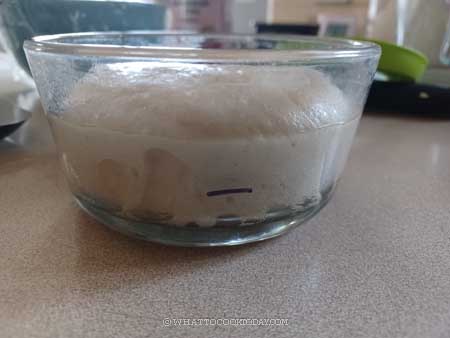
5. Place both Jack doughs in a lightly oiled bowl, separated by an aluminum foil (applied oil to the foil to prevent sticking), cover and let them rise at a warm place for about 45 minutes to 1 hour, or until double in volume. if it’s colder, it may take longer to proof the dough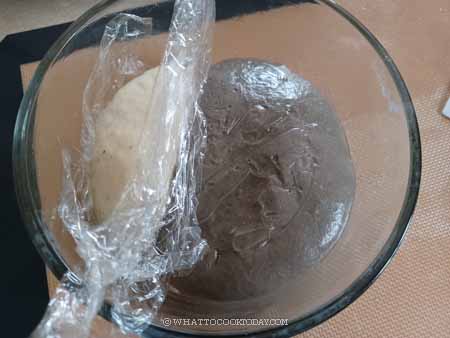
6. While waiting, prepare the cookie crust for the green monsters. Combine the flour, salt, and icing sugar. Add butter and egg and combine into a soft dough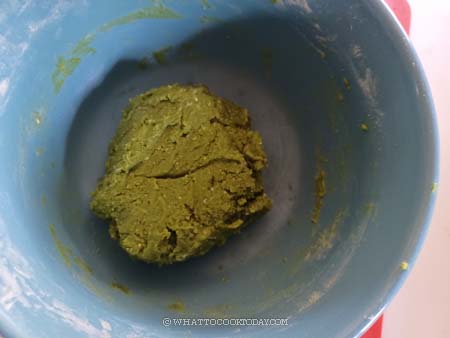
7. Divide into 10 portions (or any amount you plan to make). Roll each one into round balls. Keep them covered tightly in an air-tight container to prevent them from drying out. We want the cookie dough to be soft and easy to roll out, but not too soft that it’s sticky and hard to work with. If it’s too sticky or the butter starts to melt, put them in the fridge for a bit to firm it up slightly. We also don’t want the cookie dough to be too stiff or cold from the fridge because it’s also hard to work with.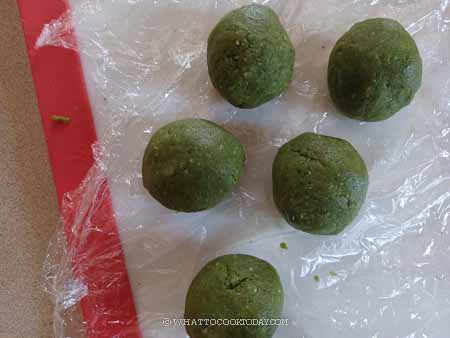
8. To prepare the filling, you can use this recipe for red bean paste or simply use chocolate chips for Jack buns.
9. For green monsters’ filling, combine all the ingredients into creamy mixture. Transfer to a piping bag with a piping tip of your choice or no tip is fine too. Keep it chilled in the fridge. Get the filling out of the fridge to soften a bit for about 30 minutes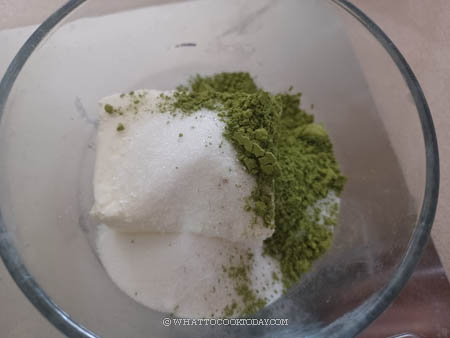
10. To shape the green monsters, Line two baking sheets with parchment paper. Knock out all the gas by giving it some kneading. Divide the dough into 10 equal portions (I only did half recipe here). Round them up into balls. Cover and let them rest for 5 minutes to relax the gluten. 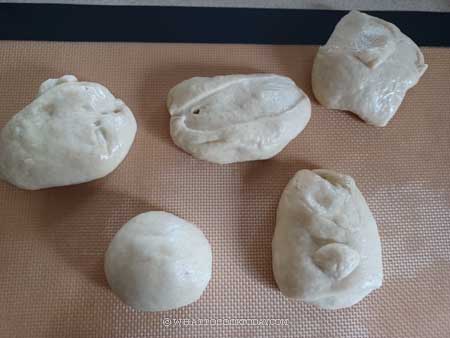
11. Work with one dough at a time. Flatten the dough slightly with your palm and then stretch the edge towards the center and round it up into a taut dough ball. Repeat with the rest. Keep them covered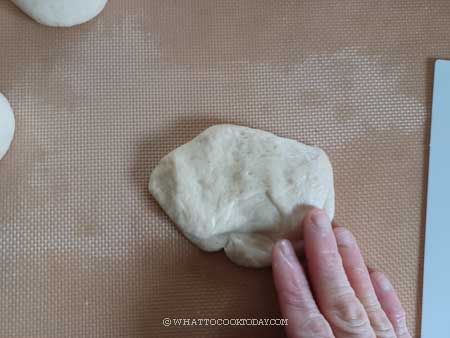
12. Work with one cookie dough at a time. Take one dough out and flatten it into a round larger than the main dough in between two cling wraps. 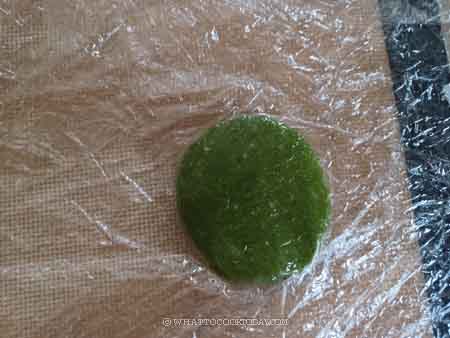
13. Cover the dough with the cookie dough. Use a bench scraper to score the cookie dough to create that pattern. Dip the cookie dough part in a sugar. Place it on a prepared baking sheet, about 2 inches apart and repeat with the rest of the dough and cookie dough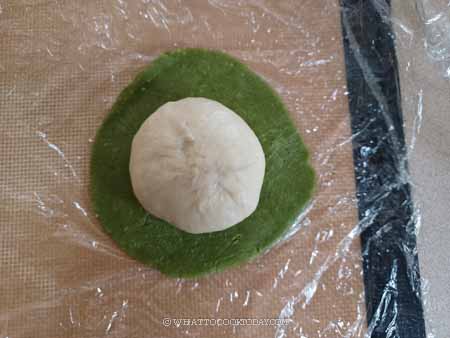
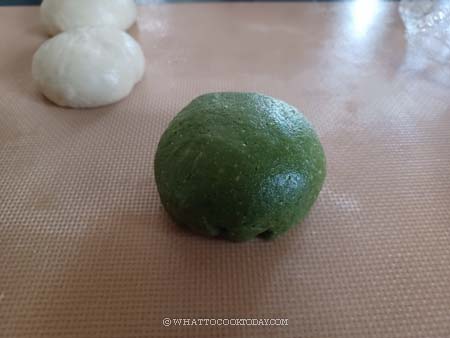
14. Use a bench scraper to score the cookie dough to create that pattern. Dip the cookie dough part in a sugar. 
15. Place it on a prepared baking sheet, about 2 inches apart and repeat with the rest of the dough and cookie dough. Proceed to the final proofing stage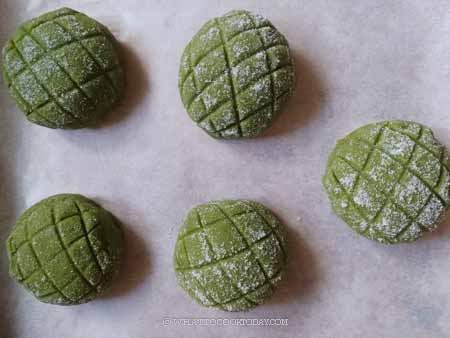
16. Line two baking sheets with parchment paper. Knock out all the gas by giving both dough some kneading. Divide each dough into 10 equal portions (10 white doughs and 10 cocoa dough) . Round them up into balls. Cover and let them rest for 5 minutes to relax the gluten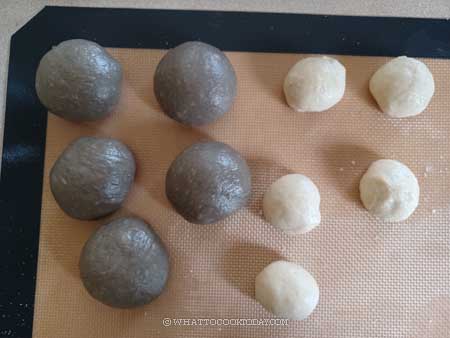
17. If you plan to use red bean paste for filling, use about 40 grams for each bun. Roll it into a round for easier wrapping. If you use chocolate, you can use chocolate chips or bar, about 10-12 grams for each bun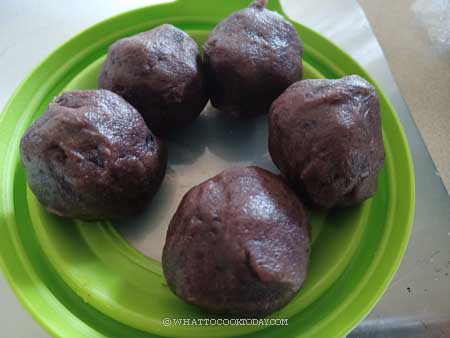
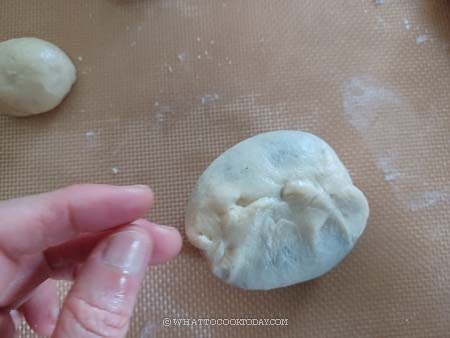
18. Get the one cocoa dough, flatten it with your palm slightly and roll into about 4-inch round. Put the filling in the middle and wrap the dough tightly around it. Repeat with the rest of the cocoa dough and the filling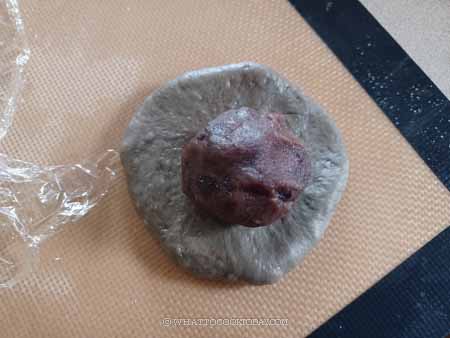
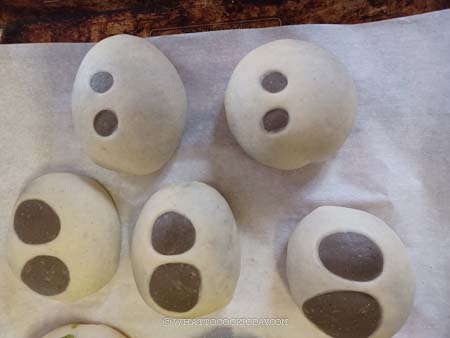
19. Roll out the white dough into about 4 inches wide, it doesn’t have to be a perfect round. I used a piping tip, about 1-inch wide and cut out two holes (for the eyes). 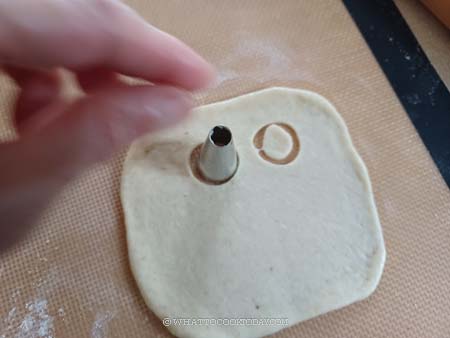
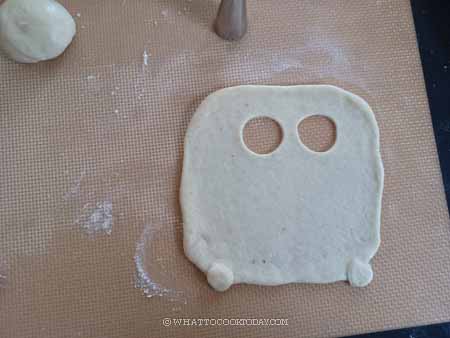
20. Place the cocoa dough on top of the two holes and wrap the white dough around it. 
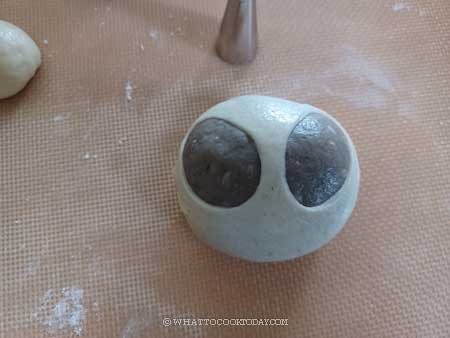
21. I tried to cut out smaller holes, but it makes Jack look funny with smaller holes for the eyes LOL! Repeat with the rest of the dough. Proceed to the final proofing stage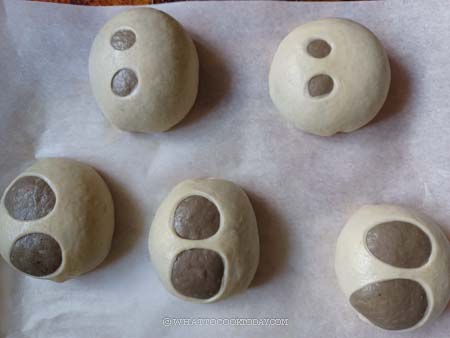
22. Cover and let them proof at a warm place until they are really puffy. This may take about 45 minutes to 1 hour. If it is colder where you are, it may take longer. When you gently push on the dough, it should bounce back very slowly and leave some indentation. The dough is done proofing and start preheating your oven to 375 F (190 C) for a conventional oven. For a convection oven, lower the temperature by 20 F or 15 C. Place one rack on the 3rd top and another on the 3rd bottom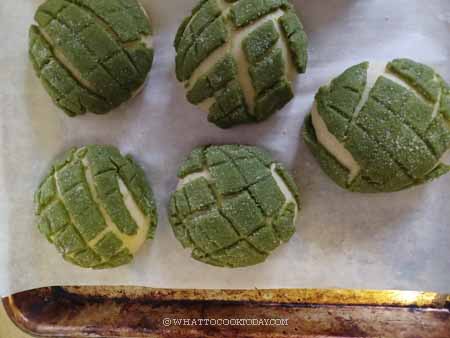
23. Place the pan in the positioned racks and bake for 15 minutes, rotate after 7 minutes of baking, front to back, top to bottom. Continue baking for another 8 minutes or a thermometer should register at least 190 F (88 C) at the center of the bread
24. Remove from the oven and let them cool down on the rack completely before piping the filling for the green monsters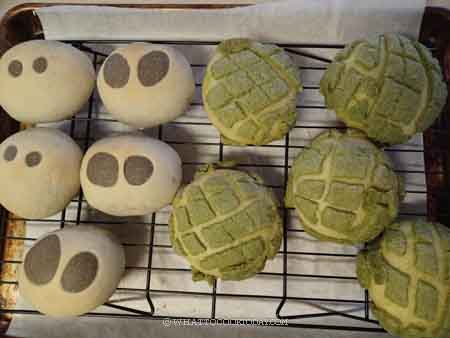
25. Slice the bread horizontally. Pipe the filling and then top with other half of the bread. Attach the two eyeball candies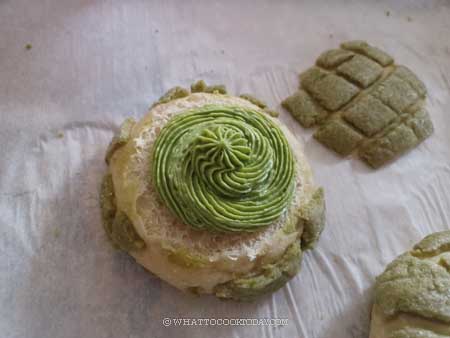
26. Melt the chocolate in a microwave in a 10-second burst until all chocolate almost melt but you can still see some that have not. Stir until all the chocolate melts. Transfer to a small plastic bag or piping bag. Cut a very small opening at the tip of the plastic bag. Use the melted chocolate to draw the nose and the mouth. Let the chocolate set at room temperature.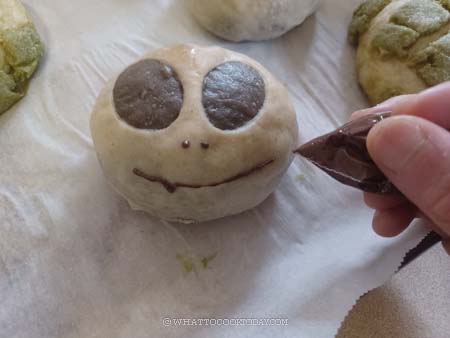
Did you make this Halloween milk bread recipe?
I love it when you guys snap a photo and tag it to show me what you’ve made. Simply tag me @WhatToCookToday #WhatToCookToday on Instagram and I’ll be sure to stop by and take a peek for real!

