This post may contain affiliate links. Please read our disclosure policy.
Learn how to make this symbolic Italian Easter bread that is so soft and slightly sweet with an amazing hint of citrus and spices. The bread stays soft for days using tangzhong. The recipe also includes an option for sourdough version using sweet stiff starter.

This fun Italian Easter egg bread is so much fun to make. I love the idea of a real egg nestled in the middle of the bread. The raw eggs are dyed with color and then baked together with the bread. So you get soft fluffy bread and hard-boiled eggs at the same time. The hard-boiled eggs actually cooked perfectly in the oven. They are a bit soft on the yolk, but firm enough to hold its shape, which I really like. The bread is soft and stays soft because of the tangzhong used in the recipe! The kids are digging this bread because it looks fun and festive!
Use a high-quality strong instant yeast
I used to bake with active dry yeast until I baked panettone a few years ago and I swear by this SAF Gold instant yeast for the enriched dough. It’s a game-changer. This yeast is strong and made for dough that has high sugar and high fat. It gives the loaf a high rise, airy, and works quickly.

How to bake pane di Pasqua using tangzhong
1. Dye the eggs: Get the raw eggs out from the fridge to let them come to room temperature, about 15-20 minutes. We will soak the eggs in hot water, so it’s important that the raw eggs aren’t cold from the fridge or they may crack when you put inside the hot water. There is no need to boil the eggs as they will cook in the oven together with the bread
2. Prepare 4 heat-proof cups or glasses. I only dyed 3 and left one undyed. Pour 1/2 cup of hot water into each cup and add 1 Tbsp of vinegar and food coloring to each one. Gently lower the egg into each cup and let them sit for 10 minutes or longer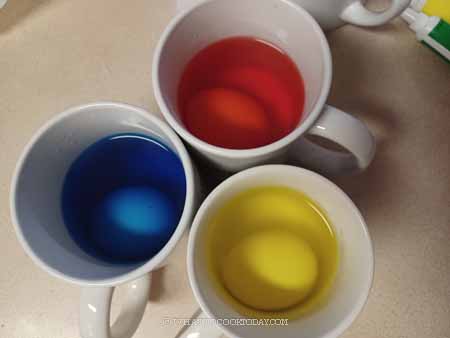
3. Remove from the cup and place on an absorbent paper towel to let them dry. If you do this the day before, store the eggs in the fridge until ready to be used
4. Prepare sweet stiff starter for sourdough version: About 8-10 hours before you plan to make the bread, combine all ingredients for the stiff starter in a bowl. Stir a bit to roughly combine and then use your clean hand to knead it. This is a stiff starter, it’s like a dough. Make sure no pockets of dry flour are visible. Transfer to a large see-through container (plastic or glass is fine, preferably wide-mouth so you can get it out easier later). Loosely cover with the lid and let it ferment until triple in size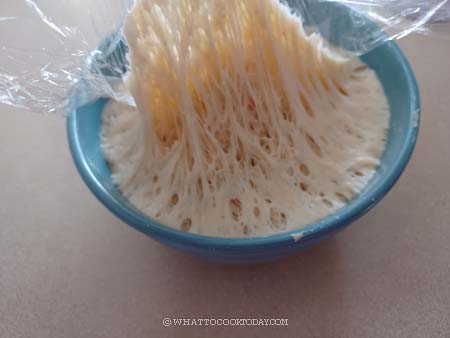
5. Prepare tangzhong (for both yeast and sourdough versions): Place milk and the bread flour in a small saucepan. Whisk until there is no more lumps. Cook this mixture over low-medium heat until it reaches 65 C (149 F). This takes about 3 minutes. 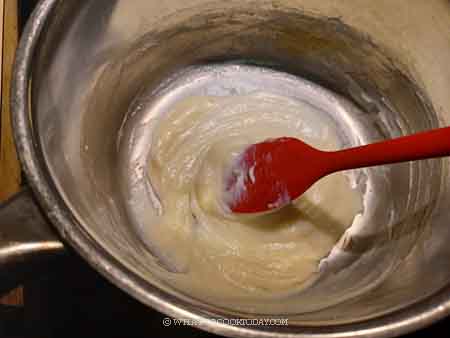
6. Remove from the heat and cover with a plastic wrap, touching the tangzhong so the skin won’t form. I highly suggest using this the next day and keep it in the fridge if you have the time, otherwise you can use it once it has cooled down completely. 
7. Prepare the dough: Mix all the ingredients together in a mixing bowl, tangzhong, and sweet stiff starter for sourdough version. 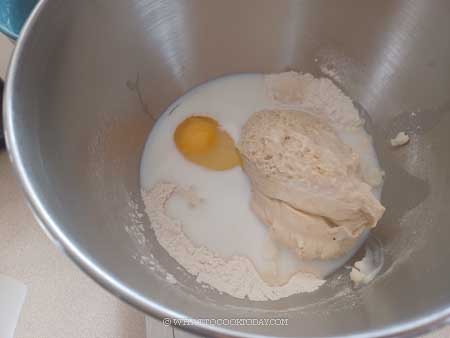
8. Use a dough hook attachment to knead the dough on speed 2 until all the crumbly dough starts to come together into one mass, it may take about 2-3 minutes for this to happen. Don’t be tempted to add any liquid. You may need to stop halfway and scrape the dough off the hook and the sides of the bowl and continue to knead for another 3-4 minutes until dough is relatively smooth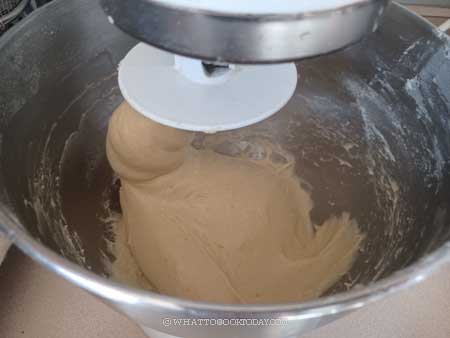
9. Gradually add the softened butter bit by bit. The dough will turn into a REAL sticky mess again because of the butter, just keep kneading and stop halfway and scrape the dough off the hook and bowl again and continue to knead until the butter is absorbed by the dough. IT WILL HAPPEN, don’t worry! DO NOT be tempted to add any extra flour. You will get a shiny smooth dough that is very elastic. This may take about 10-15 minutes on speed 2. The dough must pass a windowpane test, meaning, when you stretch a small amount of dough thinly, it won’t break and a light can pass through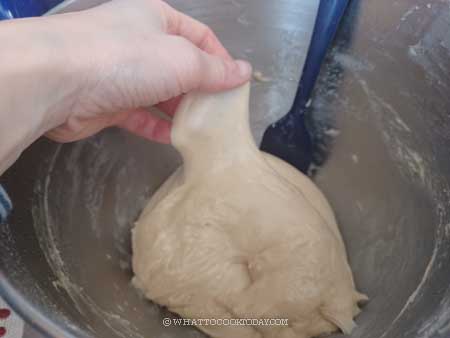
10. Bulk fermentation: Place this dough in a lightly oiled large bowl, cover it with a clean and damp tea cloth or plastic wrap and let it rise at a warm place. If you use commercial yeast, this may take about 1 hour or longer depending on temperature. If you use a sourdough starter, proof for 2 hours. The dough will not double for sourdough version, only about 50% rise, which is fine. When you poke the dough with your lightly-floured finger, the indentation stays and the dough has clearly almost doubled or doubled in size
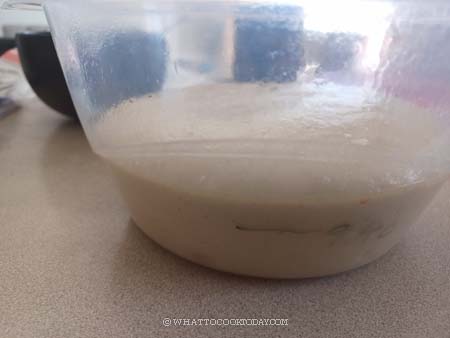
11. Line a large baking sheet with parchment paper. Divide the dough into 4 equally in weight. Then divide each dough into two again. So you have a total of 8 doughs. 

12. Without deflating the dough, roll each dough into a rope, about 12-15 inches long. If the dough keeps retracting back, give them a rest of 5-10 minutes to relax the gluten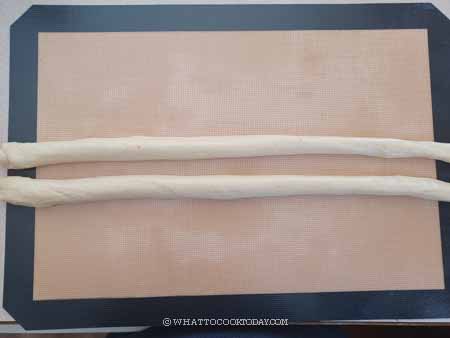
13. Twist each rope against the other and then bring the two ends together to form a ring. Seal the end well. Place this on the prepared baking sheet and repeat with the rest of the dough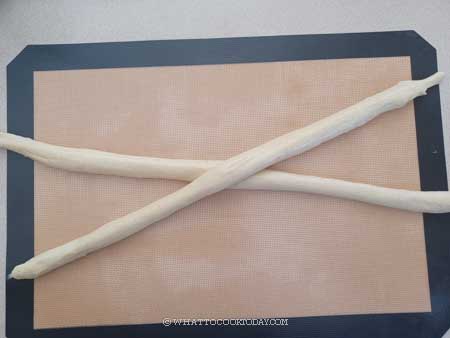


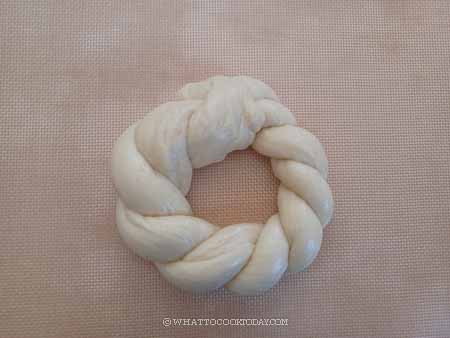
14. Let the dough proof again at a warm place until they are puffy. They won’t double in size. If you use commercial yeast, this may take 45 minutes to 1 hour or longer depending on the temperature. If you use a sourdough starter, this may take about 2 1/2 -3 hours or longer, depending on temperature and the strength of your starter. Final proofing usually takes much longer for sourdough. When you gently push on the dough, the indentation bounces back very gradually and may leave a bit of indentation. The dough also feels really light and puffy. These are signs that we are done with final proofing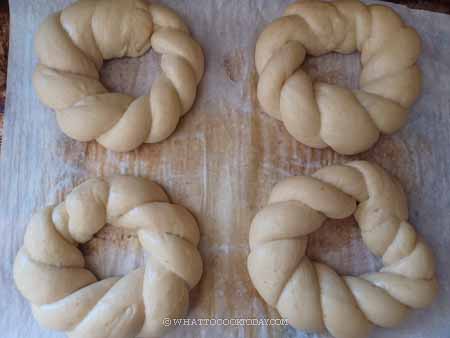
15. 15 minutes before the end of the last proofing, preheat the oven to 375 F (190C) for coventional oven. If you use convection oven, lower the temperature by 20 F or 15 C. Prepare the egg wash by combining a beaten whole egg with 1 teaspoon of water. Brush the egg wash on the surface of the dough. Put on some sprinkles if you like. 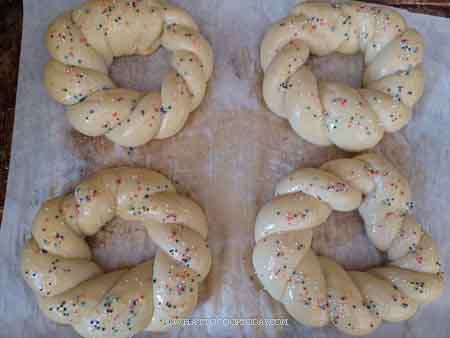
16. Carefully place one dyed egg on the center of each bread. 
17. Put the pan on the middle rack and bake for 18-20 minutes or until the top is golden brown and internal temperature is 190 F (88 C)
18. Let the bread cool on the pan for 5 minutes before transferring to a cooling rack to let them cool completely

Did you make this Pane di Pasqua using tangzhong recipe?
I love it when you guys snap a photo and tag it to show me what you’ve made. Simply tag me @WhatToCookToday #WhatToCookToday on Instagram and I’ll be sure to stop by and take a peek for real!

Pane Di Pasqua (Italian Easter Bread) – Tangzhong
Ingredients
Tangzhong (for both yeast and sourdough version):
- 15 g bread flour
- 90 g whole milk
Dough:
- 300 g bread flour with at least 12% protein content
- 5 g SAF Gold instant yeast
- 15 g milk powder
- 100 g whole milk plus more as needed
- 55 g egg 1 large egg
- 40 g unsalted butter softened
- 4 g salt
- 30 g sugar
- Zest of one orange
For sourdough version:
Prepare sweet stiff starter:
- 45 g active starter (100% hydration)
- 135 g bread flour (12.7% protein content)
- 55 g water
- 25 g sugar
Dough for sourdough version:
- 145 g bread flour (12.7% protein content)
- 25 g milk powder
- 55 g egg 1 large egg
- 40 g unsalted butter softened
- 4 g salt
- 30 g sugar
- Zest of one orange
- Milk as needed
Egg wash:
- 1 large egg
- 1 tsp water
Topping:
- Sprinkles
To dye the eggs:
- 4 raw eggs
- 2 cup hot water divided
- 4 Tbsp vinegar
- Food coloring of your choice
Instructions
Dye the eggs: (recommend the day before)
- Get the raw eggs out from the fridge to let them come to room temperature, about 15-20 minutes. We will soak the eggs in hot water, so it's important that the raw eggs aren't cold from the fridge or they may crack when you put inside the hot water. There is no need to boil the eggs as they will cook in the oven together with the bread
- Prepare 4 heat-proof cups or glasses. Pour 1/2 cup of hot water into each cup and add 1 Tbsp of vinegar and food coloring to each one. Gently lower the egg into each cup and let them sit for 10 minutes or longer
- Remove from the cup and place on an absorbent paper towel to let them dry. If you do this the day before, store the eggs in the fridge until ready to be used
Prepare sweet stiff starter for sourdough version:
- About 8-10 hours before you plan to make the bread, combine all ingredients for the stiff starter in a bowl. Stir a bit to roughly combine and then use your clean hand to knead it. This is a stiff starter, it's like a dough. Make sure no pockets of dry flour are visible. Transfer to a large see-through container (plastic or glass is fine, preferably wide-mouth so you can get it out easier later). Loosely cover with the lid and let it ferment until triple in size
Prepare tangzhong (for both yeast and sourdough versions):
- You can read this post about preparing tangzhong in more details if you are interested. Place milk and flour in a small saucepan. Whisk until there are no more lumps. Cook this mixture over low-medium heat for about 3-4 minutes. It should reach about 65 C (149 F). If you overcook it, liquid will evaporate more than needed. Remove from the heat and immediately cover with a cling wrap touching the surface of tangzhong directly to prevent skin from forming.
- I highly suggest using this the next day and keep it in the fridge if you have the time, otherwise you can use it once it has cooled down completely.
Prepare the dough:
- Mix all the ingredients together in a mixing bowl, tangzhong, and sweet stiff starter for sourdough version. Use a dough hook attachment to knead the dough on speed 2 until all the crumbly dough starts to come together into one mass, it may take about 2-3 minutes for this to happen. Don't be tempted to add any liquid. You may need to stop halfway and scrape the dough off the hook and the sides of the bowl and continue to knead for another 3-4 minutes until dough is relatively smooth
- Gradually add the softened butter bit by bit. The dough will turn into a REAL sticky mess again because of the butter, just keep kneading and stop halfway and scrape the dough off the hook and bowl again and continue to knead until the butter is absorbed by the dough. IT WILL HAPPEN, don't worry! DO NOT be tempted to add any extra flour. You will get a shiny smooth dough that is very elastic. This may take about 10-15 minutes. The dough must pass a windowpane test, meaning, when you stretch a small amount of dough thinly, it won't break and a light can pass through
1st proofing:
- Place this dough in a lightly oiled large bowl, cover it with a clean and damp tea cloth or plastic wrap and let it rise at a warm place. If you use commercial yeast, this may take about 1 hour or longer depending on temperature. If you use a sourdough starter, proof for 2 hours. The dough will not double for sourdough version. If you use commercial yeast, the dough has clearly almost doubled or doubled in size
- When you poke the dough with your lightly-floured finger, the indentation stays.
To bake the next day:
- Deflate the dough and then keep them in the container with air-tight lid to prevent them from drying. Keep them in the fridge for up to 24 hours and then shape and bake the next day
- Simply take the dough out from the fridge and let it sit at room temperature for about an hour before you proceed to shaping
Shaping:
- Line a large baking sheet with parchment paper
- Divide the dough into 4 equally in weight. Then divide each dough into two again. So you have a total of 8 doughs
- Without deflating the dough, roll each dough into a rope, about 12-15 inches long. If the dough keeps retracting back, give them a rest 5-10 minutes to relax the gluten
- Twist each rope against the other and then bring the two ends together to form a ring. Seal the end well. Place this on the prepared baking sheet and repeat with the rest of the doughs
Final fermentation:
- Let the dough proof again at a warm place until they are puffy. They won't double in size. If you use commercial yeast, this may take 45 minutes to 1 hour or longer depending on the temperature. If you use a sourdough starter, this may take about 2 1/2 -3 hours or longer, depending on temperature and the strength of your starter. Final proofing usually takes much longer for sourdough
- When you gently push on the dough, the indentation bounces back very gradually and may leave a bit of indentation. The dough also feels really light and puffy. These are signs that we are done with final proofing
Baking:
- 15 minutes before the end of the last proofing, preheat the oven to 375 F (190C) for coventional oven. If you use convection oven, lower the temperature by 20 F or 15 C.
- Prepare the egg wash by combining a beaten whole egg with 1 teaspoon of water. Brush the egg wash on the surface of the dough. Put on some sprinkles if you like. Carefully place one dyed egg on the center of each bread. Put the pan on the middle rack and bake for 18-20 minutes or until the top is golden brown and internal temperature is 190 F (88 C)
- Let the bread cool on the pan for 5 minutes before transferring to a cooling rack to let them cool completely
Storing:
- The bread can be kept at room temperature for 2-3 days. However, you need to remove the hard-boiled eggs and keep them in the refrigerator to avoid spoilage.


