This post may contain affiliate links. Please read our disclosure policy.
Sourdough shokupan represents a harmonious fusion of Japanese bread-making traditions and the art of sourdough fermentation. This sourdough shokupan offers a unique twist on the classic, delighting both bread enthusiasts and those seeking a healthier and more flavorful option.

I keep a log of my sourdough feeding schedule and activity and today is 365 days since I have baked with my faithful robust starter! Happy birthday my little starter (that I have yet to name to this date!). It feels like I have baked with it for a long time but it’s been only a year. I had baked over 300+ of sourdough bread in this one year. That includes rustic artisan, enriched sweet or savory bread, steamed buns, and anything in between.
No Sour Sourdough Bread
This recipe will give you sourdough bread that doesn’t taste sour. Why? Because we use a sweet stiff starter, which is built from a regular 100% hydration sourdough starter. Ever since I learned how to bake enriched bread using sweet stiff starter, I hardly ever bake using a regular liquid starter. It just takes too long for me when it comes to enriched bread. I love the shreddy and soft texture when I use sweet stiff starter.
What is a sweet stiff starter?
In sourdough baking, a sweet stiff starter refers to a type of sourdough starter that is maintained with a higher ratio of flour to water or milk and contains sweeteners such as sugar or honey. Unlike the more common liquid or semi-liquid sourdough starters, a stiff starter has a firmer consistency, similar to dough. I don’t maintain a sweet stiff starter. I build it using my regular liquid starter whenever I need it. So I just maintain my regular liquid starter. I love baking enriched bread/buns and steamed buns using a sweet stiff starter.
Sourdough Shokupan/Milk Bread (with Sweet Stiff Starter)
Ingredients
Option 1: Sweet stiff starter (peak in 8-10 hours):
- 55 g active starter (100% hydration)
- 165 g bread flour (12.7% protein content)
- 65 g water
- 30 g sugar
Option 2: Sweet stiff starter (peak in 4-6 hours):
- 115 g active starter (100% hydration)
- 115 g bread flour (12.7% protein content)
- 45 g water
- 25 g sugar
Final dough with option 1:
- 133 g bread flour (12.7% protein content) or more as needed
- 90 g whole milk or more as needed
- 12 g milk powder
- 45 g sugar
- 5 g salt
- 32 g unsalted butter softened
Final dough with option 2:
- 153 g bread flour (12.7% protein content) or more as needed
- 90 g whole milk or more as needed
- 12 g milk powder
- 45 g sugar
- 5 g salt
- 32 g unsalted butter softened
Egg wash (if you bake the bread in a pan without the lid)
- 1 egg beaten
- 1 tsp milk
Instructions
- I use a 7 1/2 x 4 1/2 x 4 1/2 small but tall loaf pan. You can also use 8 1/2 x 4 1/2 loaf pan, the loaf will come out shorter but wider
Prepare sweet stiff starter:
- I recommend using a starter that is at least two months old and consistently doubles or triples in 4-6 hours when you feed it at 1:1:1 ratio. Young starter will not give the best result
- Combine all ingredients for the sweet stiff starter in a bowl. Stir a bit to roughly combine and then use your clean hand to knead it. This is a stiff starter, it's like a dough. Make sure no pockets of dry flour are visible. Transfer to a large see-through container (plastic or glass is fine, preferably wide-mouth so you can get it out easier later). Loosely cover with the lid and let it ferment until triple in size
Prepare the dough:
- Place all ingredients and the stiff starter, except for the butter, in a mixing bowl of a stand mixer fitted with a dough hook attachment. Use the hook to stir everything around a bit so when you turn the machine on, the flour won't fly around and wet ingredients won't splash (it happened to me before!).
- Start with the lowest speed to mix things up and then increase to speed 2 and knead for about 5 minutes or until it forms a dough. If the dough is too dry to come together, you can add a bit of milk one teaspoon at a time. Don't add too much as we haven't added the butter yet
- Then add butter in 2-3 batches. The dough will turn into a complete mess again because of the butter, but don't worry, it will get absorbed by the dough as it kneads. Knead at speed 4 for about 10 minutes or until the dough is smooth and elastic. If you slowly stretch a small amount of dough, it will not break and light can pass through, like a window pane. Proceed to first proofing
First proofing:
- Transfer to a lightly oiled bowl, cover, and proof at a warm place for about 1 1/2 – hours max at 78-82 F (26-28 C), the dough will not double in size. It probably rises only about 25%, which is fine. Sourdough starter is different from commercial yeast.
Shaping:
- Lightly grease your loaf pan on all sides
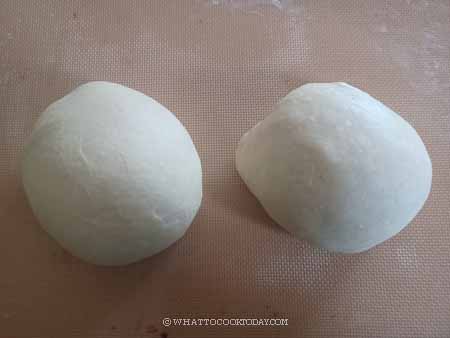
- Punch the dough down and give it a knead for a few times. Divide into 2 or 3 equal-weight doughs. Round up each dough to roughly form a ball. Cover and let them rest for 10 minutes
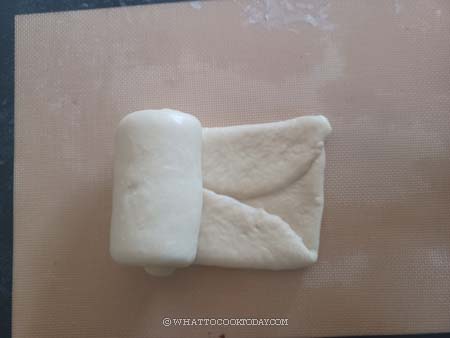
- Then work with one dough at a time and keep the rest covered. Flatten the dough with your palm and roll it into a rectangle shape, the width should about twice the width of the loaf pan and about the same length as the loaf pan. Fold the two sides over to meet in the middle and then roll the dough up, not too tight, not too loose, like a Swiss roll
- Place the shaped dough into the pan. Repeat with the other dough. Place all the shaped dough side by side inside the loaf pan. Slightly flatten the three doughs with your palm so they are about the same height
Final proofing:
- Cover and let the dough proof again at a warm place until it fills up about 80-90% of the pan. This may take about 3-4 hours or longer at 82 F (28 C). Mine usually takes about 3-3 1/2 hours. If you want to bake with the lid, slide the lid now before the dough rises too high and you won't be able to use the lid anymore
- If you bake in a pan without the lid, brush the surface of the dough with an egg wash
Baking:
- 10 minutes before the end of proofing, preheat your oven to 375 F (190 C) for a conventional oven. For convection top and bottom heat, lower the temperature by 20 F or 15 C
- Place the loaf pan on the middle rack and bake for 30 minutes or until the top is golden brown if you bake without the lid. UPDATED: If you bake with the lid, bake for 30 minutes and then lower the temperature to 350 F (180 C) for conventional oven and bake for another 5 minutes or until internal temperature is 190 F (88 C)
Cooling:
- Once out of the oven, drop the pan on the counter to release some steam and immediately remove from the pan onto a cooling rack. Optional: If you want a softer shinier crust, you can brush with melted butter immediately while the bread is still warm. Let the bread cool down completely on the rack
Storing:
- Once it has cooled down, you can put in an air-tight container and can be kept at room temperature for 2-3 days. The bread should stay soft for few days if kept properly at room temperature
RECOMMEDED TOOLS


*Nutrition facts are just estimates and calculated using online tools*
Benefits of baking enriched bread with sweet stiff starter
The main benefit of using a sweet stiff starter is that it tends to produce a milder and sweeter flavor profile in sourdough bread. This can be particularly desirable when making bread with a delicate taste, such as brioche, or enriched sweet bread like shokupan. The sweet stiff starter also shortens the fermentation time compared to when you use a liquid starter to prepare the enriched dough, but still full of complex flavor that I can’t seem to get enough!

How to bake sourdough shokupan with sweet stiff starter
1. Combine all ingredients for the sweet stiff starter in a bowl. Stir a bit to roughly combine and then use your clean hand to knead it. This is a stiff starter, it’s like a dough. Make sure no pockets of dry flour are visible. Transfer to a large see-through container (plastic or glass is fine, preferably wide-mouth so you can get it out easier later). Loosely cover with the lid and let it ferment until triple in size
2. Place all ingredients and the stiff start, except for the butter, in a mixing bowl of a stand mixer fitted with a dough hook attachment. Use the hook to stir everything around a bit so when you turn the machine on, the flour won’t fly around and wet ingredients won’t splash (it happened to me before!).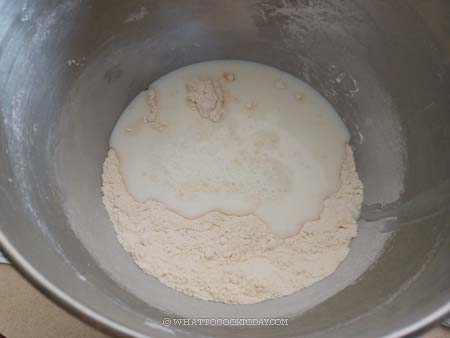
3. Start with the lowest speed to mix things up and then increase to speed 2 and knead for about 5 minutes or until it forms a dough. If the dough is too dry to come together, you can add a bit of milk one teaspoon at a time. Don’t add too much as we haven’t added the butter yet
4. Then add butter in 2-3 batches. The dough will turn into a complete mess again because of the butter, but don’t worry, it will get absorbed by the dough as it kneads. Knead at speed 4 for about 10 minutes or until the dough is smooth and elastic. 

5. If you slowly stretch a small amount of dough, it will not break and light can pass through, like a window pane. Proceed to first proofing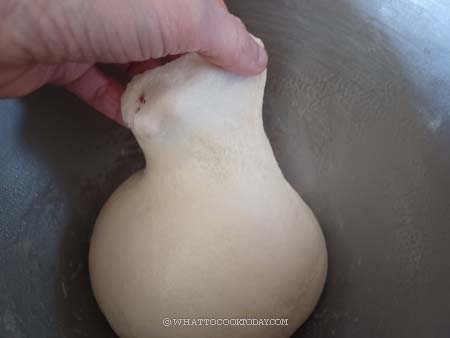
6. Transfer to a lightly oiled bowl, cover, and proof at a warm place for about 1 1/2 – hours max at 78-82 F (26-28 C), the dough will not double in size. It probably rises only about 25%, which is fine. Sourdough starter is different from commercial yeast.
7. Lightly grease your loaf pan on all sides. Punch the dough down and give it a knead for a few times. Divide into 2 or 3 equal weight smaller doughs. Round up each dough to roughly form a ball. Cover and let them rest for 10 minutes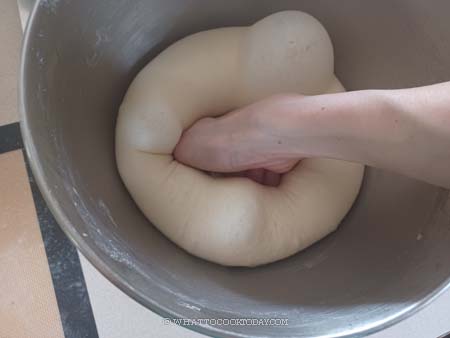
8. Then work with one dough at a time and keep the rest covered. Flatten the dough with your palm and roll it into a rectangle shape, the width should be about twice the width of the loaf pan and about the same length as the loaf pan. Fold the two sides over to meet in the middle and then roll the dough up, not too tight, not too loose, like a Swiss roll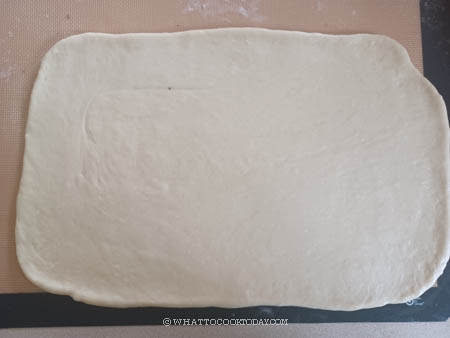


9. Place the shaped dough into the pan. Repeat with the other dough. Place all the shaped dough side by side inside the loaf pan. Slightly flatten the three doughs with your palm so they are about the same height
10. Cover and let the dough proof again at a warm place until it fills up about 80-90% of the pan. This may take about 3-4 hours or longer at 82 F (28 C). If you want to bake with the lid, slide the lid now before the dough rises too high and you won’t be able to use the lid anymore
11. 10 minutes before the end of proofing, if you bake without the lid, preheat your oven to 375 F (190 C) for conventional oven and lower temperature by 20 F or 15 C for convection oven
12. If you bake without the lid, brush some egg wash on the surface of the dough. Place the loaf pan on the middle rack and bake for 30 minutes or until the top is golden brown if you bake without the lid. UPDATED: If you bake with the lid, bake for 30 minutes and then lower the temperature to 350 F (180 C) for conventional oven and bake for another 5 minutes or until internal temperature is 190 F (88 C)
13. Once out of the oven, drop the pan on the counter to release some steam and immediately remove from the pan onto a cooling rack. Optional: If you want a softer shinier crust, you can brush with melted butter immediately while the bread is still warm. Let the bread cools down completely on the rack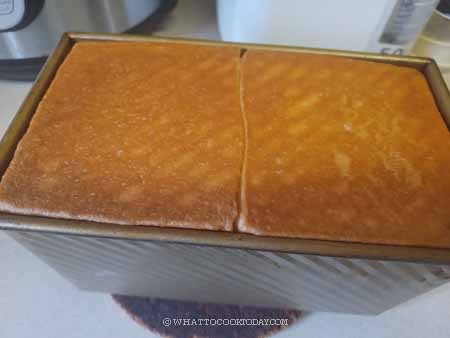
14. Once it has cooled down, you can put in an air-tight container and can be kept at room temperature for 2-3 days. The bread should stay soft for a few days if kept properly at room temperature

Look at the dreamy soft fluffy crumbs

Did you make this sourdough shokupan using sweet stiff starter recipe?
I love it when you guys snap a photo and tag it to show me what you’ve made. Simply tag me @WhatToCookToday #WhatToCookToday on Instagram and I’ll be sure to stop by and take a peek for real!


44 comments
Can I refrigerate the dough in the pans for the last rise?
Hi Brenda, yes, after the first rise, you can deflate and shape and put it inside the pan and cover it tightly to prevent it from drying out in the fridge. It may not rise much in the fridge, if at all. The next day you can get it out from the fridge and let it continue finishing up the final proofing.
I’m still relatively new to this, but this is THE best bread I’ve ever made! However … A correction is needed. Step one says to mix all ingredients together, but based on the next paragraph, I Believe that should be everything except the butter. I would give this 5 stars if that’s corrected, but as it stands it can be confusing for a newbie. Stretch and folds are not mentioned. Are they not needed? (I did them anyway.) Both rises did take about double the time stated, but that’s normal for me and probably due to a difference in ambient temperature. (It’s winter here.) The end result, however, was absolutely amazing. It was not sour, it wasn’t too sweet, it was super-soft, and it had a crumb and crust that is just perfect for a sandwich. And best of all, it wasn’t difficult! I think this is probably going to end up being my favorite go-to recipe for our daily bread.
Hi Edie, thank you for catching the butter part! I left my brain somewhere when I typed this. Sorry for the confusion. I have amended it accordingly. Stretch and fold is not needed because this bread is kneaded with a machine. You want to knead the dough until it reaches windowpane, which means the gluten has well-developed. I hope that makes sense.
As for proofing time, if your starter is still new, it will take longer and yes, the temperature also affects a lot when it comes to sourdough starter or anything that has to do with yeast. I’m glad the bread still turned out great for you! It is one of our favorite bread too!
Hi Marvellina, Kindly ignore my previous question that I wrote to you just few minutes ago! I just read again of your recipe and realised that you have actually shared your starter recipe for either 4-6hr or 8-10hr schedule. My sincere apology and many thanks for sharing your detailed recipe! Regards, Hun Beng
Hi Hun Beng, not a problem at all! Good luck with the recipe if you have a chance to try it out! Please let me know if I can help to clarify anything!
Hi Marvellina, based on your recipe for the sweet stiff starter, may I know roughly how long it takes for it to reach it’s peak(triple in size as mentioned). I’m from Singapore and room temperature wise is around 27~28C day time. Thanks in advance!
Hi . I tried your sourdough shokupan recipe . It took me many many hours for the Final rise but it never reached the beam of the loaf pan . I am using height 4.5in X length 8 in n width 4.5 in .
Hi Rachel, what was your proofing temperature and how long was the final rise? and how did the bake turn out ? Sometimes it may not reach the rim of the loaf pan, but you will still get that oven spring during baking.
Thanks so much for clarifying! At this point, I’m not sure I can use your recipe anymore, though. Not sure I can keep up with demand. We went through the loaf in 3 days! (Usually we never finish it and the bread goes stale.) LOL Just kidding about giving it up, really. It’s too good! I’m just going to have to figure out how to bake twice in a week.
Ha..ha..! My kids usually never care much for bread but they love this bread (especially when I make sandwiches with them). You can always double the recipe and make two loaves 😉 Because sourdough takes more time to proof, might as well make more than one 🙂 I usually freeze the other loaf, but in your case you probably never need to freeze LOL!