This post may contain affiliate links. Please read our disclosure policy.
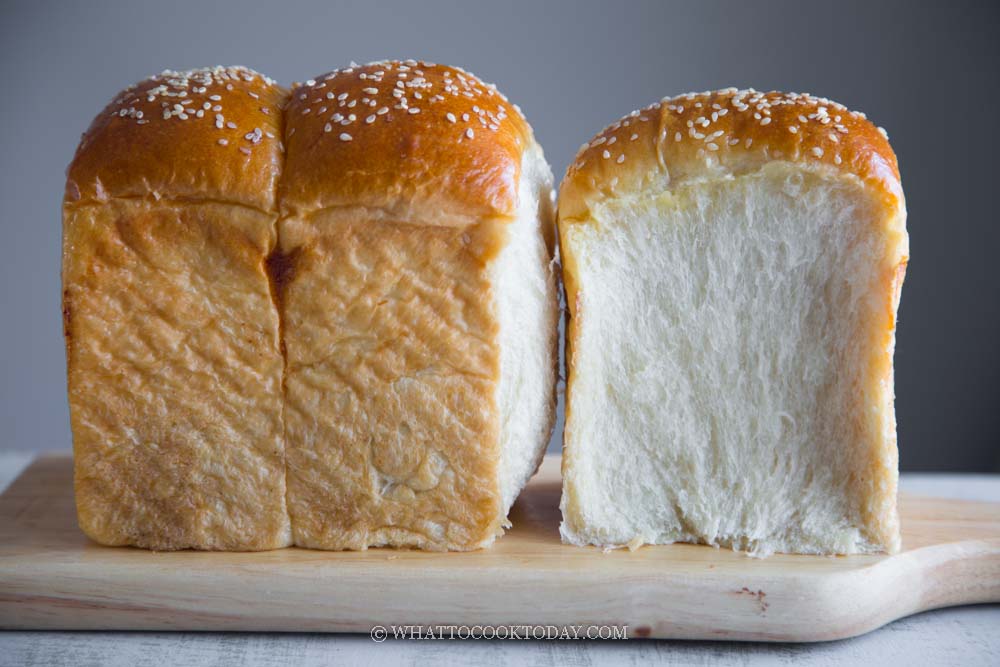
You will be blown away by how incredibly soft and fluffy this milk bread is. The sponge and dough method also contributes to a loaf of bread with a nice complex flavor with a softness that stays for days.
A while ago, I posted a shokupan/Hokkaido milk bread using tangzhong/yudane method, which is highly popular among the readers here and I swear by that recipe too as a base for many of my other bread recipes. This super soft shokupan using a sponge method is another one of my favorites that I have to share! It is seriously soft and incredibly flavorful thanks to the sponge method.
Why I like preferment
I am a huge sourdough fan now lol, when I experiment on a bread recipe, I would say 90% of the time I do a sourdough version and then another version using commercial yeast using a preferment. Using a preferment is the closest one can get to get amazing texture and flavor like those of sourdough bread. Preferment helps to develop texture and flavor for your bread. It’s almost like a sourdough starter, but they are a one-time use and you don’t have any starter to maintain for long term. Preferments I have tried before in the past were biga and poolish. I love the bread made with those two. After reading The Bread Bible by Rose Levy Beranbaum (my idol for bread baking), I have been making lots of bread using a sponge method too.
What is a sponge method?
Sponge method is also sometimes known as sponge and dough method. It is a bread-making technique that involves making a pre-ferment or sponge using a portion of the flour, water, and yeast in the recipe. This pre-ferment is then mixed with the remaining flour, water, yeast, and any other ingredients to make the final dough. The sponge can be fermented for as little as 1 hour or to 24 hours. The longer you let it ferments, the better the texture and flavor of your bread.
Does preferment make bread sour?
Unless it’s a sourdough starter, usually preferments like biga, poolish, and sponge methods don’t make your bread sour. Unless you leave it for a very long period of time, such as beyond 24 hours, then the result might be “tangy” (but in a pleasant way if you ask me). In general though, No, it doesn’t make your bread sour. It does contribute to a more complex flavorful bread and I notice bread stays softer for days!

Ingredients and substitutions
1. Bread flour
I use bread flour with about 12.7% protein content. If you use anything above 12.7% is fine too, but just know that the bread will be chewier. I don’t recommend using all-purpose flour for this recipe.
2. Active dry yeast
You can use active dry yeast or instant yeast. If you use instant yeast, you don’t need to dissolve the yeast first
3. Dry milk powder
Dry milk powder helps to keep the bread softer. So I encourage you to use it instead of replacing it with liquid cow’s milk. It is widely available in major grocery stores. If you must substitute, replace all the water in the sponge with milk, BUT, bring the milk to a boil (scalding the milk) and then turn off the heat and let it cool down completely before you make the sponge or it will kill the yeast. Scalding dairy milk will destroy the protease enzyme. The protease enzyme can break down the gluten proteins in the flour, which can result in a weaker dough structure and less rise in the bread. The protease enzyme in dry milk has been denatured during the drying process
4. Honey
The honey is used to help with fermentation in the sponge and also to add a subtle sweetness to the dough. You can replace it with agave nectar if you prefer
5. Salt
I use fine sea salt. The salt brings out the overall flavor of the bread. A little sure goes a long way
6. Unsalted butter
The butter used in this recipe (together with the water) contributes to the softness and fluffiness. I do not recommend cutting down on this. However, you can substitute with soft coconut oil. I have made this shokupan several times with coconut oil instead of butter with great success too
How to make super soft shokupan with sponge method
1. Combine all the ingredients for the sponge in a mixing bowl of a standmixer (if you don’t plan to use it for other things). Use a whisk to whisk for about 2 minutes. The consistency is like a thick batter. Cover tightly and let it ferment until doubles in volume at a warm place for at least 1 hour or up to 4 hours if you plan to bake on the same day. If you want an even greater flavor, once the sponge has doubled, cover it tightly and put it in the fridge for 24 hours (no longer than that)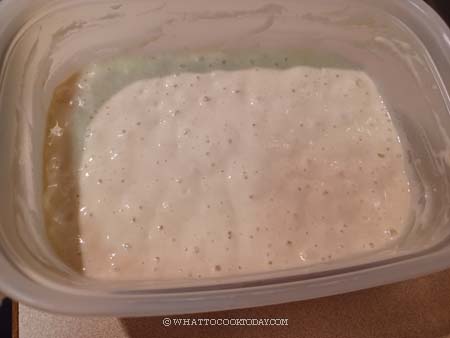
2. Combine all the ingredients for the dough, except for the butter. Add this to the bowl where you have your sponge. Stir the mixture with the dough hook to combine roughly so the dry ingredients won’t start flying when you turn on the machine. Start mixing at speed 2 for about 1 minute and then increase to speed 4 and continue to knead for 5 minutes to get a soft dough that won’t entirely clear the sides of the bowl yet and still stick to the bottom of the bowl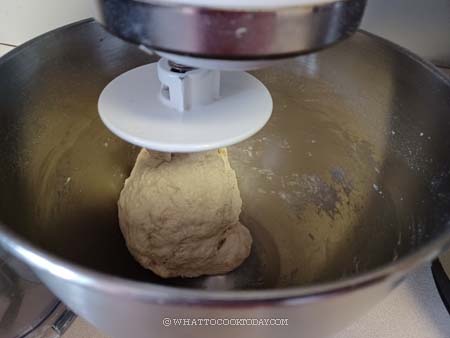
3. Add the softened butter in 3-4 additions, pat by pat. Add butter only after the dough has roughly absorbed the butter, in about 2-3 minute intervals. Let it continue to knead until the dough is smooth, shiny, and elastic, still slightly sticky. You may have a bit of dough still sticking to the side of the bowl, that’s ok. This may take an additional 7-10 minutes (or longer) of kneading. 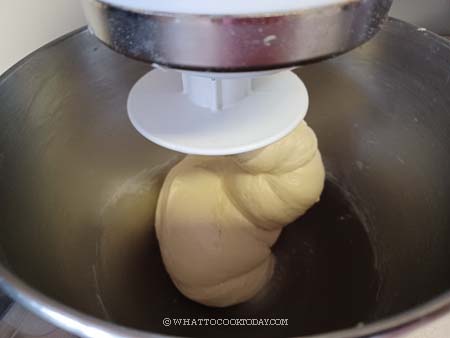
4. It should reach a windowpane stage. When you gently stretch the dough thinly, it shouldn’t tear easily. If it does, knead a bit longer.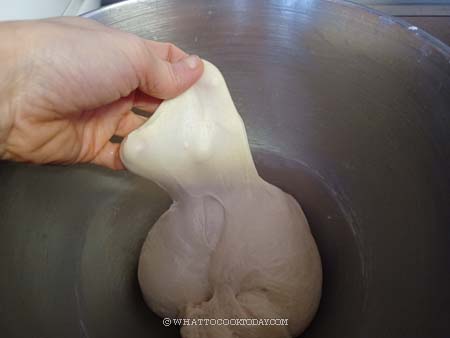
5. Lightly oil your hands and pick up the dough and round it up into a smooth ball. It’s a very soft dough and you know this bread is going to be ultra soft and fluffy. Place the dough in a lightly oiled bowl. This is optional but I like to put it in a round container, about 1 quart-size so I can monitor when it doubles in volume. Gently press the dough down so it’s flat and fill up the container. I will mark the side of the container with masking tape where the dough would double in volume. This may take about 45 minutes to 1 hour at a warm place. It may take longer if your room temperature is cooler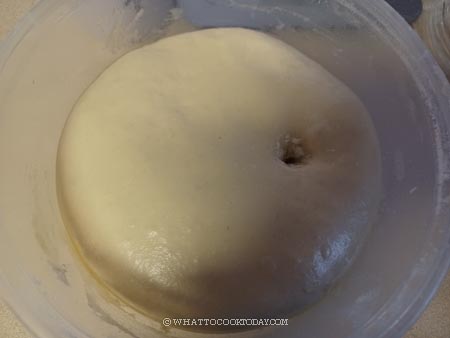
6. Once the dough has doubled, transfer it to a work surface. Deflate the air by pressing and folding the dough a few times. Divide into 3 equal portions. Dividing the dough into 3 helps the dough to rise taller and more stable since this is a very soft and delicate dough. I encourage you to weigh the dough so they will be the same size. Round them up into dough balls, keep them covered and let them rest for 10 minutes to relax the gluten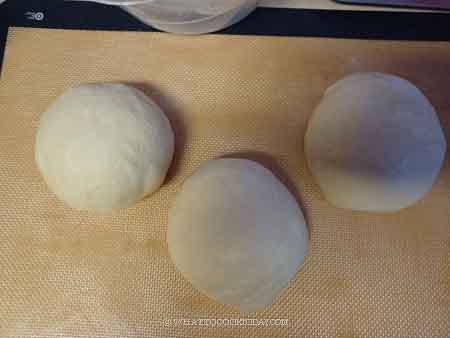
7. Brush your loaf pan with some oil all over. I use a 7 1/2 x 4 1/2 x 4 1/2 tall loaf pan. You can also use 8 1/2 x 4 1/2 loaf pan. Work with one dough at a time. Roll the dough out into a rectangle, about 12 x 8 inches roughly, trying to deflate as much air bubbles as possible at the same time so there won’t be holes inside your bread later. 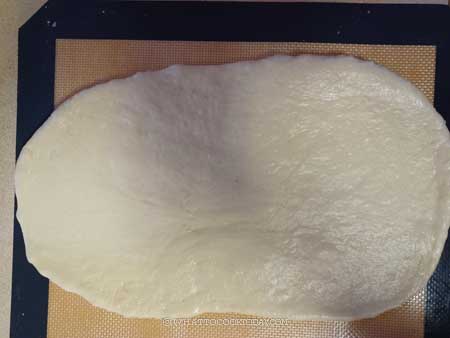
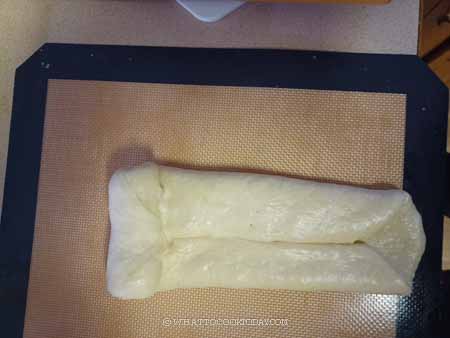
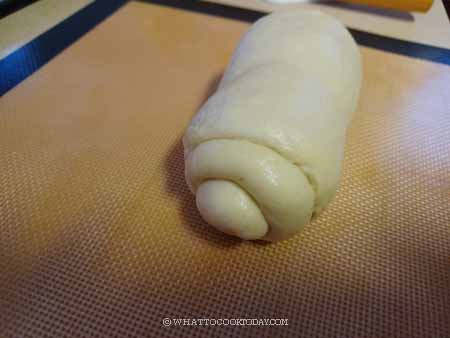
8. Fold both sides to the center. Roll it up tightly from the short side and pinch the seam to seal. Place this inside the loaf pan. Repeat with another two doughs. 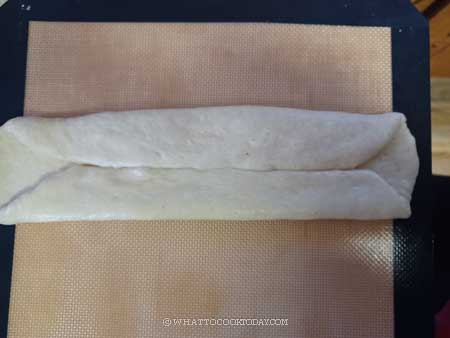
9. Place all the shaped dough side by side. Gently press them down to fit the pan and so that they are the same height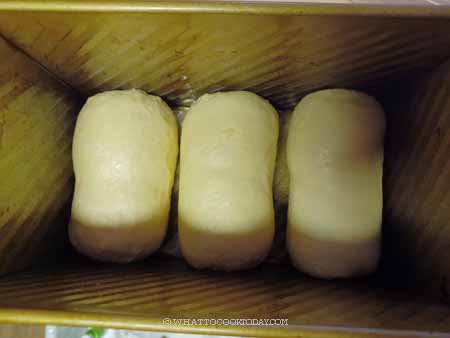
10. Cover the loaf pan with a plastic wrap and let it ferment until they reach the top of the pan, about 1 hour at a warm place. 15 minutes before the end of the proofing, preheat oven to 350 F (180 C) for convection oven, 330 F (165 C) for convection oven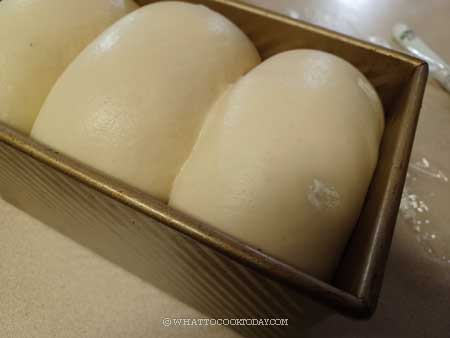
11. Combine the egg with water using a whisk. Strain them if necessary so the white won’t be in one blob. Brush this thinly on top of the dough. Sprinkle with some white sesame seeds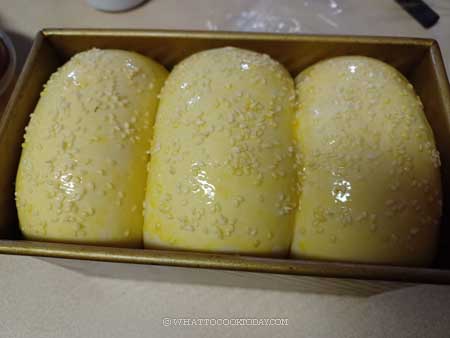
12. Place the loaf pan in the middle of the oven and bake for 40 minutes. The time is just for reference. You may need to tent loosely with aluminum foil halfway through baking if the top gets browned too quickly.
13. Due to the softness and airiness of the dough, we have to ensure the bread is fully baked so that the crust can support the height or it can collapse if it’s underbaked. I always check the internal temperature by poking a digital thermometer at 35-40 minute-mark, right into the center of the loaf, usually it has reached 190 F (88 C). If it hasn’t, bake 3-5 minutes longer and check again until it reaches that internal temperature.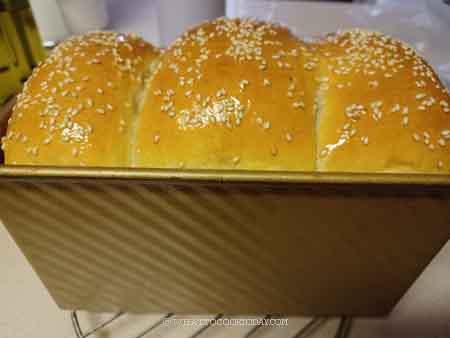
14. Remove from the oven and drop the pan on the counter once or twice. Brush with some melted butter on top if you like. Let it sit in the pan for 5 minutes and then gently unmould the bread and let it cool down on its side first for about 15 minutes and then let the bread stand on its upright position and cool completely on a cooling rack. Do not cut into freshly baked bread for at least 2 hours. The bread may collapse and worse, turns gummy
How to store
1. Let the bread cool down completely
2. I like to separate into three loaves, wrap each loaf (sliced or not sliced) in a cling wrap and then put in air-tight container or a zipper bag, push all the air out and seal. They can be kept at room temperature for 3 days and they stay soft for at least 3 days
3. For longer storage, keep them wrapped and put in freezer bag, push all the air out and seal the bag. Keep them frozen for one month. I don’t like to keep longer than that. Simply thaw at room temperature and they are as good as new and still soft in texture. This bread is amazing!
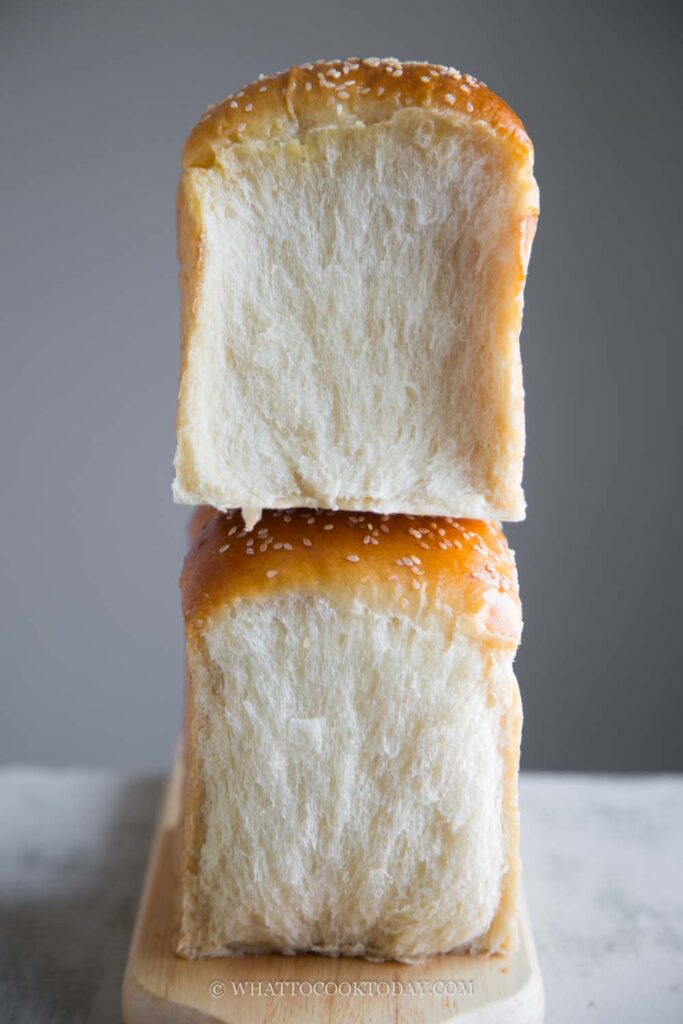
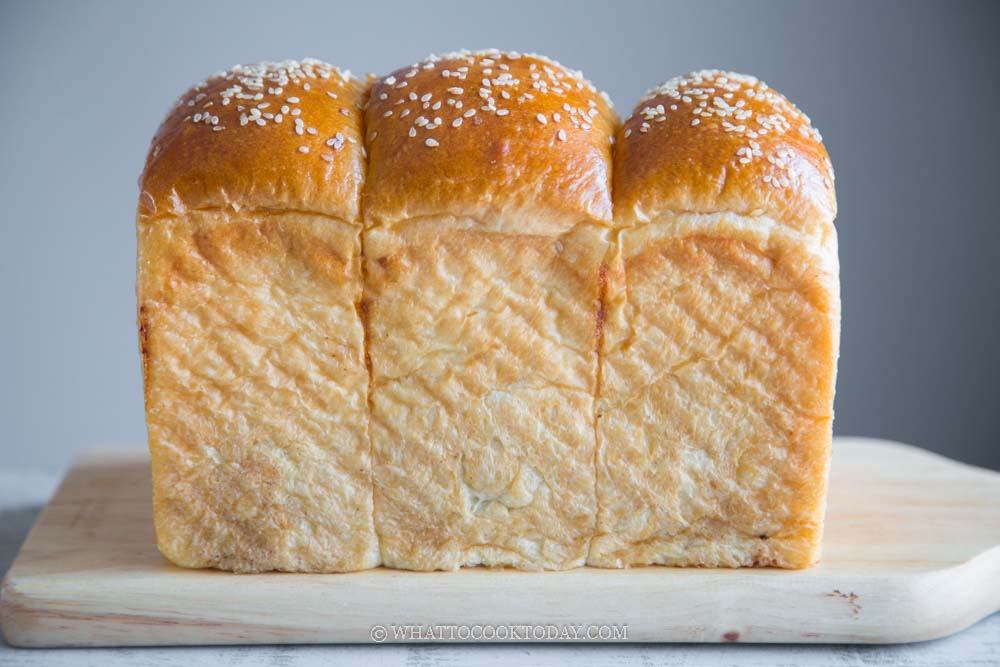
Look at those soft and feathery crumbs!!!! so dreamy and fluffy!!!

Did you make this super soft shokupan using sponge method recipe?
I love it when you guys snap a photo and tag it to show me what you’ve made. Simply tag me @WhatToCookToday #WhatToCookToday on Instagram and I’ll be sure to stop by and take a peek for real!
You may also like these
Super Soft Shokupan/ Japanese Milk Bread (Sponge Method)
Ingredients
For the sponge:
- 170 gr bread flour (12.7% protein content) do not use all-purpose flour
- 200 g water see notes 1
- 23 gr honey
- ¼ tsp active dry yeast or instant yeast
For the dough:
- 160 g bread flour (12.7% protein content) do not use all-purpose flour
- ½ tsp active dry yeast or instant yeast
- 28 g dry milk powder see notes 2
- 5 g salt
- 25 gr honey
- 50 g unsalted butter softened
Egg wash:
- 1 large egg
- 1 tsp water
Topping: (optional)
- 1 tsp white sesame seeds
Instructions
Prepare the sponge: (at least 1 hour or up to 24 hours before)
- Combine all the ingredients for the sponge in a mixing bowl of a standmixer (if you don't plan to use it for other things). Use a whisk to whisk for about 2 minutes. The consistency is like a thick batter. Cover tightly and let it ferment until doubles in volume at a warm place for at least 1 hour or up to 4 hours if you plan to bake on the same day
- If you want an even greater flavor, once the sponge has doubled, cover it tightly and put it in the fridge for 24 hours (no longer than that)
Prepare the dough:
- Combine all the ingredients for the dough, except for the butter. Add this to the bowl where you have your sponge. Stir the mixture with the dough hook to combine roughly so the dry ingredients won't start flying when you turn on the machine. Start mixing at speed 2 for about 1 minute and then increase to speed 4 and continue to knead for 5 minutes to get a soft dough that won't entirely clear the sides of the bowl yet and still stick to the bottom of the bowl
- Add the softened butter in 3-4 additions, pat by pat. Add butter only after the dough has roughly absorbed the butter, in about 2-3 minute intervals. Let it continue to knead until the dough is smooth, shiny, and elastic, still slightly sticky. You may have a bit of dough still sticking to the side of the bowl, that's ok. This may take an additional 7-10 minutes (or longer) of kneading. It should reach a windowpane stage. When you gently stretch the dough thinly, it shouldn't tear easily. If it does, knead a bit longer.
- Lightly oil your hands and pick up the dough and round it up into a smooth ball. It's a very soft dough and you know this bread is going to be ultra soft and fluffy.
First proofing:
- Place the dough in a lightly oiled bowl. This is optional but I like to put it in a round container, about 1 quart-size so I can monitor when it doubles in volume. Gently press the dough down so it's flat and fill up the container. I will mark the side of the container with masking tape where the dough would double in volume. This may take about 45 minutes to 1 hour at a warm place. It may take longer if your room temperature is cooler
Shaping:
- Once the dough has doubled, transfer it to a work surface. Deflate the air by pressing and folding the dough a few times. Divide into 3 equal portions. Dividing the dough into 3 helps the dough to rise taller and more stable since this is a very soft and delicate dough
- I encourage you to weigh the dough so they will be the same size. Round them up into dough balls, keep them covered and let them rest for 10 minutes to relax the gluten
- Brush your loaf pan with some oil all over. I use a 7 1/2 x 4 1/2 x 4 1/2 tall loaf pan. You can also use 8 1/2 x 4 1/2 loaf pan. Work with one dough at a time. Roll the dough out into a rectangle, about 12 x 8 inches roughly, trying to deflate as much air bubbles as possible at the same time so there won’t be holes inside your bread later. Fold both sides to the center. Roll it up tightly from the short side and pinch the seam to seal. Place this inside the loaf pan. Repeat with another two doughs.
- Place all the shaped dough side by side. Gently press them down to fit the pan and so that they are the same height
Final proofing:
- Cover the loaf pan with a plastic wrap. Update: Let it ferment to about 80% of the height of the pan, about 1-inch below the rim of the pan at a warm place. Do a finger poke test: flour your finger lightly and then gently push on the dough. If the indentation stays and the dough slowly sprinsg back, but still leave some indentation, it's done proofing. If it bounces back almost immediately, proof a bit longer
- 15 minutes before the end of the proofing, preheat oven to 350 F (180 C) for convection oven, 330 F (165 C) for convection oven
Baking:
- Combine the egg with water using a whisk. Strain them if necessary so the white won't be in one blob. Brush this thinly on top of the dough. Sprinkle with some white sesame seeds
- Place the loaf pan in the middle of the oven and bake for 45-50 minutes. The time is just for reference. You may need to tent loosely with aluminum foil halfway through baking if the top gets browned too quickly.
- Due to the softness and airiness of the dough, we have to ensure the bread is fully baked so that the crust can support the height or it can collapse if it's underbaked. I always check the internal temperature by poking a digital thermometer at around 45 minute-mark, right into the center of the loaf, usually it has reached 190 F (88 C). If it hasn't, bake 5 minutes longer and check again until it reaches that internal temperature.
Cool down:
- Remove from the oven and drop the pan on the counter once or twice. Brush with some melted butter on top if you like. This is a very soft and delicate bread. Let it sit in the pan for 10 minutes. Then gently loosen the sides with spatula and let it cool down on its side first for about 15 minutes and then let the bread stand in its upright position and cool completely on a cooling rack.
- Do not cut into freshly baked bread for at least 2 hours. The bread may collapse and worse, turns gummy
RECOMMEDED TOOLS


Marv’s Recipe Notes
- Different flour has different absorbency to liquid. You can use 170 grams of water to prepare the sponge if you aren’t sure the flour you use can handle a higher hydration. When you prepare the dough and if it’s too dry, you can always add more to compensate for it
- Dry milk powder helps to keep the bread softer. So I encourage you to use it instead of replacing it with liquid milk. If you must substitute, replace all the water in the sponge with milk, BUT, bring the milk to a boil (scalding the milk) and then turn off the heat and let it cool down completely before you make the sponge or it will kill the yeast. Read my post above for detail on why we want to scald the milk.

22 comments
i want to try this recipe, but when i prepare the sponge the mixture dont seem to be ferment and double at all, any idea what’s wrong, i am using all fresh ingredients
You may want to test your yeast to see if it’s still active. Simply dissolve them in some water and see if they foam up in 10 minutes. If it doesn’t, you will need new batch of yeast.
I tried this recipe 4x and everytime the bread deflated once it comes out of the oven. Have baked it at least 50-60 mins, checked bread temperature but it’s still deflated, sunked in the middle. I followed the recipe and it was all the same until the bread is in the oven, where the bread will rise beautifully. But as soon as it’s out of the oven, not even 5 mins it deflated everytime. So frustrating and discouraging. I had no problem with the other recipe using yudane or tangzhong, so i really don’t know what’s wrong with this one :,(
Hi Natalie, I’m sorry that you are having trouble with this recipe. May I ask if the bread is cooked on the inside ? I’m trying to think of few possibilities what could have gone wrong. This dough is softer than any other shokupan recipes I’ve worked with before because of the amount of moisture and butter used. You can try to cut back down on the liquid and make sure to use strong bread flour. Another thing is during the final proofing, make sure not to overproof the dough. Proof until about 80-90% of the height of your loaf pan. Do the finger poke test to make sure the dough is ready. When you gently poke the dough, it will gradually bounce back and leave slightly indentation on the dough. Oven temperature that is too hot cooks the bread faster on the outside but the inside is still not cooked through, causing the bread to collapse when you pull it out from the oven.
Hi, I am using 8.5 x 4.5 pan. I tried 3 times. The first time, it was very successful. However, for the second and third time, It does not rise when I bake in the oven. I tried using 170 and 180 in microwave convention oven. What could be the reason?
Hi Kahtleen,
It’s kinda hard to pinpoint the problem without knowing the whole process, but most likely it could be that the dough has overproofed the second time around and not much energy left for oven spring during baking.
Hi, can I use milk in the sponge instead of honey?
Hi June, you don’t want to replace the honey with milk. You can use sugar instead of honey. You want to double the amount of sugar because honey is much sweeter than sugar.
Oh I see! Thank you! Can’t wait to try the recipe out 😉
I hope the recipe turns out well for you 🙂
Hi,
Thanks for the recipe! It looks doable. I’m planning to bake this bread but wondering if I should use speed 2 on my Kenwood Premier Chef. May I know which stand mixer you’re using? I’ve been using speed 2 to knead bread dough. Not sure if I should use speed 4 like in your recipe. Thanks!!
Hi Audrey, I use Kitchen Aid. I sometimes use speed 2 too, it just going to take longer when I use speed 2. If speed 2 has been working well for you with your Kenwood Premier Chef, I would go with it. I hope it works out for you 🙂