This post may contain affiliate links. Please read our disclosure policy.
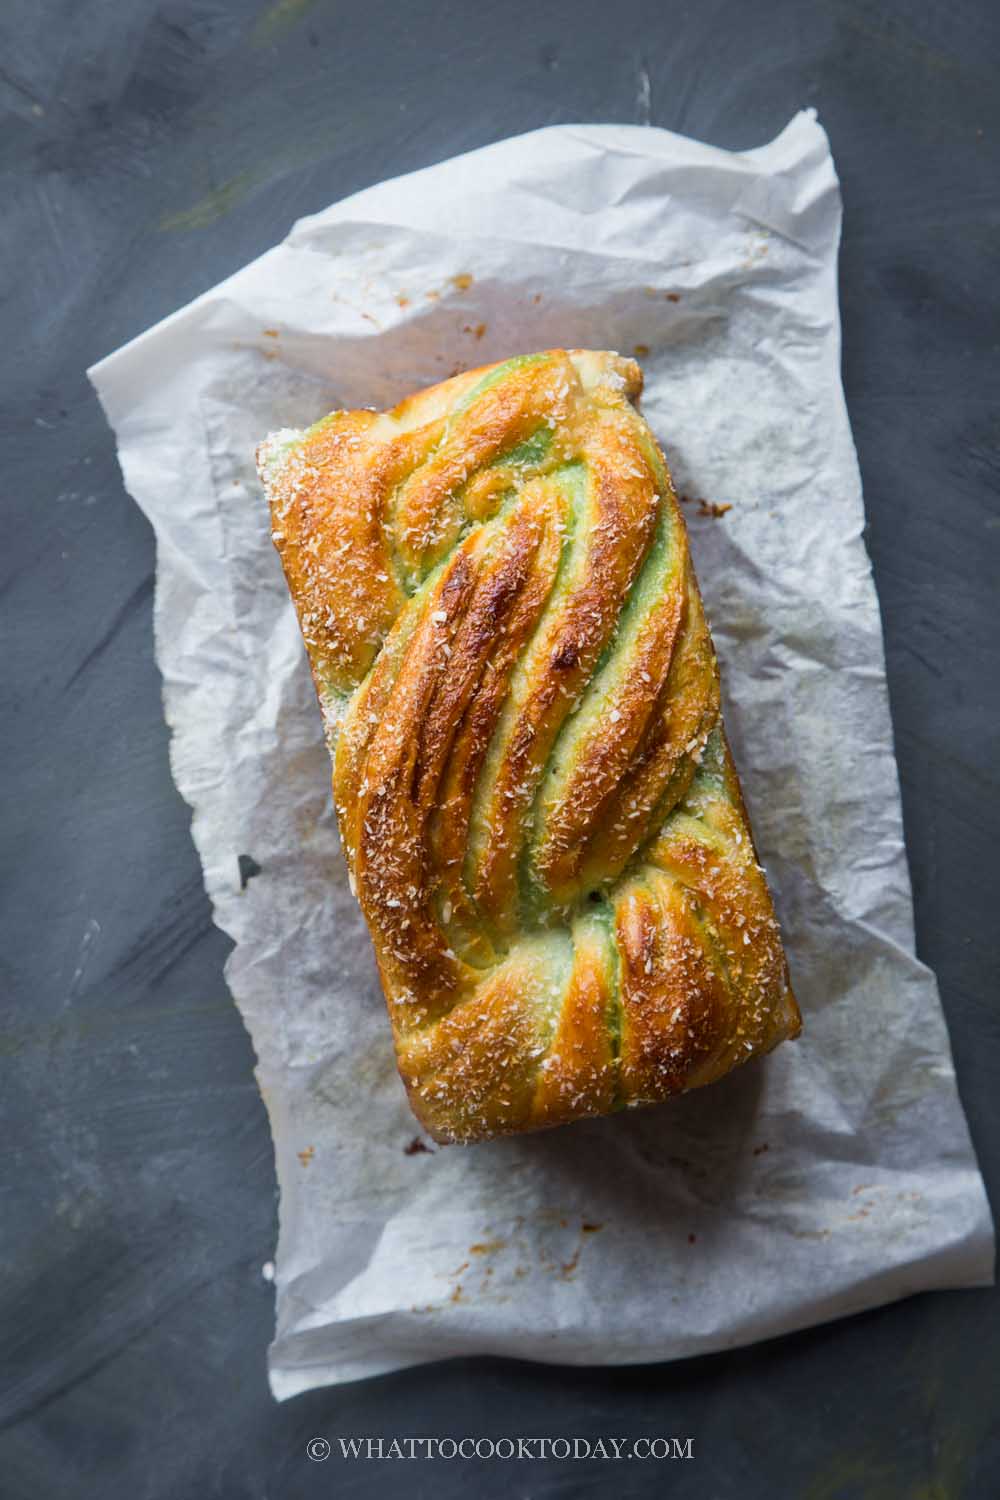
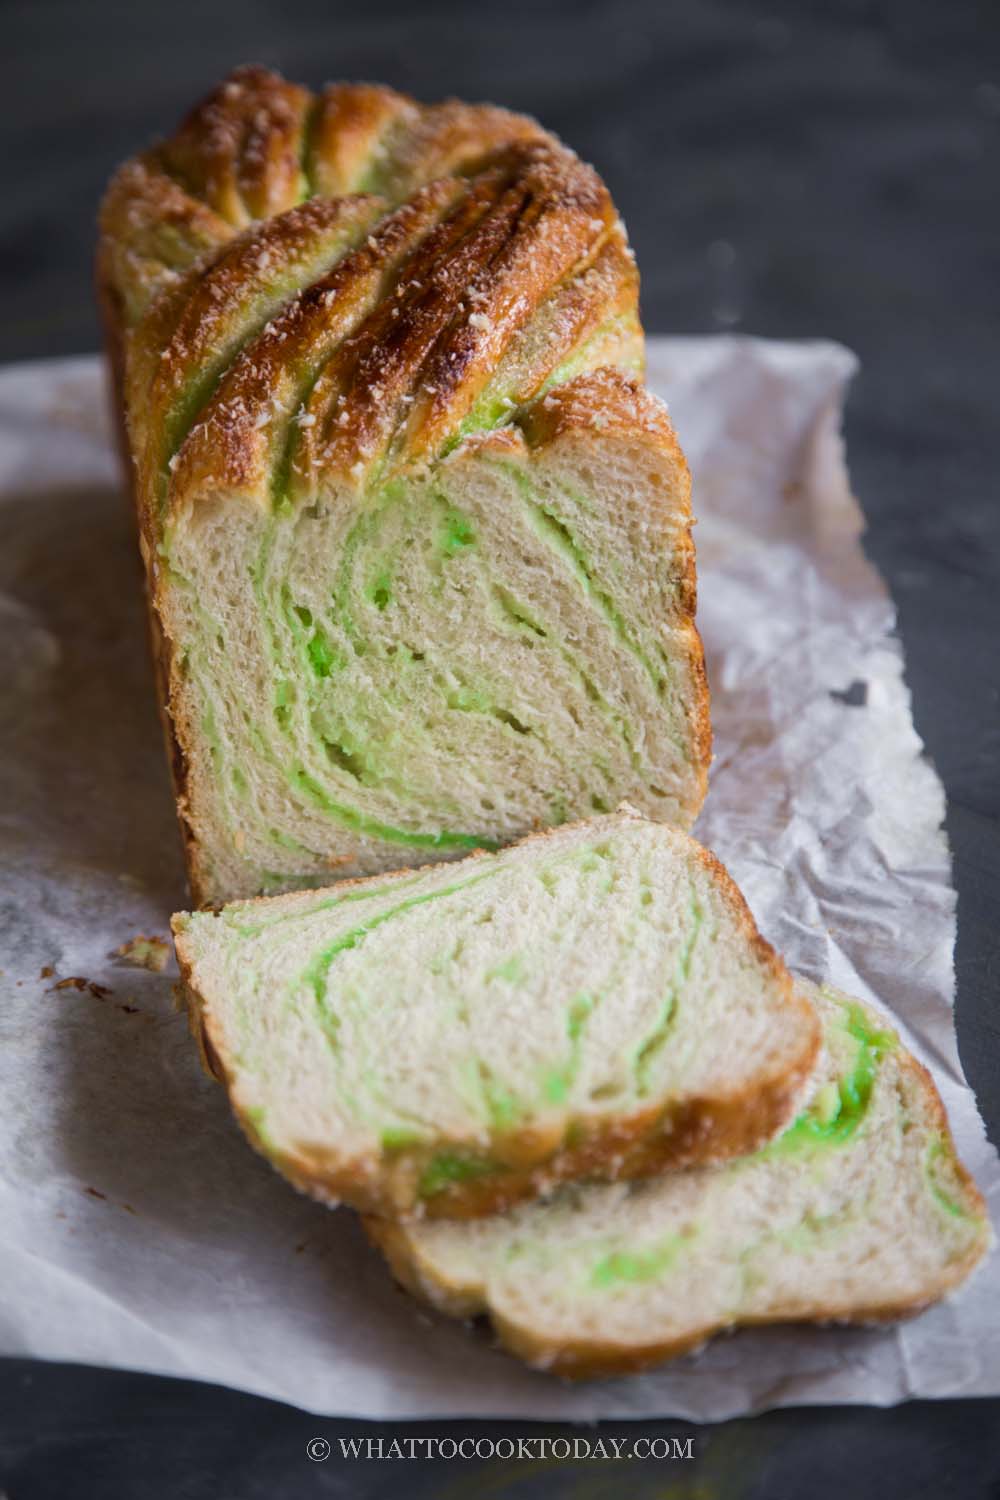
I took the classic braided babka and added the flavor of Southeast Asia, Pandan (screwpine leaves) and desiccated coconut to make this pandan coconut babka using a biga that yields sturdy and really soft loaf. It was a big hit in the house!
What is babka?
Babka sure has gained lots of popularity in the past few years. This Jewish sweet and rich bread (or some said it’s actually a cake) is characterized by its braided look. So, I decided to join the babka cult, but with some Southeast Asian twist and by using biga. I love anything pandan. It’s like vanilla of Southeast Asia if you ask me.
What is biga?
Besides tangzhong, which is one of my favorite methods of baking bread and rolls, I love using biga and poolish too. Biga is an Italian word for “yeasted preferment”. Biga is basically made with flour, water, and commercial yeast. The biga can be loose or more dough consistency, depending on the hydration level. You will see some biga with 100% hydration level, meaning the ratio of flour to water is 1:1. For this recipe, the biga is at 75% hydration level. So the consistency is not as loose compared to 100% level.
Biga is often uses in Italian bread such as ciabatta, but it can also be used in other types of bread, like this one for example. It’s a bit unorthodox to use biga in babka recipe I know, but hey, it works beautifully. Biga helps to extend shelf life of bread, keeping it soft and moist and gives a nice flavor and texture, but not as acidic as a sourdough starter.
Why you’ll like this recipe
1. Soft bread
The biga contributes to the softness of the bread. It takes some passive time to prepare the biga, but it worth of the wait
2. Less butter, sugar, and eggs compared to traditional babka
Traditional babka is almost similar to brioche, rich and buttery. This recipe uses less butter, sugar, and eggs. BUT, that doesn’t mean it tastes less. I can assure you that you will still enjoy the flavor of pandan and coconut, the softness of the loaf with the right amount of sweetness.

How to make pandan coconut babka using biga
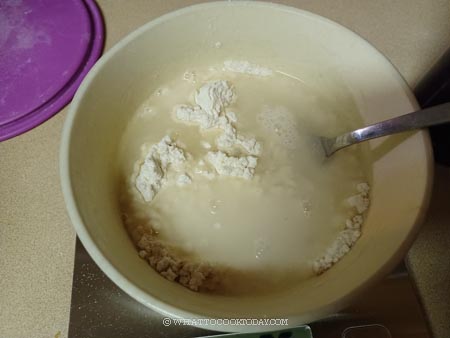
1. Prepare biga: Place all ingredients for starter in a mixing bowl. Stir with a spoon. It may be a bit hard to stir but just do your best to combine it. Cover and put at room temperature and let it ferment for 8-10 hours. It will double or triple in size. The longer it takes to ferment, the better the flavor and that’s why we want it to ferment at room temperature or even do a cold ferment (in the fridge). It can stay in the fridge for about 4-5 days before you use it and can be kept in the freezer for 3 months

2. If your biga is ready before the 8 hours, let’s say in 6 hours, you can use it too and don’t have to wait until 8-10 hours. If you do a cold ferment, take it out from the fridge to let it comes to room temperature while you prepare other things
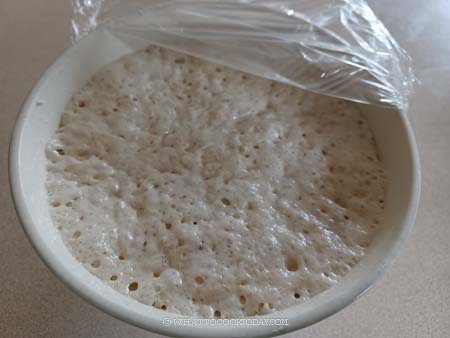
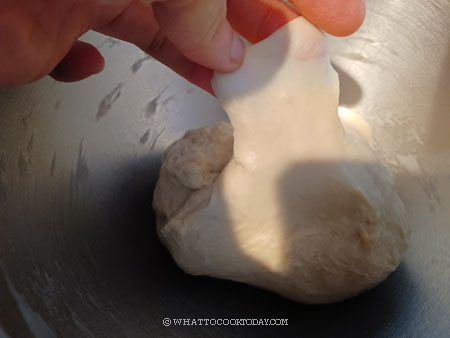
Biga after 8 hours
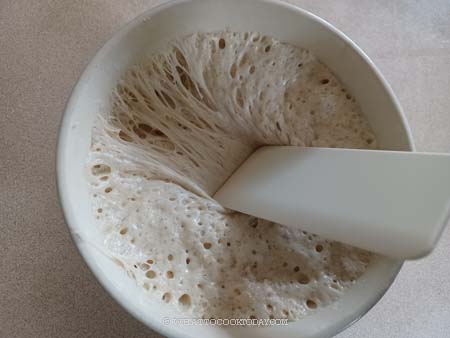
When you pull on the biga you will see all these strands
3. Filling: Whisk the egg white with a fork until bubbly and loosen. Put all ingredients in a saucepan, except for butter. Use a whisk to whisk until combine and no lumps. Put this over low-medium heat and cook until the mixture started to thicken into a thick paste. Add the butter and continue to stir until the mixture is shiny and non-sticky


4. Transfer to a plate and cover with a cling wrap, touching the surface of the paste to prevent skin from forming. Chill in the fridge while you prepare other things

5. Prepare the dough: Put all ingredients, except for butter, in a mixing bowl of a stand mixer fitter with a dough hook attachment. Add the starter
6. Start mixing on low speed (speed 2 on KA) until you get a rough dough

7. Then add the softened butter and continue to knead on speed 2 until the dough is smooth and absorbs all the butter, about 10 minutes of kneading with a stand mixer. The dough should reach a window pane. When you gently stretch a small amount of the dough, light can go through and the dough will not tear when you stretch it thin. You are done kneading if you have reached this stage
8. Cover and let the dough rise at a warm place until it doubles in size. I use my oven “bread proof” function for this. It took about 1 hour

9. Filling and shaping: Take the filling out from the fridge. I put it in between two cling wrap and roll it out into about 7 x 5 inch rectangle and then keep it covered in the fridge while you work on the dough

10. The dough should have doubled in size. Take it out from the oven and punch all the air out. Roll into a round dough ball again wrap and let it chill in the fridge for 15 minutes

11. First fold: Lightly dust your work surface with some flour. Take the dough out and roll it out into 14 x 10 inches rectangle

12. Place the filling in the middle of the rectangle, sprinkle with desiccated coconut

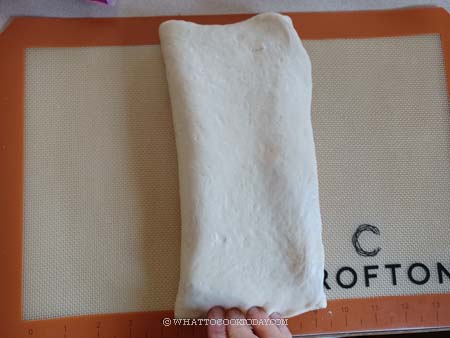
13. Fold the two sides over to cover the filling. Push some air out and pinch the top and bottom sides to seal so the filling won’t ooze out (refer to photos above if needed)

14. Second fold: Turn the dough 90 degrees

15. Then roll it out again into a rectangle, roughly about 14 x 10 inches. If at any point the dough keeps retracting and hard to roll out, cover and rest the dough for 10-15 minutes to relax the gluten so it’s easier to roll it out

16. Fold 1/3 into the middle and do the same with the other 1/3. Turn the dough 90 degrees again. Cover with a cling wrap and let it rest for 10 minutes before rolling it out again


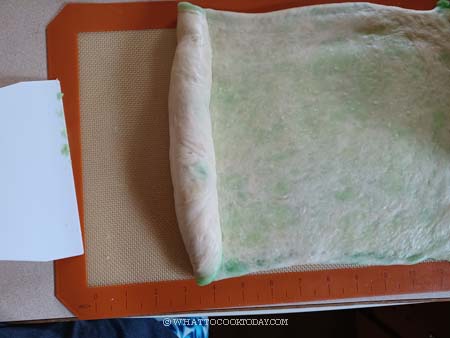
17. Third fold: This time roll the dough again into a rectangle, about 14 x 8 inches, the width should be a little bit over the length of the bread pan you are going to use. The long side (the 14 inches side) should be near you.

18.Roll the dough up like a Swiss roll from the short side. Roll as tight as possible

19. Cover with a plastic wrap and then chilli in the fridge again for another 15 minutes so when you cut the dough and start braiding, the filling won’t be too sticky

20. Braiding: Use a serrated knife to cut the dough in half, revealing the beautiful layers inside. Make sure the cut sides are facing up. Now you have two dough halves side by side


21. Let them touch each other. Place one half over the other to make an X, and then do that two more times, about 3 twists


22. Second proofing: Transfer to loaf pan and cover with plastic wrap and let it proofs

23. The shaped dough will double in size again, about 45 minutes to 1 hour at a warm place. Start preheating the oven at 350 F (180 C) 10-15 minutes before the end of the proofing time. My oven is conventional with bottom heat only. If your oven is convection top and bottom heat, you may need to lower the temperature by 15-20 degrees

24. Brush the remaining egg that you have whisked earlier all over the surface of the loaf

25. Sprinkle with more desiccated coconut

26. Place the pan in the middle rack and bake for 30 minutes and then tent with a foil (shiny side up) and continue baking for another 10-20 minutes, rotating halfway, or until a skewer inserted into the middle of the loaf comes out clean with just few crumbs

27. Remove from the oven and if you want a softer crust, immediately brush with melted butter and honey combination on the surface of the bread loaf, otherwise you can skip this brushing with butter and honey step

28. Remove from the pan immediately to let it cools down on the wire rack completely before slicing

It may seem like a long process, well, making the biga takes some time, but it’s passive time and you can always prepare ahead. There’s that sense of satisfaction when you look at the pandan coconut babka you just baked. It may seem complicated, but it’s not. I know my long step-by-step photos may freak you out, but that’s because I just want to be as clear as I possibly can.
How to store and reheat babka
1. Let babka cools down completely
2. Then wrap in cling wrap or store in air-tight container and they can be kept at room temperature for 2-3 days
3. For longer storage, wrap the loaf or portion out few slices of the bread in cling wrap and then another layer of aluminum foil and I put this in another large zipper freezer bag, push all the air out and seal the bag
4. Simply thaw on the counter for few hours and then remove the plastic wrap and loosely wrap in a foil and reheat at 350 F for 10-15 minutes or until warm again
Did you make this recipe?
I love it when you guys snap a photo and tag to show me what you’ve made 🙂 Simply tag me @WhatToCookToday #WhatToCookToday on Instagram and I’ll be sure to stop by and take a peek for real!

Pandan Coconut Babka / Braided Loaf (Starter Dough Method)
Ingredients
Prepare biga: (8-10 hours in advance or few days before)
- 120 gr bread flour
- 1 Tbsp sugar
- ¼ tsp instant yeast
- 75 gr water
Dough:
- 180 gr bread flour plus more for dusting
- ¼ tsp instant yeast
- 15 gr milk powder
- 70 gr whole milk
- 30 gr sugar
- 40 gr eggs beaten, save the rest for egg wash later
- ¼ tsp kosher salt
- 25 gr butter unsalted, softened
Filling:
- 80 gr Pandan juice
- 15 gr milk powder
- 30 gr egg white about 1 egg white
- 20 gr all-purpose flour
- 60 gr granulated sugar
- ¼ tsp pandan essence
- 10 gr butter unsalted
- Pinch of salt
- 4 Tbsp desiccated coconut or more as needed
To brush:
- 1 Tbsp melted butter
- 1 Tbsp honey
Topping:
- 1 Tbsp desiccated coconut or more as needed
Instructions
Preparing biga:
- Place all ingredients for starter in a mixing bowl. Stir with a spoon. It may be a bit hard to stir but just do your best to combine it. Cover and put at room temperature and let it ferment for 8-10 hours. It will double or triple in size. The longer it takes to ferment, the better the flavor and that's why we want it to ferment at room temperature or even do a cold ferment (in the fridge). It can stay in the fridge for about 4-5 days before you use it and can be kept in the freezer for 3 months
- If your biga is ready before the 8 hours, let's say in 6 hours, you can use it too and don't have to wait until 8-10 hours. If you do a cold ferment, take it out from the fridge to let it comes to room temperature while you prepare other things
Prepare the filling:
- Whisk the egg white with a fork until bubbly and loosen. Put all ingredients in a saucepan, except for butter. Use a whisk to whisk until combine and no lumps. Put this over low-medium heat and cook until the mixture started to thicken into a thick paste. Add the butter and continue to stir until the mixture is shiny and non-sticky
- Transfer to a plate and cover with a cling wrap, touching the surface of the paste to prevent skin from forming. Chill in the fridge while you prepare other things
Preparing the dough:
- Put all ingredients and biga, except for butter, in a mixing bowl of a stand mixer fitter with a dough hook attachment. Start mixing on low speed (speed 2 on KA) until you get a rough dough, knead for about 5-6 minutes. Then add the softened butter and continue to knead on speed 2 until the dough is smooth and absorbs all the butter, about 8-10 minutes of kneading with a stand mixer. The dough should reach a window pane. When you gently stretch a small amount of the dough, light can go through and the dough will not tear. You are done kneading if you have reached this stage
- Cover and let the dough rise at a warm place until it doubles in size. I use my oven "bread proof" function for this. It took about 1 hour
Filling and Shaping :
- Generously butter the 8 1/2 x 4 1/2 inch loaf pan. You can also line the pan with parchment paper
- Take the filling out from the fridge. I put it in between two cling wrap and roll it out into about 7 x 5 inch rectangle and then keep it covered in the fridge while you work on the dough
- The dough should have doubled in size. Take it out from the oven and punch all the air out. Roll into a round dough ball again wrap and let it chill in the fridge for 15 minutes
- First fold: Lightly dust your work surface with some flour. Take the dough out and roll it out into 14 x 10 inches rectangle. Place the filling in the middle of the rectangle, sprinkle with desiccated coconut. Fold the two sides over to cover the filling. Push some air out and pinch the top and bottom sides to seal so the filling won't ooze out (refer to photos above if needed)
- Second fold: Turn the dough 90 degrees and then roll it out again into a rectangle, roughly about 14 x 10 inches. If at any point the dough keeps retracting and hard to roll out, cover and rest the dough for 10-15 minutes to relax the gluten so it's easier to roll it out. Fold 1/3 into the middle and do the same with the other 1/3. Turn the dough 90 degrees again. Cover with a cling wrap and let it rest for 10 minutes before rolling it out again
- Third fold: This time roll the dough again into a rectangle, about 14 x 8 inches, the width should be a little bit over the length of the bread pan you are going to use. The long side (the 14 inches side) should be near you. Roll the dough up like a Swiss roll from the short side. Roll as tight as possible. Cover with a plastic wrap and then chilli in the fridge again for another 15 minutes so when you cut the dough and start braiding, the filling won't be too sticky
- Braiding: Use a serrated knife to cut the dough in half, revealing the beautiful layers inside. Make sure the cut sides are facing up. Now you have two dough halves side by side and let them touch each other. Place one half over the other to make an X, and then do that two more times, about 3 twists
Second proofing:
- Transfer to loaf pan and cover with plastic wrap and let it proof until it doubles in size again, about 45 minutes to 1 hour at a warm place. Start preheating the oven at 350 F (180 C) 10-15 minutes before the end of the proofing time. My oven is conventional with bottom heat only. If your oven is convection top and bottom heat, you may need to lower the temperature by 15-20 degrees
Baking :
- When babka is ready to be bake, Brush the remaining egg that you have whisked earlier all over the surface of the loaf. Sprinkle with more desiccated coconut. Place the pan in the middle rack and bake for 30 minutes and then tent with a foil (shiny side up) and continue baking for another 10-20 minutes or until a skewer inserted into the middle of the loaf comes out clean with just few crumbs
- Tips: If you use a darker color pan , it absorbs heat and your bread will cook faster. So you may want to start checking for doneness 10 minutes earlier. Unless you pan is really like black in color or very close to black, you may even need to lower the oven temperature by about 20 degrees, otherwise, keep the same temperature and just check a bit earlier for doneness
Cooling down:
- Remove from the oven . Optional: If you want a softer crust, brush with melted butter and honey combination on the surface of the bread loaf
- Remove the bread loaf from the pan immediately so the bottom of the bread won't be soggy and wet. Let it cool down completely on a wire rack before slicing


3 comments
Marv,
This looks amazing. I would like to try this. can you please upload video. it’s clearer watching the video for the exact steps on how to make this bread. thanks
Hi Cindy, I will make this again soon and let you know when I have the video ready 🙂
Hi Cindy, I have uploaded the video for this in case you haven’t notice.