This post may contain affiliate links. Please read our disclosure policy.
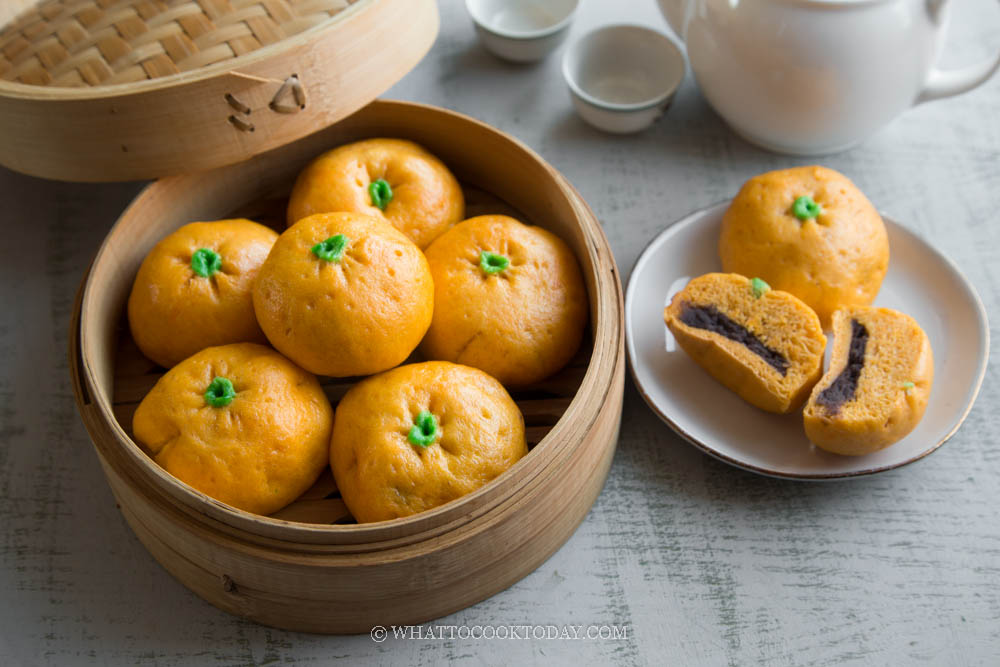
Learn how to easily make these soft fluffy Mandarin orange-shaped mantou/bao. They are fun to make and can be made plain to serve with other condiments or filled with sweet or savory fillings of your choice. I filled the buns with dou sha (sweet red bean paste). It is perfect to usher in the Chinese New Year. They are made with natural colors.

Why Mandarin orange is popular for Chinese New Year?
Mandarin orange is known as 桔子 (Júzi). The word 桔 has the same pronunciation as 吉 (ji), which means lucky. The Chinese have several auspicious saying and one of them is this 大吉大利 (Dàjí dàlì), which means lucky and may everything is favorable your way. So, it’s mainly because of the pronunciation. It’s bright orange color is also similar to gold. My parents like to put some Mandarin oranges on the tables in different rooms in the house during Chinese New Year. Mom also uses Mandarin oranges as offerings.
Why you’ll love this Mandarin orange shaped mantou
1. They are easy and fun to make and you don’t need any special tool
2. Natural coloring from oranges, carrots, and natural food dyes are used
3. The mantou is soft and fluffy with some chewiness and a hint of oranges
What you will need to shape mantou like Mandarin orange
1. Clean towel
2. Toothpicks/chopsticks
3. Natural green food coloring

How to make Mandarin orange-shaped mantou/bao
1. Puree one Mandarin orange and one small carrot (about 50 grams) in a blender. You shouldn’t need to add any water. Measure out and measure out about 125 grams to use in the recipe. It’s hard to puree a small amount of fruit so you will have leftovers and you can drink the rest 🙂 I added carrot because with just the orange, the color is not as orange, it’s more yellowish. Zest the skin of two oranges. This is optional. I added it because I like a hint of orange in the mantou. Set aside

2. Place the flour/starch combination, instant yeast, sugar, salt, oil, orange-carrot puree, zest of orange in a mixing bowl. If you are using a stand mixer, use a dough hook attachment. Knead the dough at low speed (speed 2) until dough can come together into a rough dough. If it’s too dry, add water a teaspoon by teaspoon until you can get a rough dough. You won’t need much extra liquid (at least I didn’t)

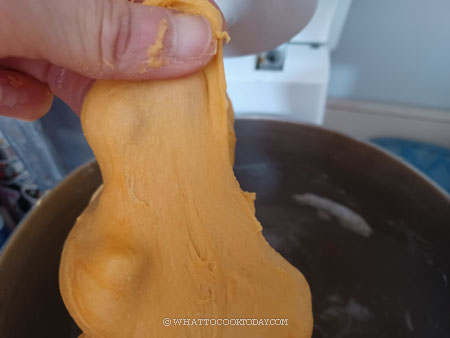
3. Continue to knead at low speed (speed 2 on KA) for 12-15 minutes or until the dough is smooth, silky and elastic. When you stretch a small amount of the dough thinly, it won’t break (windowpane stage). Cover and rest the dough for 15 minutes. This is not to proof the dough. It shouldn’t double in size. This is to relax the gluten for easier shaping and rolling the dough, then proceed to next step


4. While waiting, if you choose to use a dou sha filling, portion them out into about 20 gram. Oil your palm and roll it into a ball and keep them chilled in the fridge

5. Prepare a tiny amount of dough for the short stem. Mix the flour with natural green food coloring or pandan essence, mix with a spoon or use your fingers to combine into a dough. Add a few drops of water as needed to be able to form a dough. Divide into 8 equal pieces. Keep them covered

6. Divide the dough into 8 equal portions

7. Lightly dust the work surface with some flour. Work with one dough at a time. Knead the dough a few times to push out any air bubbles (if any). Flatten the dough with your palm and then use a rolling pin to roll it out to form a circle about 4-5 inches, with a slightly thicker middle part. This is to support the weight of the filling. Don’t roll the dough too thin. Place the filling at the center and then gather the sides to enclose the bun and pinch to seal


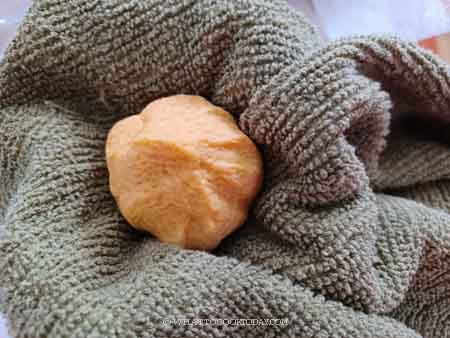
8. Place the towel on your palm and place the shaped bun on top and gather the towel around it to wrap it up. Gently squeeze the towel to “imprint” the towelling on the dough. This will give you that orange skin look. The buns don’t have to be perfectly round so it looks more natural just like the real Mandarin orange

9. Use a toothpick or chopstick to make an indentation on top

10. Then place the green round ball on top and push it into the dough (they will puff up later when you proof the dough, so make sure you push it in)


11. I use a toothpick to make a few lines indentation near the stem to make it looks more like orange

12. Let the dough rise at room temperature or at a warm place. If it’s winter where you are, you can use your oven “bread proof” function to let them proof in there, or simply turn on your oven to the lowest temperature and then turn off and after 15 minutes, place the shaped buns in there to let them proof. They won’t necessarily double in size, but at least puff up to about 50% of the original size. This may take about 1 hour or longer at a warm temperature. Don’t go by the time however

13. Fill your steamer with room-temperature water. Depending on the size of your steamer, put the proofed dough in the steamer, about 1 inch apart as they expand in size during steaming. I can put about 4 buns at a time. Wrap the lid with a cloth to prevent condensation from dripping onto the surface of the buns

14. Cover with a lid and turn on the stove to medium heat. Please note that I use the largest burner on my stove. Bring the water to a boil and then open the lid to leave about 1/4 to 1/2 inch gap for some steam to escape. Steam on this level of medium heat for 8 minutes. As long as you steam them like this, the buns will not wrinkle or collapse

15. After steaming, turn off the heat. DO NOT OPEN THE LID of the steamer. Let the buns sit there for 1 minute. The buns will not sink or wrinkle due to the sudden change in temperature. Immediately remove the buns to wire rack to let them cool down. This is to ensure the bottom of the steamed buns will not be wet and soggy


Ideas for filling the steamed buns
1. Sweet filling: red bean paste (dou sha), custard (nai wong)
2. Savory filling: veggies, pork filling, char siu
Did you make this recipe?
I love it when you guys snap a photo and tag to show me what you’ve made 🙂 Simply tag me @WhatToCookToday #WhatToCookToday on Instagram and I’ll be sure to stop by and take a peek for real!

Mandarin Orange Shaped Mantou/Bao (Steamed Buns)
Ingredients
For the main dough:
- 160 gr all-purpose flour plus more for dusting
- 20 gr cornstarch
- 2 gr instant yeast
- 15 gr sugar
- ¼ tsp salt
- 1 tsp oil
- 125 gr Orange-carrot puree
- water (room temperature, not warm) as needed
- Zest of 2 Mandarin oranges optional
For the short green stems (you will have leftover):
- 8 gr all-purpose flour
- Natural green food color or you can also use pandan essence
- 1 tsp water to start with or as needed
Filling: (you can use any sweet or savory filling of your choice)
- 160 gr Dou sha
Instructions
- If you choose to use the filling, use a store-bought dou sha or prepare the day before if you want to use homemade dou sha
Prepare the dough:
- Puree one Mandarin orange and one small carrot (about 50 grams) in a blender. You shouldn't need to add any water. Measure out and measure out about 125 grams to use in the recipe. It's hard to puree a small amount of fruit so you will have leftover and you can drink the rest 🙂 I added carrot because with just the orange, the color is not as orange, it's more yellowish. Zest the skin of two oranges. This is optional. I added it because I like a hint of orange in the mantou. Set aside
- Place the flour/starch combination, instant yeast, sugar, salt, oil, orange-carrot puree, zest of orange in a mixing bowl. If you are using a stand mixer, use a dough hook attachment. Knead the dough on low speed (speed 2) until a dough can come together into a rough dough. If it's too dry, add water a teaspoon by teaspoon until you can get a rough dough. You won't need much extra liquid (at least I didn't)
- Continue to knead at low speed (speed 2 on KA) for 12-15 minutes or until the dough is smooth, silky and elastic. When you stretch a small amount of the dough thinly, it won't break (windowpane stage)
- If you knead by hands, knead until you get a rough dough and then cover and rest for 20 minutes and then go back and knead again for another 15-20 minutes or until the dough is no longer sticky and elastic
Rest the dough: (to relax the gluten)
- Cover and rest the dough for 15 minutes. This is not to proof the dough. It shouldn't double in size. This is to relax the gluten for easier shaping and rolling the dough, then proceed to next step
- While waiting, if you choose to use a dou sha filling, portion them out into about 20 gram. Oil your palm and roll it into a ball and keep them chilled in the fridge
Prepare a tiny amount of dough for the short stem:
- Mix the flour with natural green food coloring or pandan essence, mix with a spoon or use your fingers to combine into a dough. Add few drops of water as needed to be able to form a dough. Divide into 8 equal pieces. Keep them covered
Shape the dough:
- You will need a clean towel, a toothpick or chopstick will do to
- Divide the dough into 8 equal portions. Lightly dust the work surface with some flour. Work with one dough at a time. Knead the dough a few times to push out any air bubbles (if any). Flatten the dough with your palm and then use a rolling pin to roll it out to form a circle about 4-5 inches, with a slightly thicker middle part. This is to support the weight of the filling. Don't roll the dough too thin. Place the filling at the center and then gather the sides to enclose the bun and pinch to seal
- Place the towel on your palm and place the shaped bun on top and gather the towel around it to wrap it up. Gently squeeze the towel to "imprint" the towelling on the dough. This will give you that orange skin look. The buns don't have to be perfectly round so it looks more natural just like the real Mandarin orange
- Place this on a piece of parchment paper. Use a toothpick or chopstick to make an indentation on top and then place the green round ball on top and push it into the dough (they will puff up later when you proof the dough, so make sure you push it in). I use a toothpick to make a few lines indentation near the stem to make it looks more like orange
- My kids said that some oranges have large "pores", so I use the blunt side of the toothpick to make a few small indentations to mimic the pores. Be careful not to poke holes. Repeat with the rest of the dough, filling, and shaping. Keep them covered with a towel while you are working on the rest
Proof the dough:
- Let the dough rise at room temperature or at a warm place. If it's winter where you are, you can use your oven "bread proof" function to let them proof in there, or simply turn on your oven to the lowest temperature and then turn off and after 15 minutes, place the shaped buns in there to let them proof. They won't necessarily double in size, but at least puff up to about 50% of the original size. This may take about 1 hour or longer at a warm temperature. Don't go by the time however
- When you lift them up, they should feel lighter. If not, let them proof a bit longer. They may not visually look bigger. Use a finger test too. When you gently push on the dough, it will leave an indentation but it will spring back slowly. This dough is perfectly proofed
Steaming:
- Fill your steamer with room-temperature water. Depending on the size of your steamer, put the proofed dough in the steamer, about 1 inch apart as they expand in size during steaming. I can put about 4 buns at a time. Wrap the lid with a cloth to prevent condensation from dripping onto the surface of the buns
- Cover with a lid and turn on the stove to medium heat. Please note that I use the largest burner on my stove. Bring the water to a boil and then open the lid to leave about 1/4 to 1/2 inch gap for some steam to escape. Steam on this level of medium heat for 8 minutes. As long as you steam them like this, the buns will not wrinkle or collapse
- After steaming, turn off the heat. DO NOT OPEN THE LID of the steamer. Let the buns sit there for 1 minute. The buns will not sink or wrinkle due to the sudden change in temperature
Cooling:
- Immediately remove the buns to wire rack to let them cool down. This is to ensure the bottom of the steamed buns will not be wet and soggy
Storing:
- Once they have cooled down completely, transfer to an air-tight container and they can be kept at room temperature for 2-3 days. If you use savory meat filling, then you want to wrap each bun with cling wrap and store them in the fridge for up to a week. For longer storage, put them in freezer bag, push all the air out and seal the bag and keep in the freezer for about one month
- They can go straight from freezer to steamer when you are ready to eat them. Steam on high heat for 5 minutes and they are as good as new


